Deploy TeachCopilot
TeachCopilot ships as a standard Docker image (ghcr.io/greateyin/single-class), so it runs on any container host: a VPS with docker compose, Render, Railway, Google Cloud Run, or Fly.io. This walkthrough uses Fly.io, tested end-to-end from a brand-new account to a running app.
Before you start: Fly.io requires a payment method on file even to use its free usage allowance — it's an anti-abuse check, not an upfront charge. You will not be billed unless you exceed the free tier.
1. Create a Fly.io account
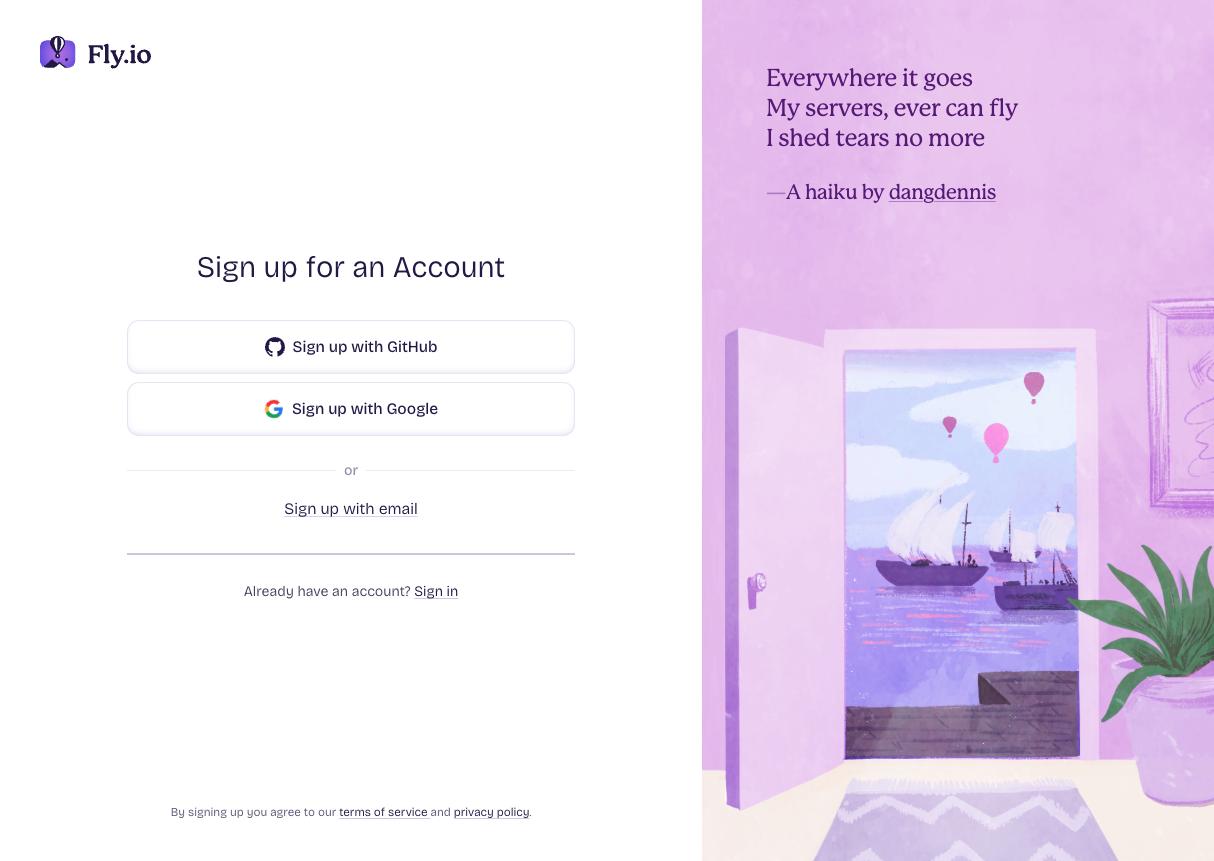
Go to fly.io/app/sign-up and sign up (GitHub OAuth is fastest if you already have a GitHub account).
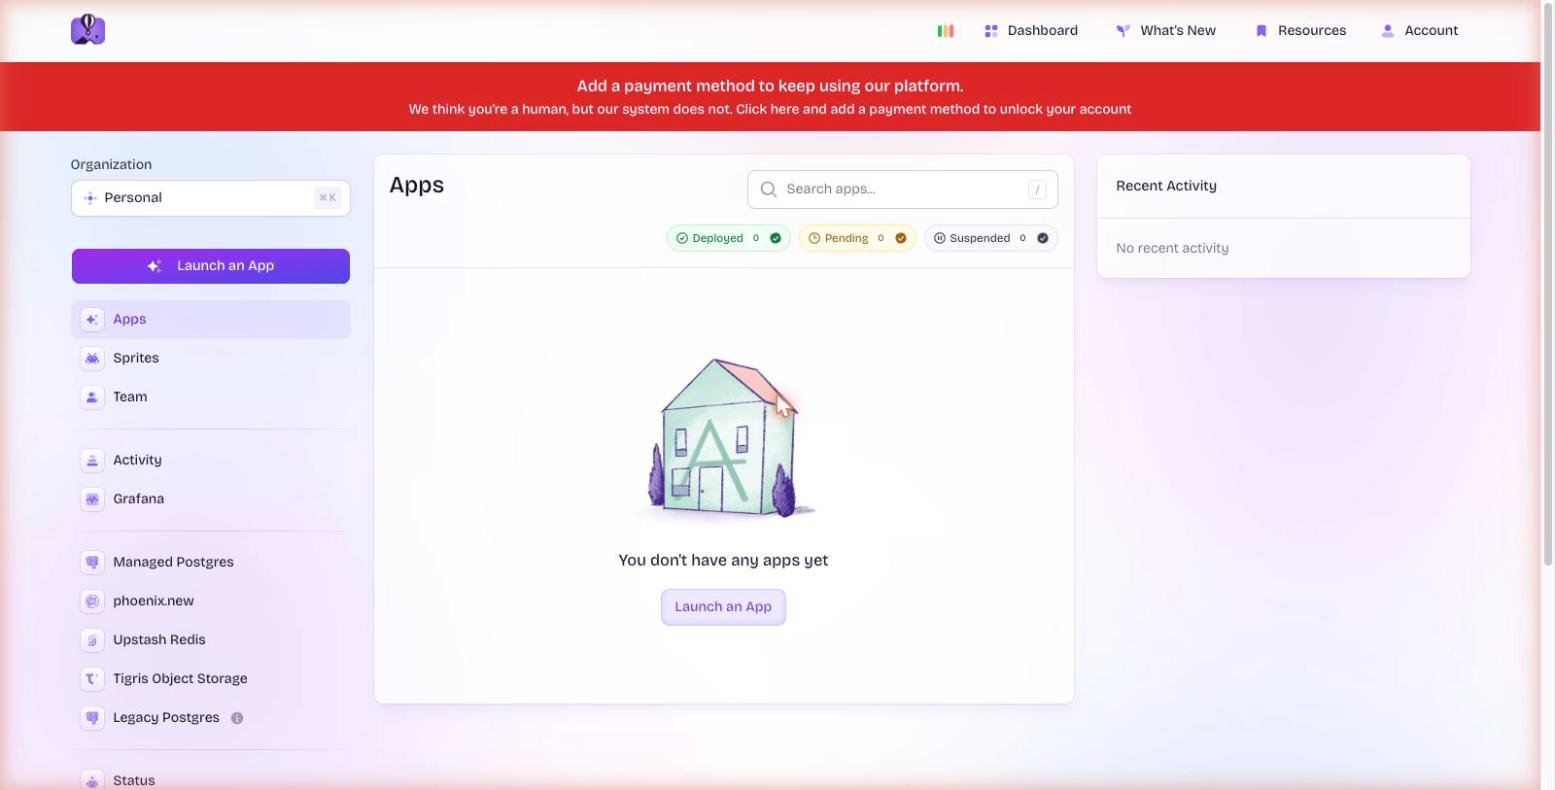
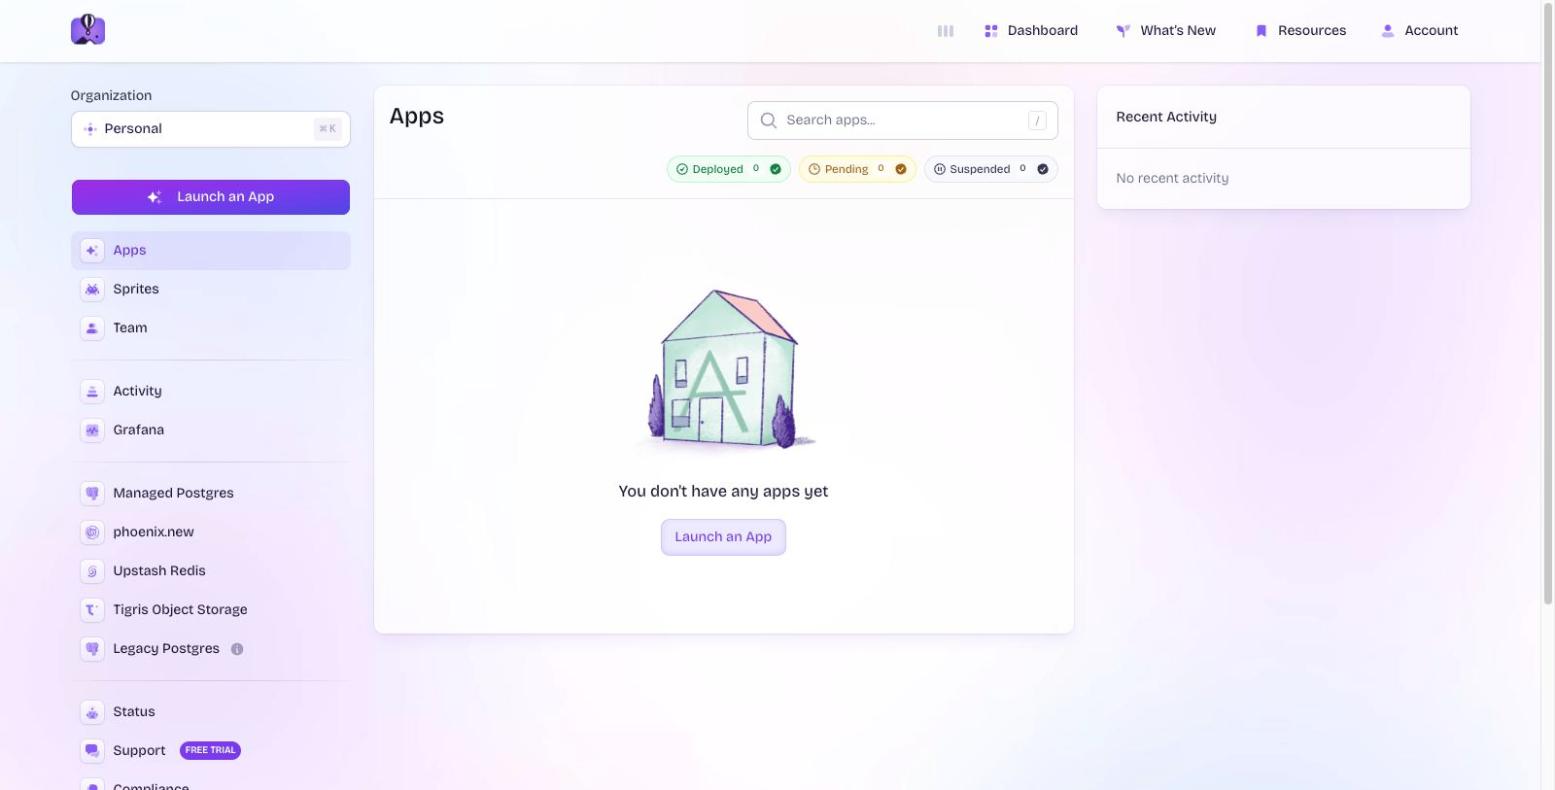
Right after signing up you'll see a banner asking you to add a payment method — click it and add a card. Once verified, the dashboard unlocks:
2. Install the CLI and create the app
curl -L https://fly.io/install.sh | sh
flyctl auth login
flyctl apps create my-single-class --org personal
3. Provision Postgres
Use Fly Postgres for the simplest setup (same private network as your app), or bring your own external Postgres (Neon, Supabase, RDS) and skip straight to step 5.
flyctl postgres create \
  --name my-single-class-db \
  --org personal \
  --region nrt \
  --vm-size shared-cpu-1x \
  --volume-size 1 \
  --initial-cluster-size 1 \
  --autostart
This prints a connection string — save it, it's shown only once.
4. Authenticate the private image pull
The image is private on GHCR. Generate a classic GitHub token (not fine-grained) with the read:packages scope at github.com/settings/tokens/new, then:
docker login ghcr.io -u <your-github-username>
# paste the token as the password when prompted
5. Set secrets before the first deploy
flyctl postgres attach my-single-class-db --app my-single-class

flyctl secrets set --app my-single-class \
  AUTH_SECRET="$(openssl rand -base64 32)" \
  AUTH_URL="https://my-single-class.fly.dev" \
  NEXT_PUBLIC_BASE_URL="https://my-single-class.fly.dev" \
  ENABLE_MIGRATIONS=true
Why this order matters: Fly creates two machines by default for high availability, even with min_machines_running = 0 — that setting only controls scale-to-zero-when-idle, not how many machines get created on first deploy. Each is a fully separate process. Leaving DATABASE_URL unset and relying on the in-app setup wizard instead means only the one machine that handled your form submission learns about it — the second machine still has nothing configured and throws a raw 500 the moment a request round-robins to it. Setting secrets upfront pushes the same configuration to every machine identically. (The wizard itself works fine — it's the right flow for a single-container VPS deployment with no replicas to desync.) Missing AUTH_SECRET/AUTH_URL also silently breaks sign-in, redirecting to the container's internal address instead of your real domain — found by re-running this exact guide end-to-end as a QA pass.
6. Write fly.toml and deploy
app = "my-single-class"
primary_region = "nrt"

[build]

[http_service]
  internal_port = 3000
  force_https = true
  auto_stop_machines = "stop"
  auto_start_machines = true
  min_machines_running = 0

[[vm]]
  size = "shared-cpu-1x"
  memory = "512mb"
flyctl deploy --image ghcr.io/greateyin/single-class:latest \
--app my-single-class \
-c fly.toml \
--local-only \
--now--local-only pulls the private image through your own authenticated Docker session (step 4) instead of Fly's remote builder, then pushes it into Fly's registry. Use v1.4.2 or later — earlier tags shipped with a broken license public key baked in, so no license key would ever activate. :latest always points to the newest tag, so it's unaffected.
7. First boot
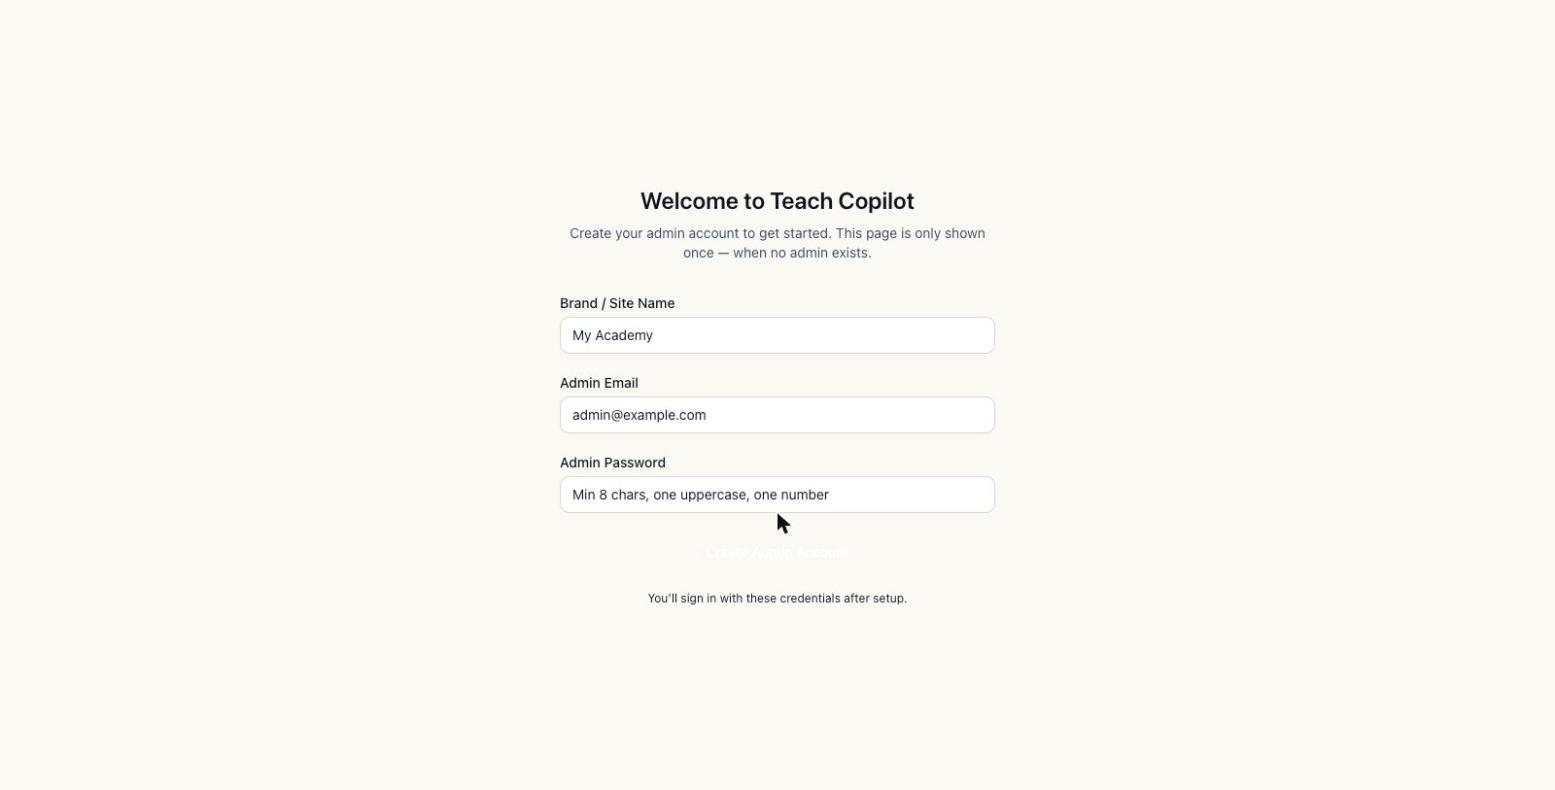
With DATABASE_URL and ENABLE_MIGRATIONS=true already set from step 5, the app runs migrations on first boot and every machine agrees on the same database — visiting your app's URL goes straight to admin account creation:
Sign in with the credentials you just created, and the instance is fully live — confirmed reliable across repeated requests, unlike the unconfigured-secrets path described above. First boot also seeds one example course and one example digital product automatically, so there's real content to click through immediately instead of an empty dashboard (set SEED_DEMO_CONTENT=false before first boot to skip it):
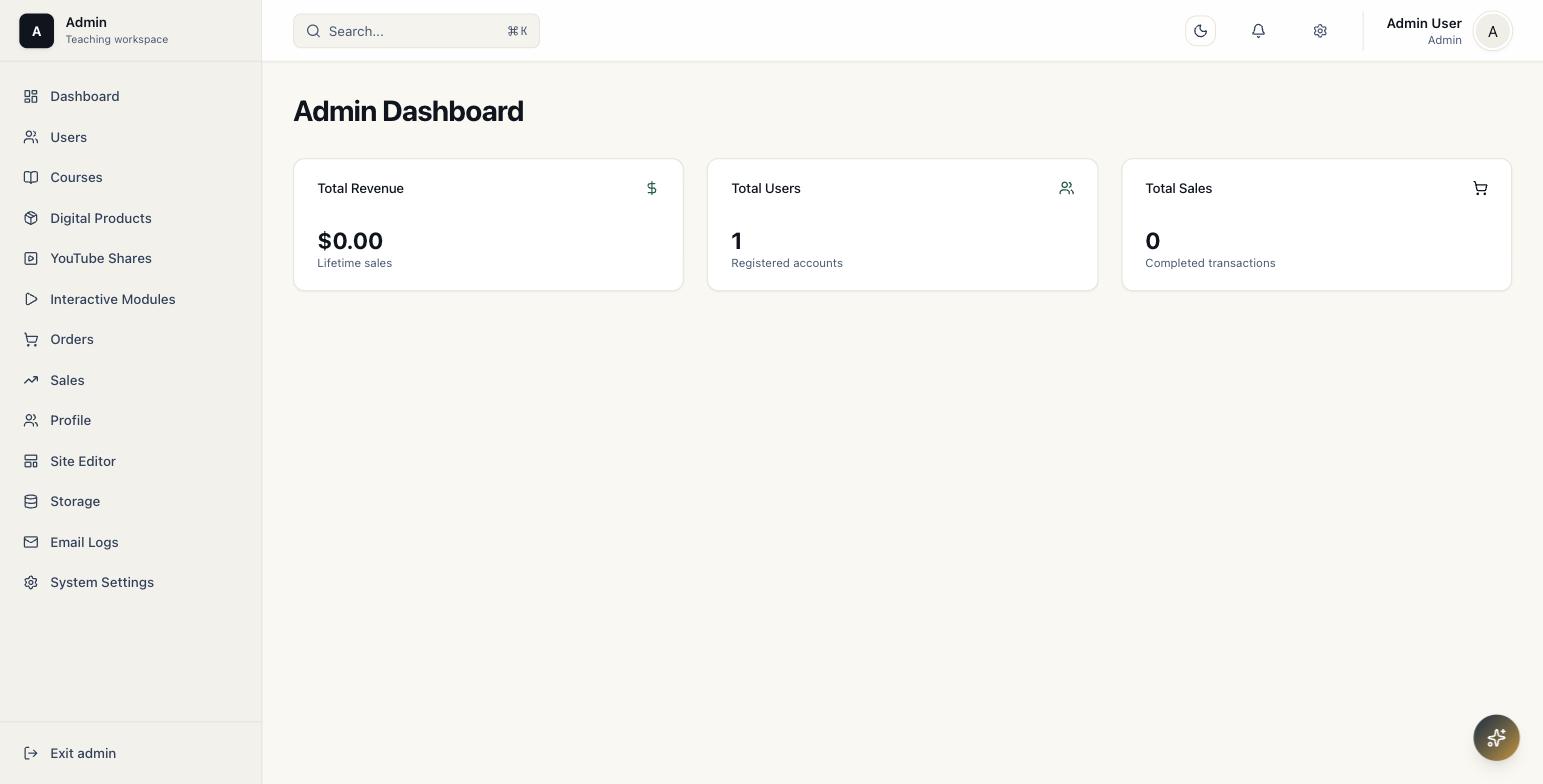
Running without a license: a fresh install runs on a 30-day grace period with full functionality except: 1 course (capped at 2 sections × 2 lectures each), 1 digital product, online payment providers (Stripe/PayPal/Lemon Squeezy — Bank Transfer stays available), and MCP key management. Activating a license at /admin/settings/license lifts every limit immediately, no redeploy required.
Custom domain
flyctl certs add courses.example.com --app my-single-classUpdate AUTH_URL and NEXT_PUBLIC_BASE_URL and redeploy.
Test Access
The screenshots in this revision were captured against the live production instance. If you are following along on your own deployment, sign in with your own admin account. The URLs below are illustrative.
| Item | Value |
|---|---|
| Production URL | https://your-domain.example |
| Admin sign-in URL | https://your-domain.example/auth/signin |
| Admin dashboard | https://your-domain.example/admin/dashboard |
| Local dev URL (alternative) | http://localhost:4000 |
If running locally instead:
pnpm dev
# or
PORT=4000 npx next dev --port 4000
Scope & Coverage
Graphify identifies the admin surface across these major communities:
| Area | Admin Features Covered |
|---|---|
| Admin Management Actions | users, orders, course/product admin workflows |
| Content & Stats Administration | dashboard, site editor, analytics-style summaries |
| System Settings & Database | platform settings, license setup, storage/email/AI/payment settings |
| Storage & Media Management | file browser, upload cleanup, storage provider status |
| Payment & Checkout Processing | orders, manual fulfillment, refunds, transaction status |
| MCP Integration & Infrastructure | admin MCP tooling and audit infrastructure |
GitNexus confirmed admin-related files under src/app/admin, covering:
| Module | Main Routes |
|---|---|
| Dashboard | /admin/dashboard |
| Users | /admin/users, /admin/users/[userId] |
| Courses | /admin/courses, /admin/courses/[id]/*, /admin/lessons/[id] |
| Products | /admin/products, /admin/products/[id]/* |
| YouTube Shares | /admin/youtube-shares, /admin/youtube-shares/[id] |
| Interactive Modules | /admin/interactive-modules, /admin/interactive-modules/new, /admin/interactive-modules/[id] |
| Orders | /admin/orders, /admin/orders/[id] |
| Sales | /admin/sales |
| Profile | /admin/profile |
| Site Editor | /admin/site-editor |
| Storage | /admin/storage |
| Email Logs | /admin/email-logs |
| Settings | /admin/settings, /admin/settings/license, /admin/settings/mcp, /admin/setup/license |
Admin Layout
The admin panel uses a persistent left sidebar and a main work area. The sidebar is the primary navigation for all admin modules.
Sidebar Navigation
| Sidebar Item | Purpose |
|---|---|
| Dashboard | Business overview and shortcuts |
| Users | Student/admin account management |
| Courses | Course creation, curriculum, sales page, pricing, settings |
| Digital Products | Downloadable products, files, pricing, settings |
| YouTube Shares | Public SEO share pages for YouTube content |
| Interactive Modules | Reusable SVG/GSAP learning modules |
| Orders | Transactions, fulfillment, refunds, invoice actions |
| Sales | Revenue and sales reporting |
| Profile | Current admin account profile |
| Site Editor | Homepage/landing content |
| Storage | File browser and storage cleanup |
| Email Logs | Transactional email delivery logs |
| System Settings | Brand, email, analytics, layout, integrations, payment, license settings |
| MCP Keys | API keys for AI clients (Claude Desktop, Cursor) connecting via MCP |
1. Dashboard
Path/admin/dashboard
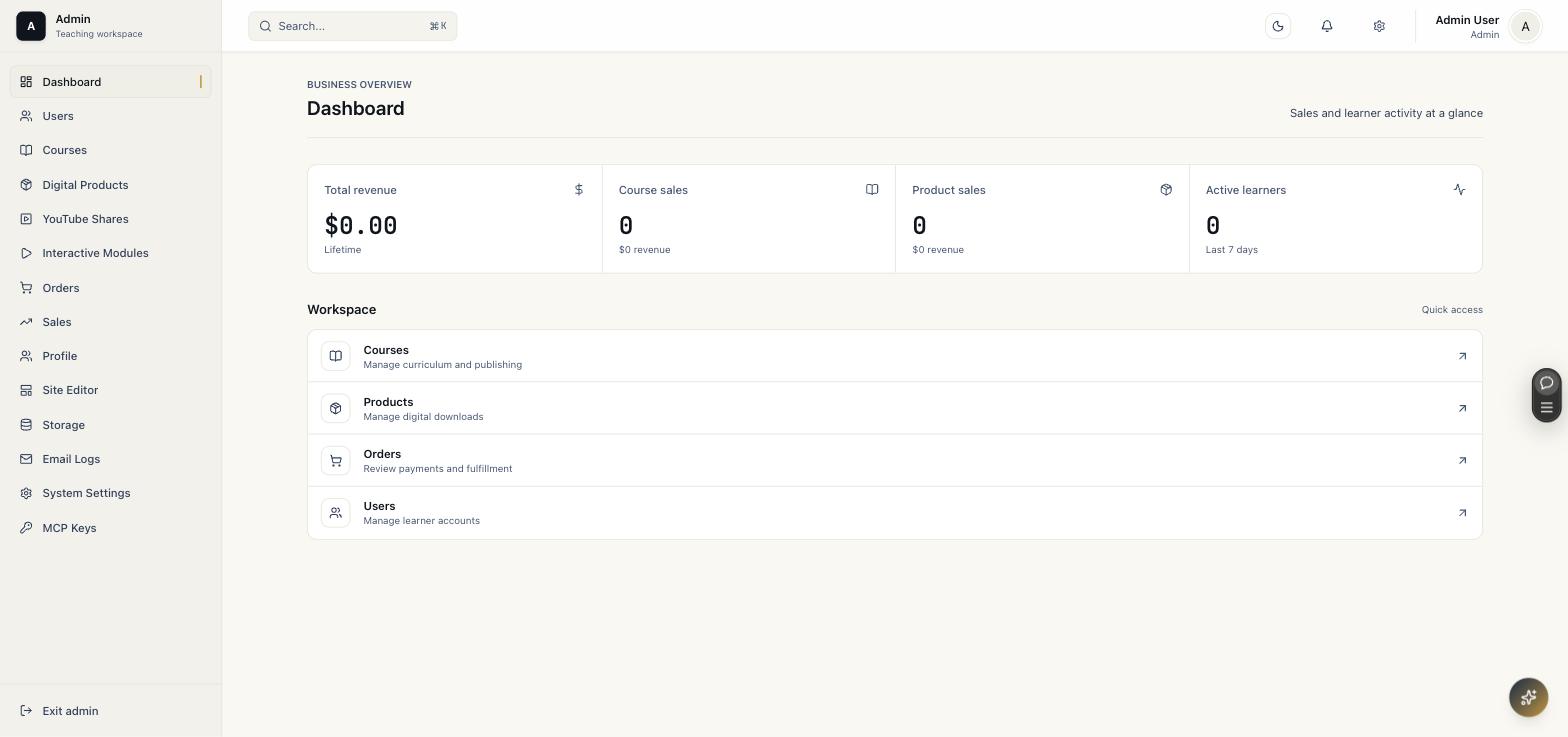
The dashboard is the first admin overview page.
Main Uses
| Area | What To Check |
|---|---|
| Revenue cards | Total revenue, course sales, product sales, active learners (last 7 days) |
| Workspace shortcuts | One-click links into Courses, Products, Orders, Users |
Recommended Operator Flow
- Sign in as admin.
- Open
/admin/dashboard. - Confirm revenue and order totals look reasonable.
- Use the sidebar or the Workspace shortcuts for deeper management.
2. Users
Path/admin/users
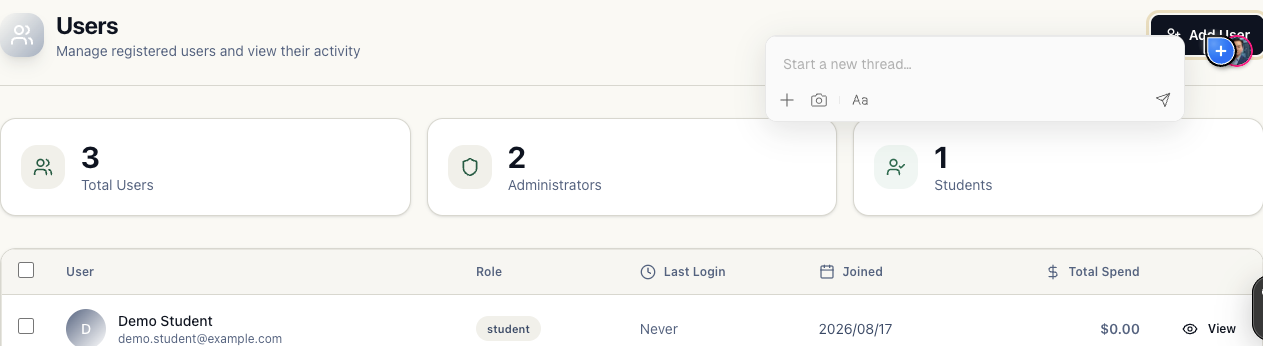
The Users section manages registered accounts.
List Page
| Feature | Description |
|---|---|
| Stat cards | Total Users, Administrators, Students |
| User table | Name, email, role, last login, joined date, total spend |
| Add User | Creates an account directly (email, optional name, role); sends a welcome email with password-setup instructions |
User Detail
Path/admin/users/[userId]
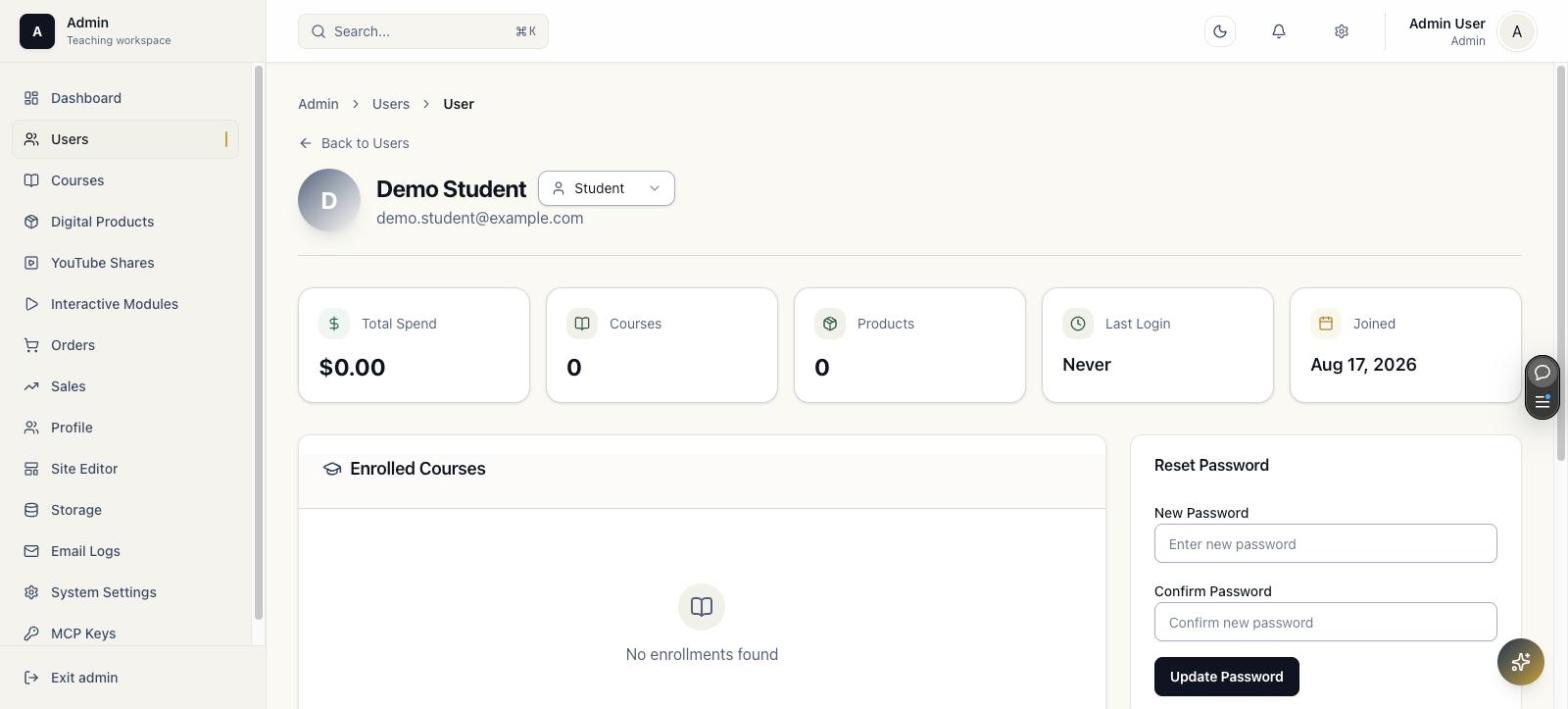
Use this page to inspect and manage one account.
| Panel | Purpose |
|---|---|
| Role selector | Promote/demote between Student and Admin |
| Stat cards | Total Spend, Courses enrolled, Products owned, Last Login, Joined date |
| Enrolled Courses | List of course enrollments for this user |
| Reset Password | Admin-set new password, bypassing the email flow |
Operational Notes
- Do not demote the last known admin unless another admin account exists.
- Disabling/demoting a user blocks admin access but does not delete order records.
- Email identity changes should be handled carefully because orders and ownership records depend on user identity.
3. Courses
Path/admin/courses
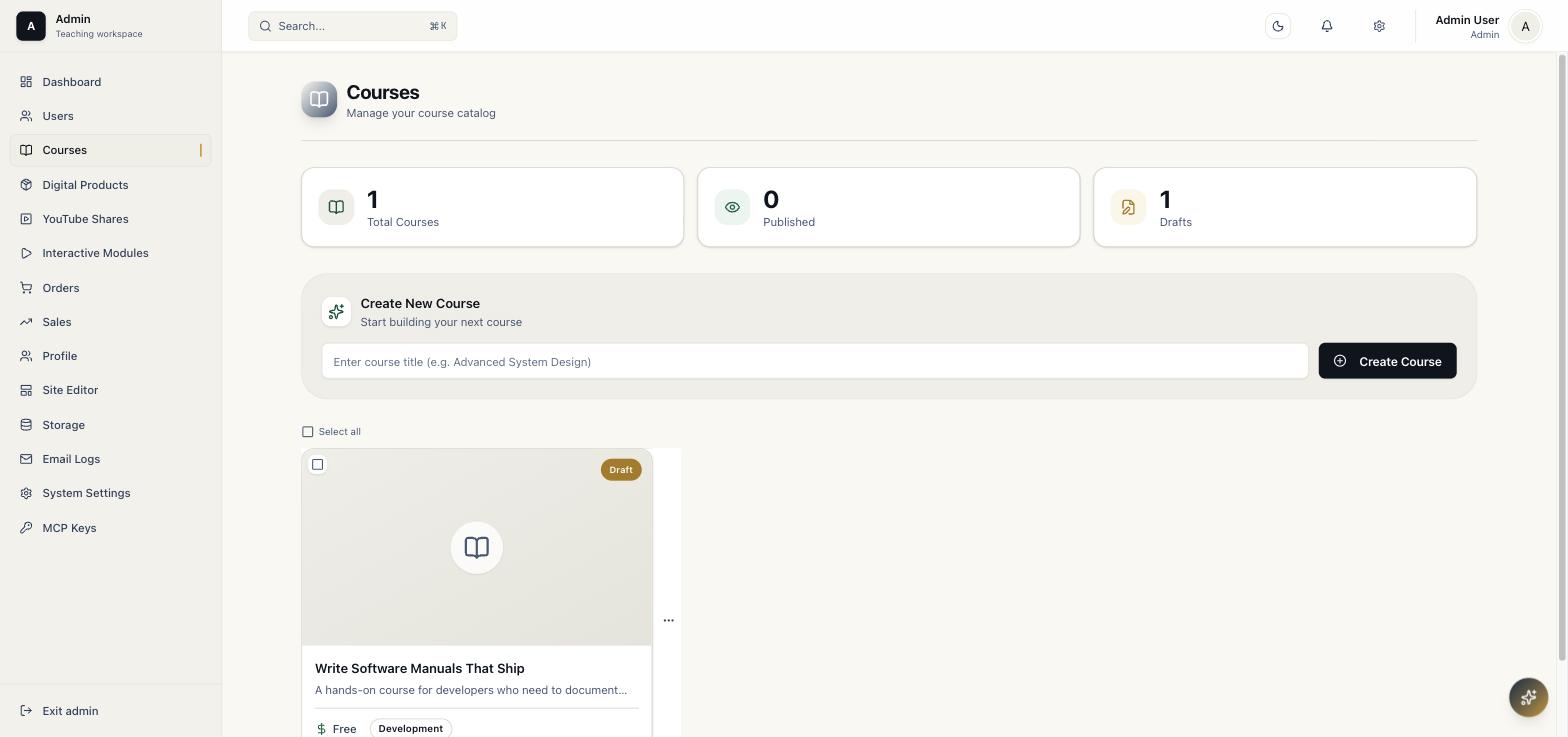
Courses are the primary learning product type. A course contains curriculum modules, lessons, landing-page copy, pricing, social proof, reviews, comments, and publication settings.
Course List
| Feature | Description |
|---|---|
| Stat cards | Total Courses, Published, Drafts |
| Create New Course | Type a title, click Create Course. Redirects straight into the editor |
| Course cards | Title, draft/published badge, price, category |
Free-tier limit: without an activated license key, the admin panel shows only 1 course. Additional courses are hidden and a yellow banner indicates how many are locked. The Create Course form is disabled when at the limit. Activating a valid license key immediately removes this restriction. No data migration needed. See License Settings.
maintenance_expired is not restricted. A license whose maintenance window has lapsed still grants full content access.
Course Editor Tabs
| Tab | Path | Purpose |
|---|---|---|
| Intended Learners | /admin/courses/[id]/intended-learners | Learning outcomes, prerequisites, target learners. Currently a "Coming Soon" placeholder, not yet implemented |
| Curriculum | /admin/courses/[id]/curriculum | Modules, lessons, lesson content, drip schedule |
| Landing Page | /admin/courses/[id]/landing-page | Sales copy, media, SEO, OG settings |
| Pricing | /admin/courses/[id]/pricing | Price, promo pricing, coupons |
| Upsell | /admin/courses/[id]/upsell | Post-purchase one-time offer |
| Social Proof | /admin/courses/[id]/social-proof | Testimonials and trust content |
| Reviews | /admin/courses/[id]/reviews | Student review moderation |
| Comments | /admin/courses/[id]/comments | Lesson Q&A/comment moderation |
| Settings | /admin/courses/[id]/settings | Publish status, access rules, downloads, deletion |
3.1 Intended Learners
Path/admin/courses/[id]/intended-learners
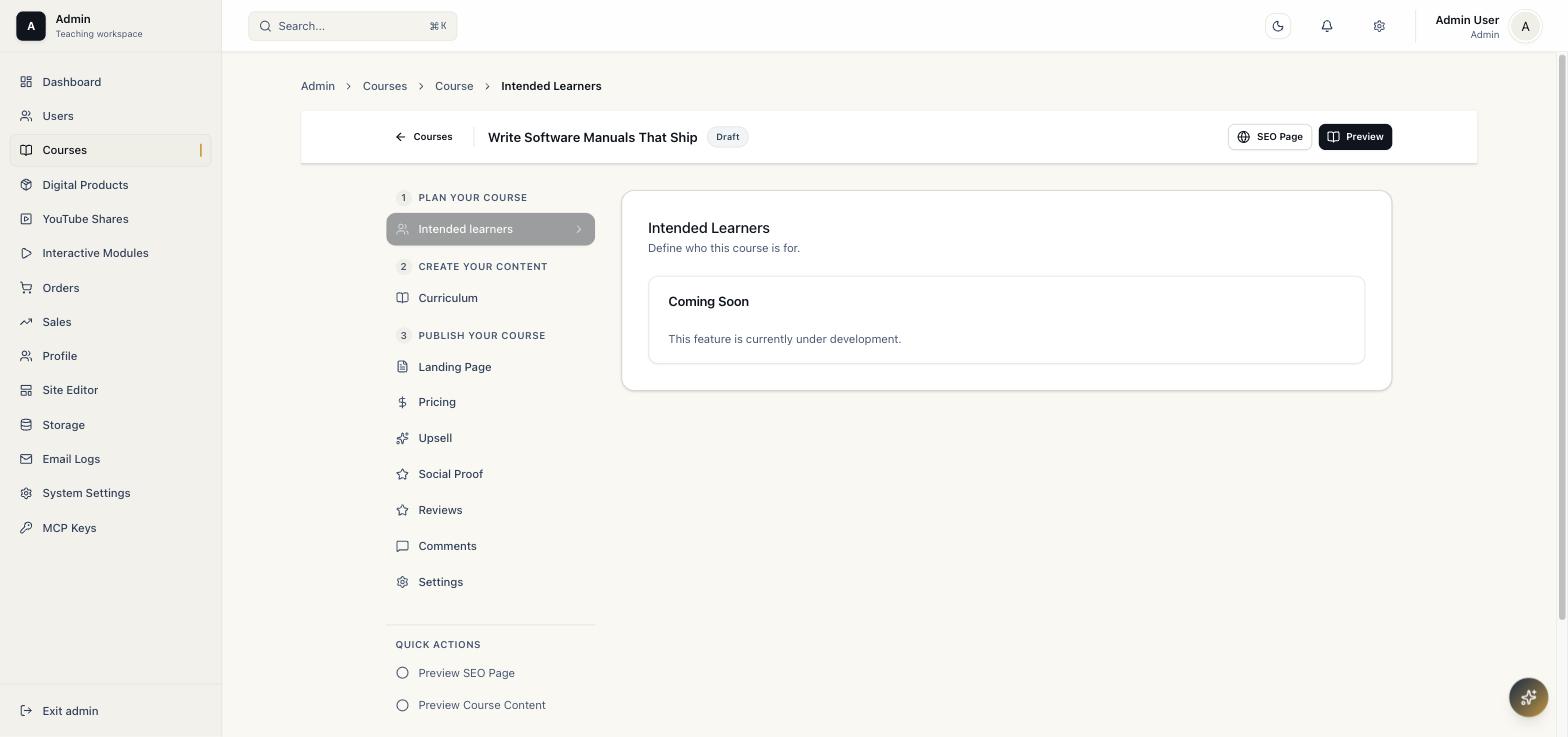
This tab is reserved for defining who the course is for, but is not built yet. It currently shows a "Coming Soon" notice. Use the Landing Page's course description and features list to communicate audience fit in the meantime.
3.2 Curriculum
Path/admin/courses/[id]/curriculum
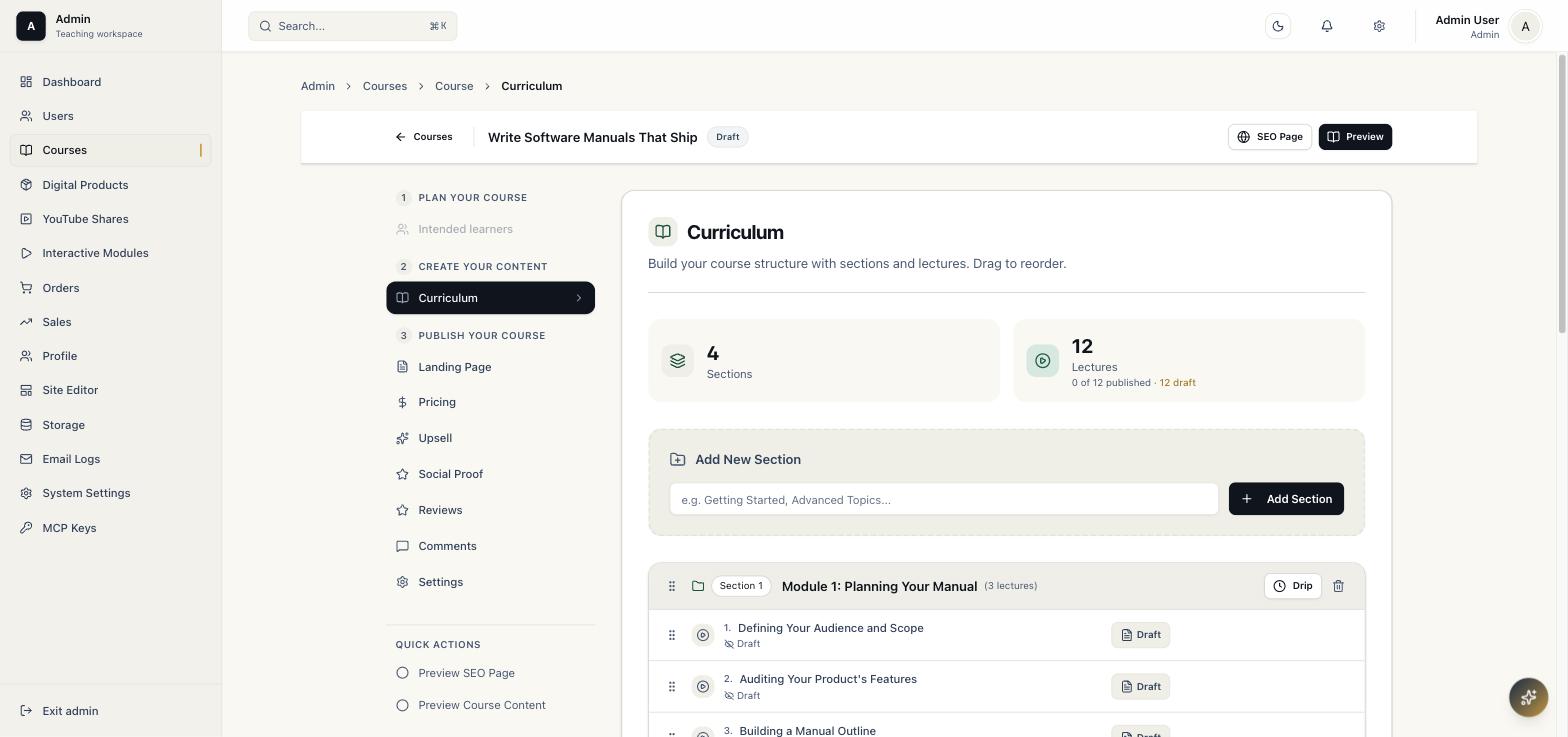
The curriculum editor manages course structure.
| Object | Description |
|---|---|
| Section (module) | A course section that groups lessons |
| Lecture (lesson) | A page inside a section |
| Draft/Published badge | Controls whether a lesson is visible to students |
| Drag handle | Reorder sections and lessons |
| Drip | Optional release timing per section |
Free-tier limit: without an activated license, only 1 section is visible in the curriculum editor. Additional sections are hidden. The Add New Section form is disabled when at the limit. Activate a license to see and manage all sections.
Curriculum Workflow
- Type a section name into Add New Section and click Add Section.
- Under each section, type a lecture title into Add a new lecture... and click Add Lecture.
- Click into a lecture to fill its markdown body, video/embed URL, and attachments.
- Publish lessons when ready. A course cannot be published while it has zero published lessons.
- Drag to reorder sections/lessons to match the intended learning path.
3.3 Landing Page
Path/admin/courses/[id]/landing-page
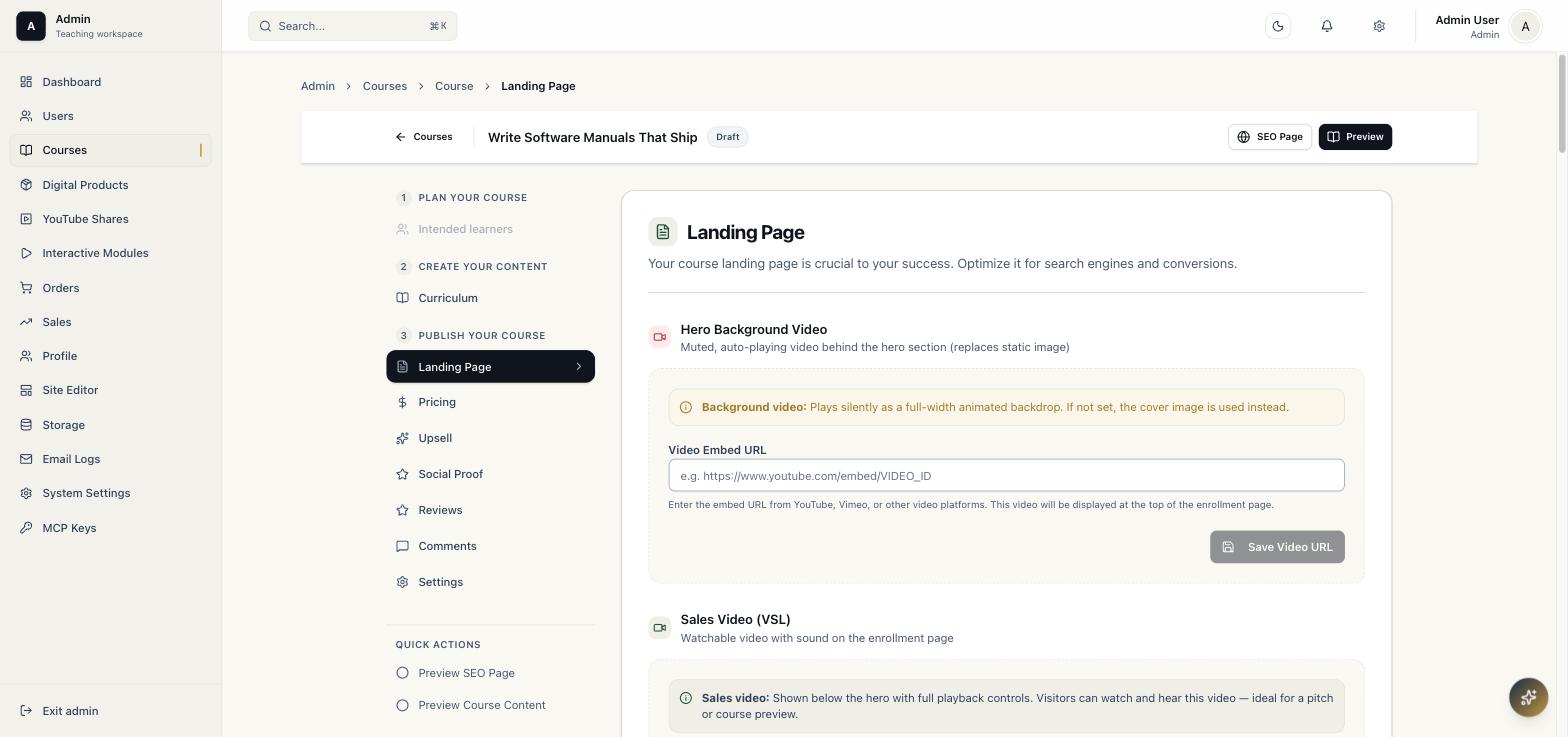
This page controls the content shown on the public course page (/course/[courseId]), which also hosts the inline checkout panel. There is no separate enrollment page; /enroll/[courseId] is only a legacy permanent redirect to it.
| Section | Purpose |
|---|---|
| Hero Background Video / Sales Video (VSL) | Optional YouTube/Vimeo embeds for the enrollment page |
| Course Image | Cover image (750x422 recommended) |
| Course Details | Title, Public SEO Slug, Subtitle, Course Description (markdown, AI-assisted Expand/Simplify/Fix Grammar/translate), Sales Story |
| Basic Information | Language, Skill Level, Category, Primary Topic |
| SEO Settings | SEO title/description/keywords, with an AI Generate button |
| OG / Social | Open Graph image and share description |
| Everything Included Features | Checklist-style feature/value rows shown on the sales page |
Recommended Landing Page Flow
- Fill Course Title, Subtitle, and a markdown Description (200+ words recommended for SEO).
- Set Language, Skill Level, Category, and Primary Topic.
- Add a cover image and OG image.
- Fill SEO Title/Description/Keywords. Use AI Generate for a first draft, then review.
- Add 3 to 5 "Everything Included" feature rows with a label and value each.
- Save, then use Preview to check the public page.
3.4 Pricing
Path/admin/courses/[id]/pricing
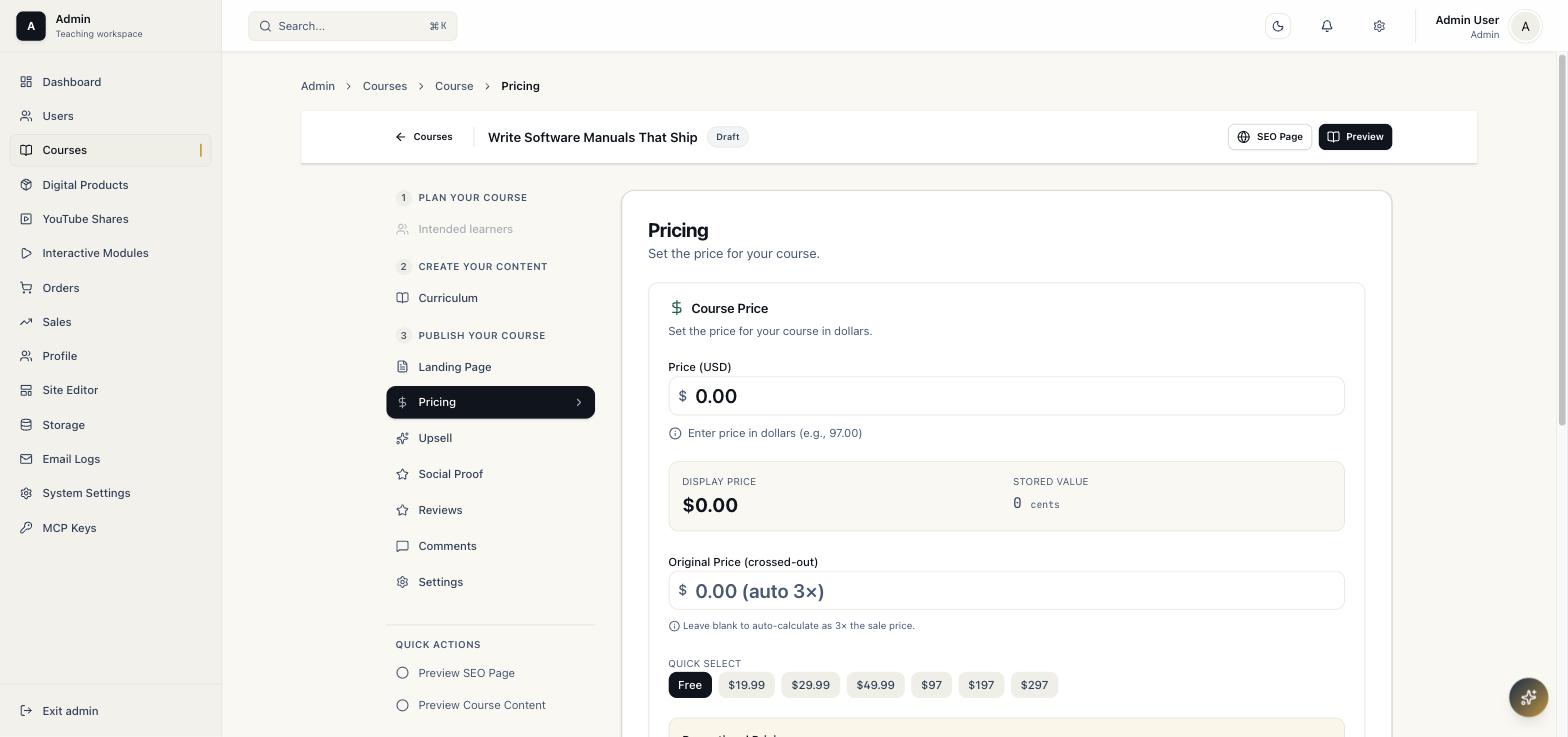
Pricing is stored internally in cents but edited as a dollar amount.
| Field/Feature | Description |
|---|---|
| Price (USD) | Main course price |
| Original Price (crossed-out) | Leave blank to auto-calculate as 3x the sale price |
| Quick Select | One-click common price points (Free, $19.99 to $297) |
| Promotional Pricing | Time-limited or permanent promotion (scroll below Quick Select) |
| Coupons | Course-scoped discount codes |
Rules
- Paid course prices should be at least 1 cent; use 0 only for intentionally free courses.
- Confirm promo end date and permanent-promo flags before publishing.
- Coupon usage is tracked and should be reviewed if usage limits matter.
3.5 Upsell
Path/admin/courses/[id]/upsell
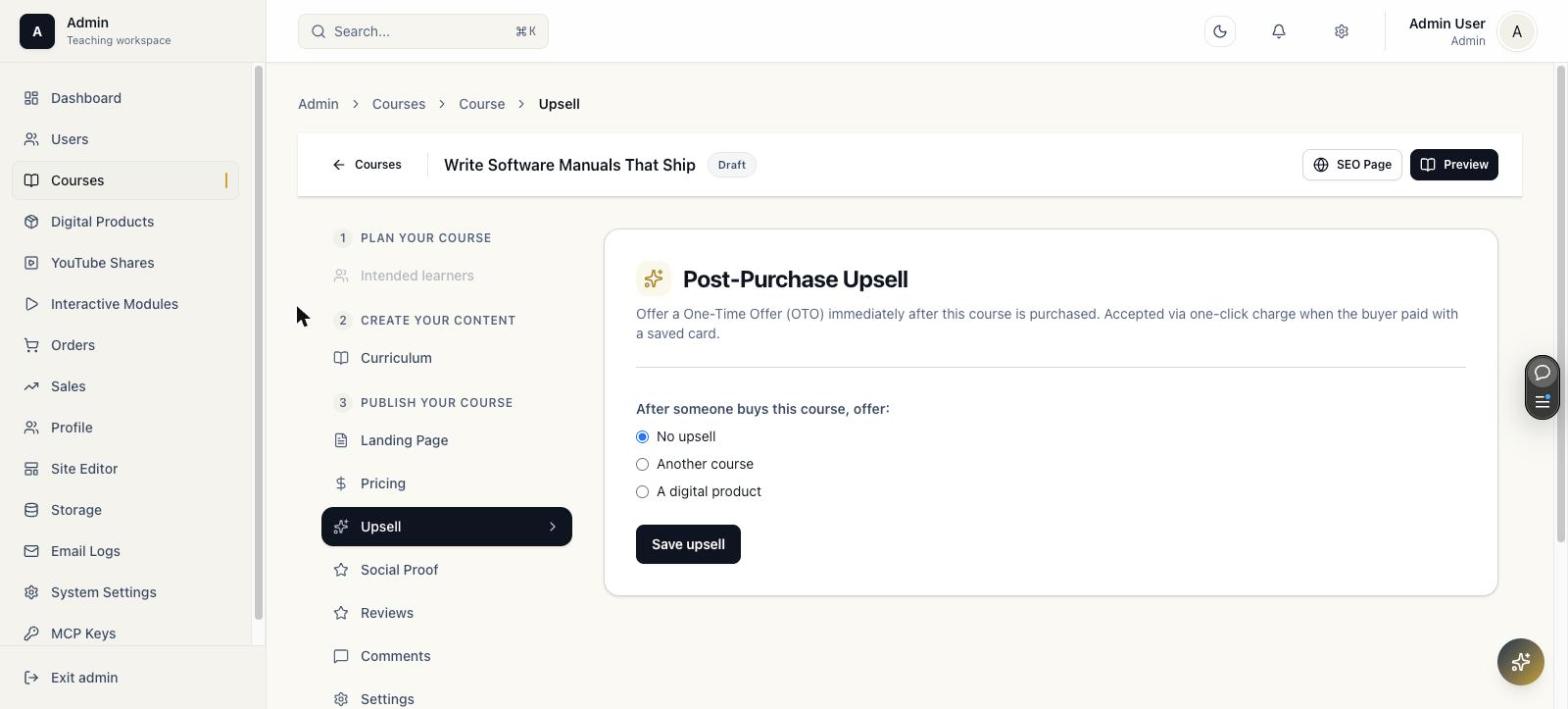
Configures a one-time offer (OTO) shown immediately after this course is purchased, accepted via one-click charge against the buyer's saved card.
| Option | Behavior |
|---|---|
| No upsell | Checkout ends normally |
| Another course | Offers a different published course as the OTO |
| A digital product | Offers a digital product as the OTO |
Only published courses/products appear in the Upsell target dropdown. If you see "No published courses available," publish the target first.
3.6 Social Proof, Reviews, Comments
Social Proof/admin/courses/[id]/social-proof
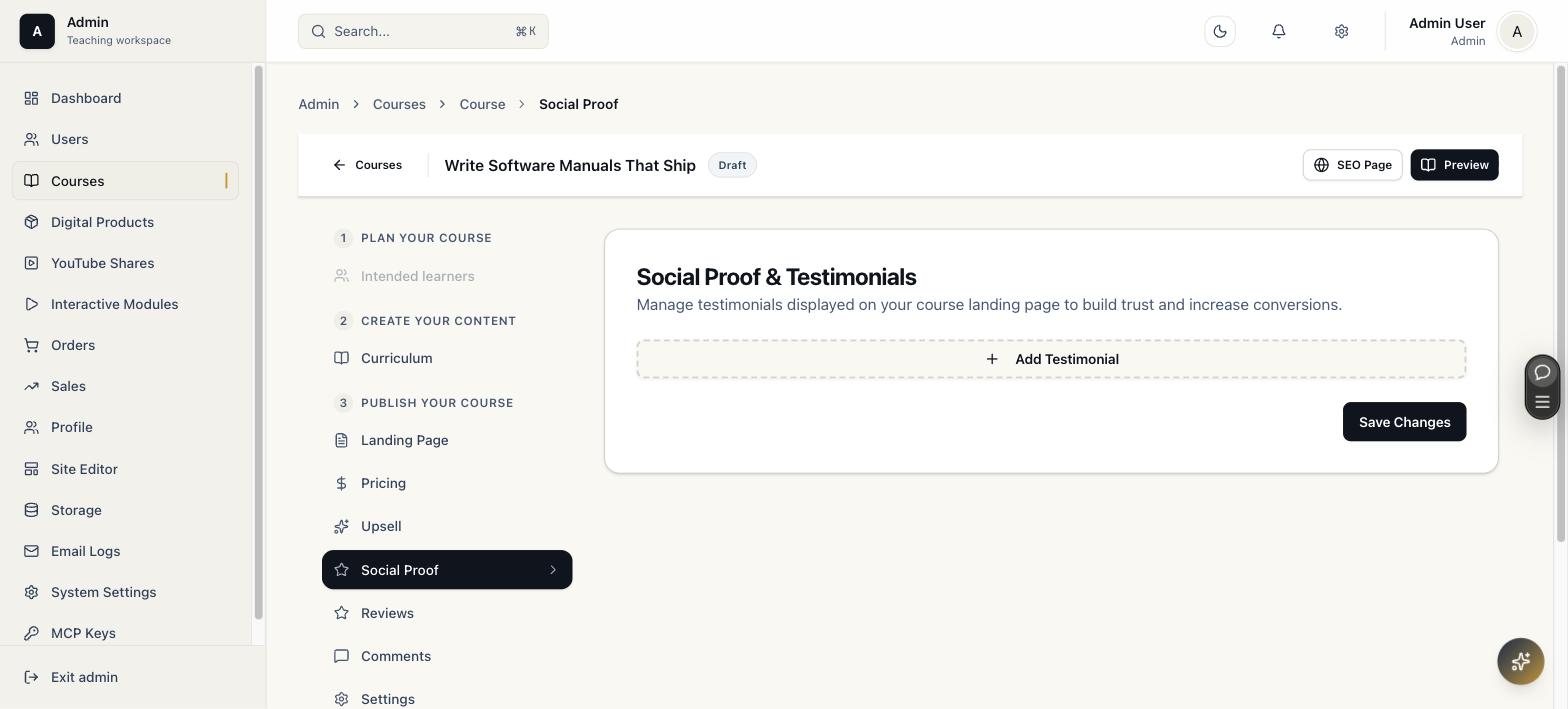
Add named testimonials shown on the landing page via Add Testimonial, then Save Changes.
Reviews/admin/courses/[id]/reviews
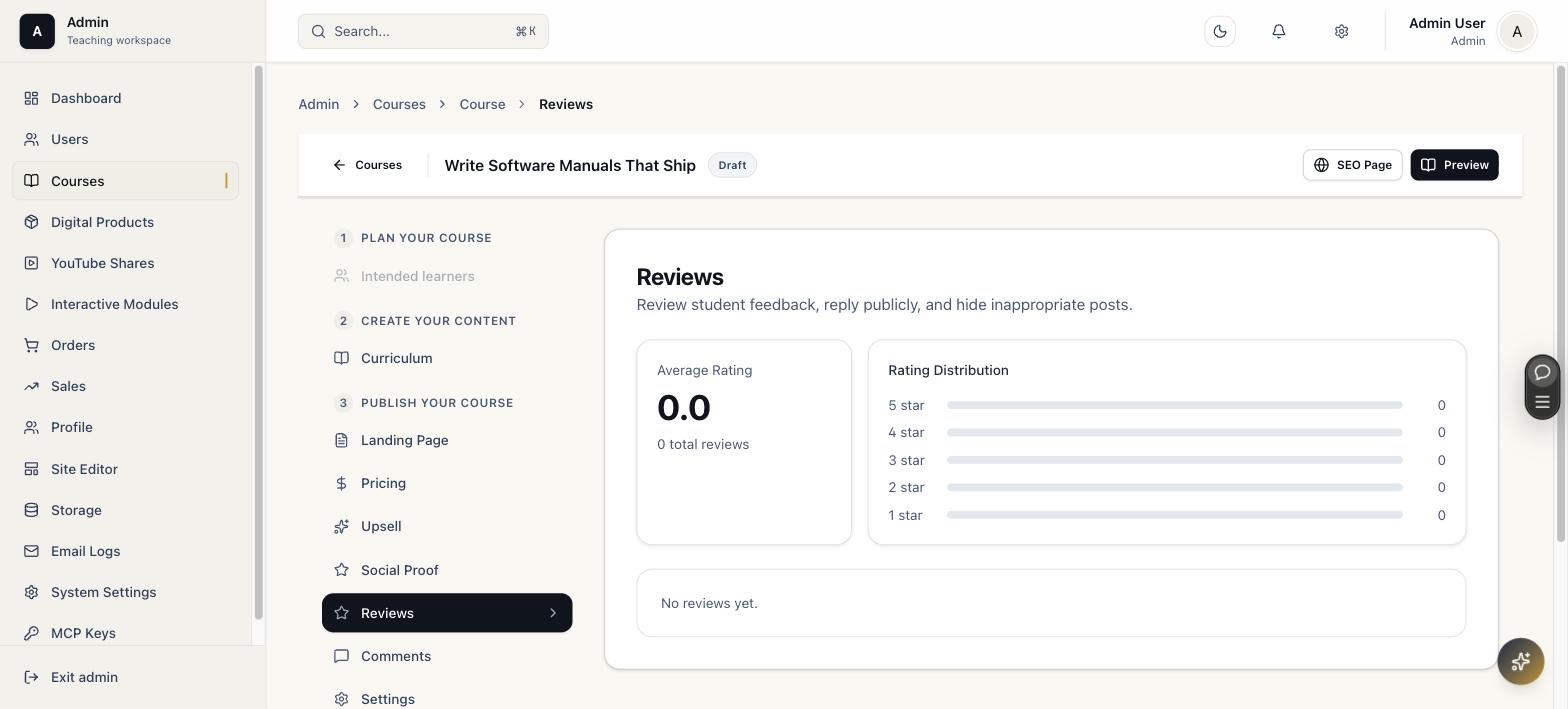
Shows average rating, a 1 to 5 star distribution, and the full review list with reply/hide/delete moderation actions.
Comments/admin/courses/[id]/comments
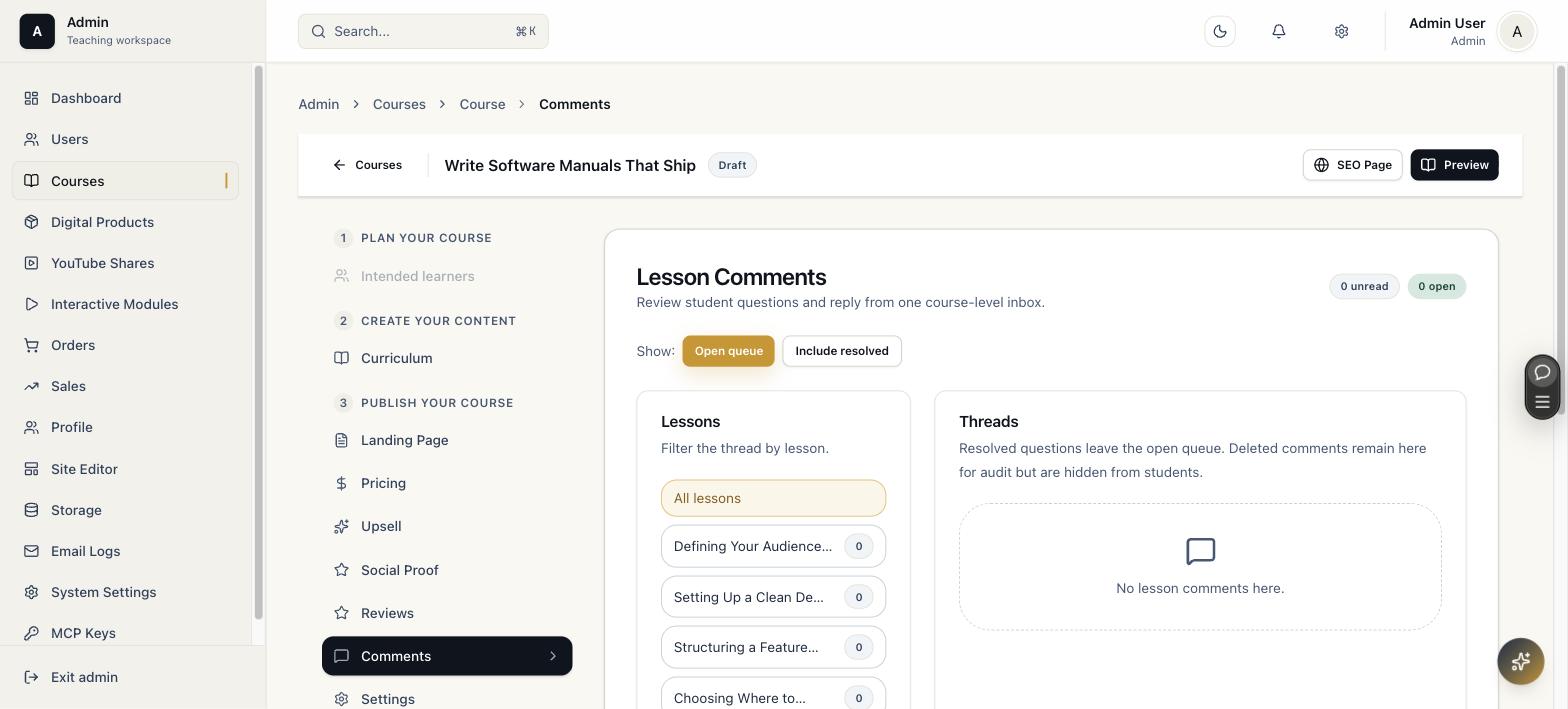
A course-level inbox for lesson Q&A. Filter the thread list by lesson using the left panel; "Include resolved" reveals closed threads.
3.7 Settings
Path/admin/courses/[id]/settings
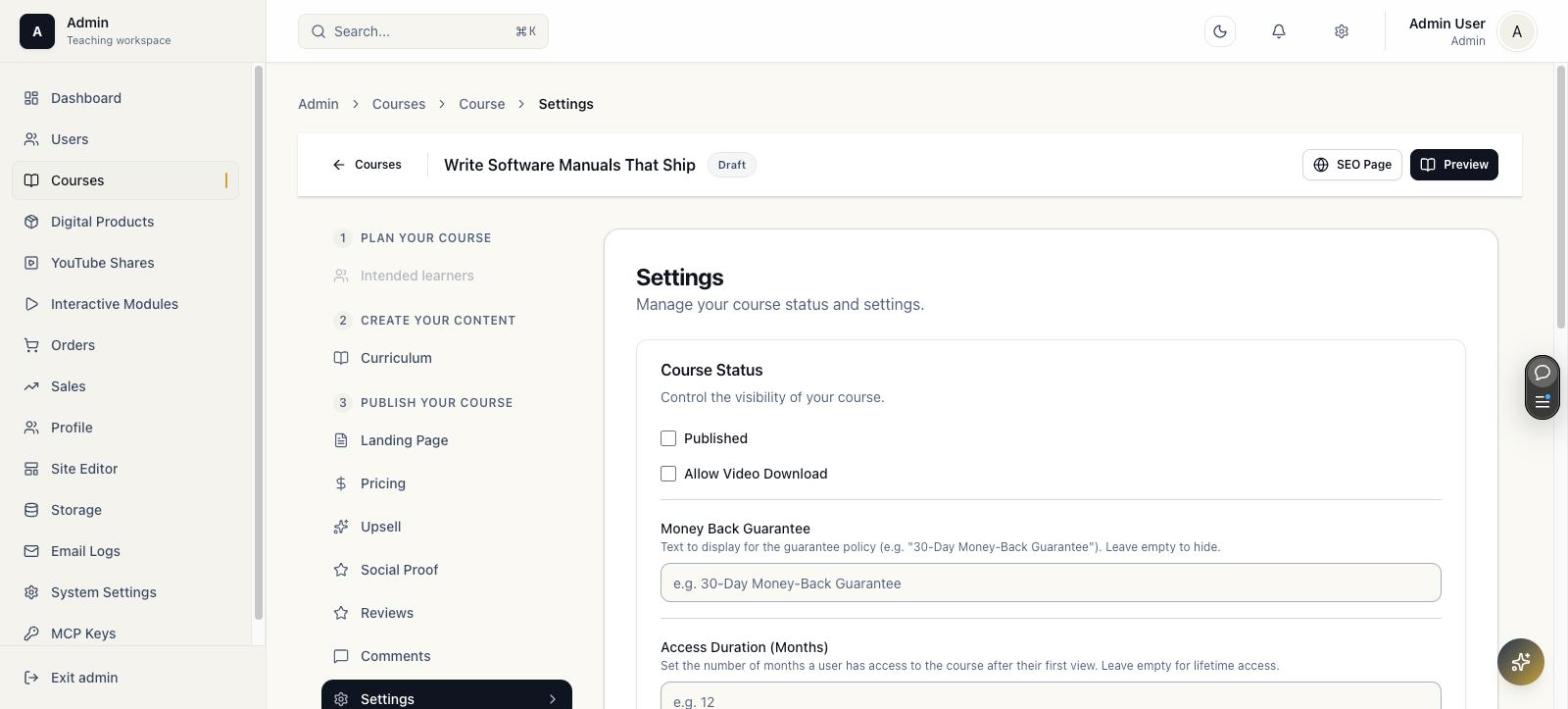
Controls course-level publication and behavior.
| Setting | Description |
|---|---|
| Published | Makes the course public. See the publish guard below |
| Allow Video Download | Lets enrolled students download lesson videos |
| Money Back Guarantee | Free-text trust badge shown on the sales page; blank hides it |
| Access Duration (Months) | Limits enrollment access; blank means lifetime |
Publish guard: checking Published and saving while no lesson is published yet shows a confirmation dialog:
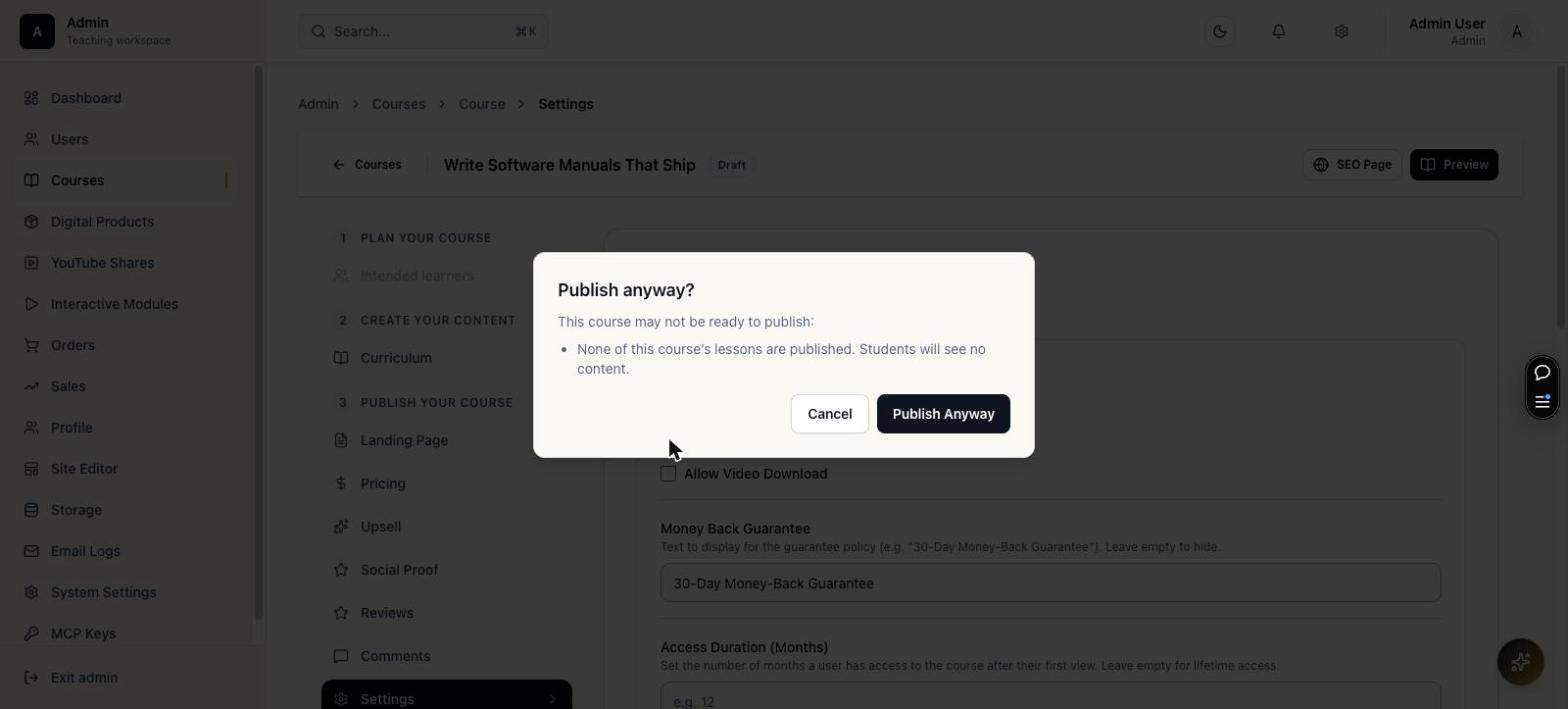
"This course may not be ready to publish: None of this course's lessons are published. Students will see no content."
You can proceed anyway (useful for reserving the public slug ahead of content), but in practice publish at least one lesson first so paying students see something immediately.
4. Digital Products
Path/admin/products
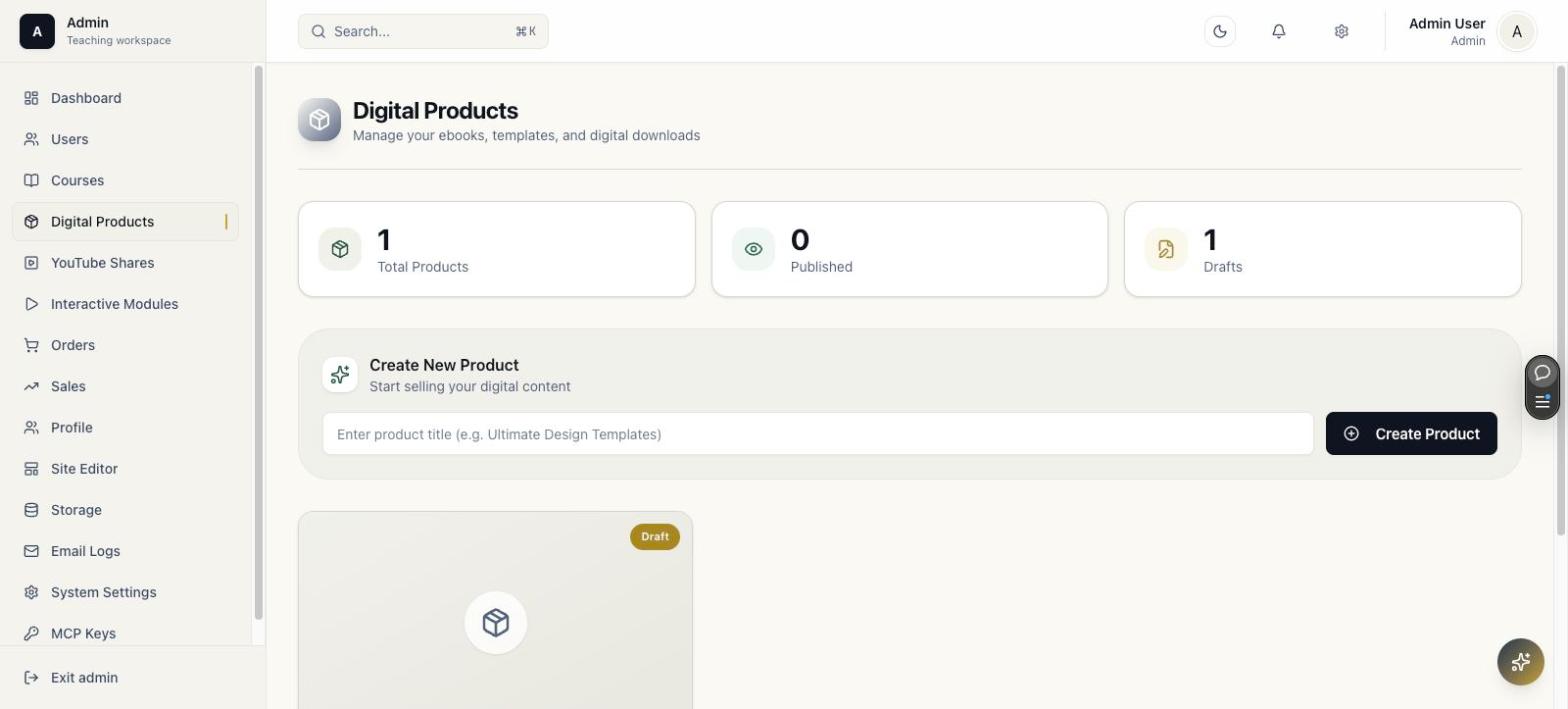
Digital products are downloadable items such as manuals, templates, PDFs, or code bundles.
Free-tier limit: without an activated license key, the admin panel shows only 1 digital product. Additional products are hidden and a yellow banner shows how many are locked. The Create Product form is disabled when at the limit. Activate a license key to access all products. See License Settings.
Product Editor Tabs
| Tab | Path | Purpose |
|---|---|---|
| Landing Page | /admin/products/[id]/landing-page | Product copy, SEO, OG, public sales content |
| Product Files | /admin/products/[id]/files | Upload downloadable files delivered after purchase |
| Pricing | /admin/products/[id]/pricing | Price, promo pricing |
| Upsell | /admin/products/[id]/upsell | Product-level post-purchase OTO |
| Social Proof | /admin/products/[id]/social-proof | Testimonials and proof |
| Settings | /admin/products/[id]/settings | Publish status and Lemon Squeezy Variant ID |
4.1 Product Landing Page
Path/admin/products/[id]/landing-page
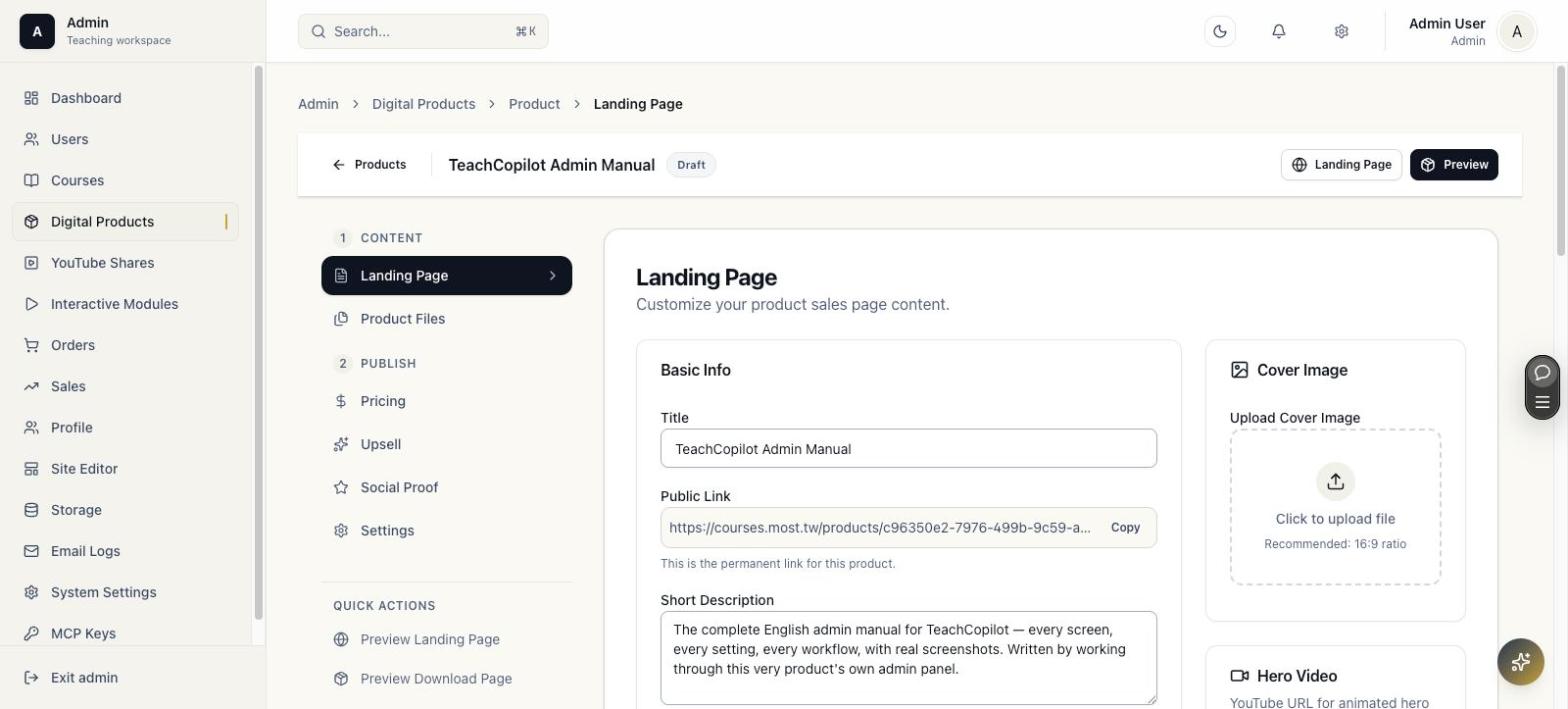
| Section | Purpose |
|---|---|
| Title / Public Link / Short Description | Headline and one-line promise; the public link is permanent and UUID-based |
| Cover Image / Hero Video | Product cover (16:9) and optional YouTube hero background |
| Sales Story | Longer markdown pitch: hook, story, offer, shown between hero and order box |
| What's Included (Feature Bullets) | Label/value rows, e.g. "Full admin manual (PDF + Markdown)" / "$49" |
| Guarantee Badge | Free-text trust badge on the sales page |
4.2 Product Files
Path/admin/products/[id]/files
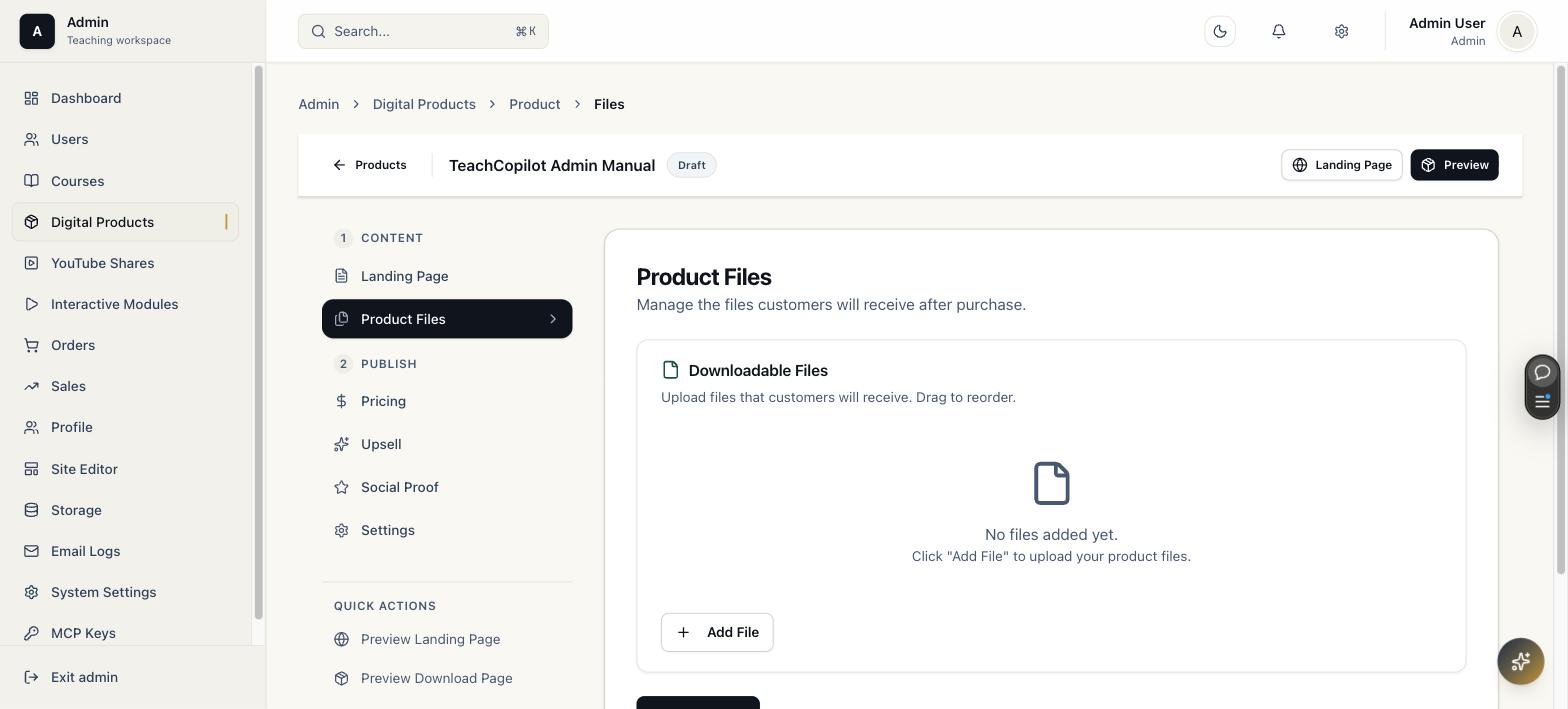
Upload the files delivered to buyers via Add File; drag to reorder if multiple files are attached.
Storage rule: product file upload should go through the platform upload module. Do not manually insert file rows into the database. The upload layer is responsible for provider selection, file metadata, public/private URL behavior, and cleanup consistency.
4.3 Product Pricing
Path/admin/products/[id]/pricing
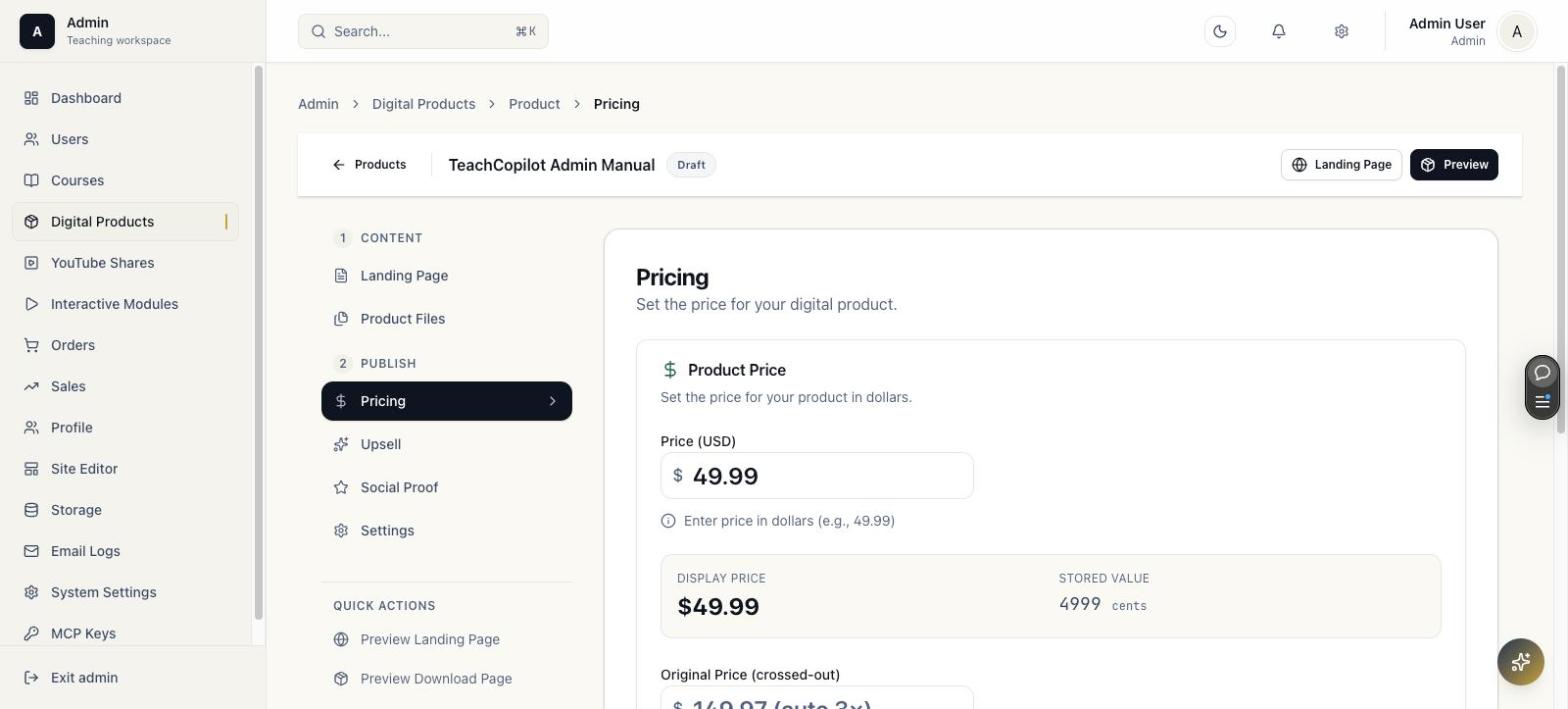
Same pattern as course pricing: dollar-denominated Price (USD), an auto-calculated 3x "Original Price," and Quick Select buttons.
4.4 Product Upsell
Path/admin/products/[id]/upsell
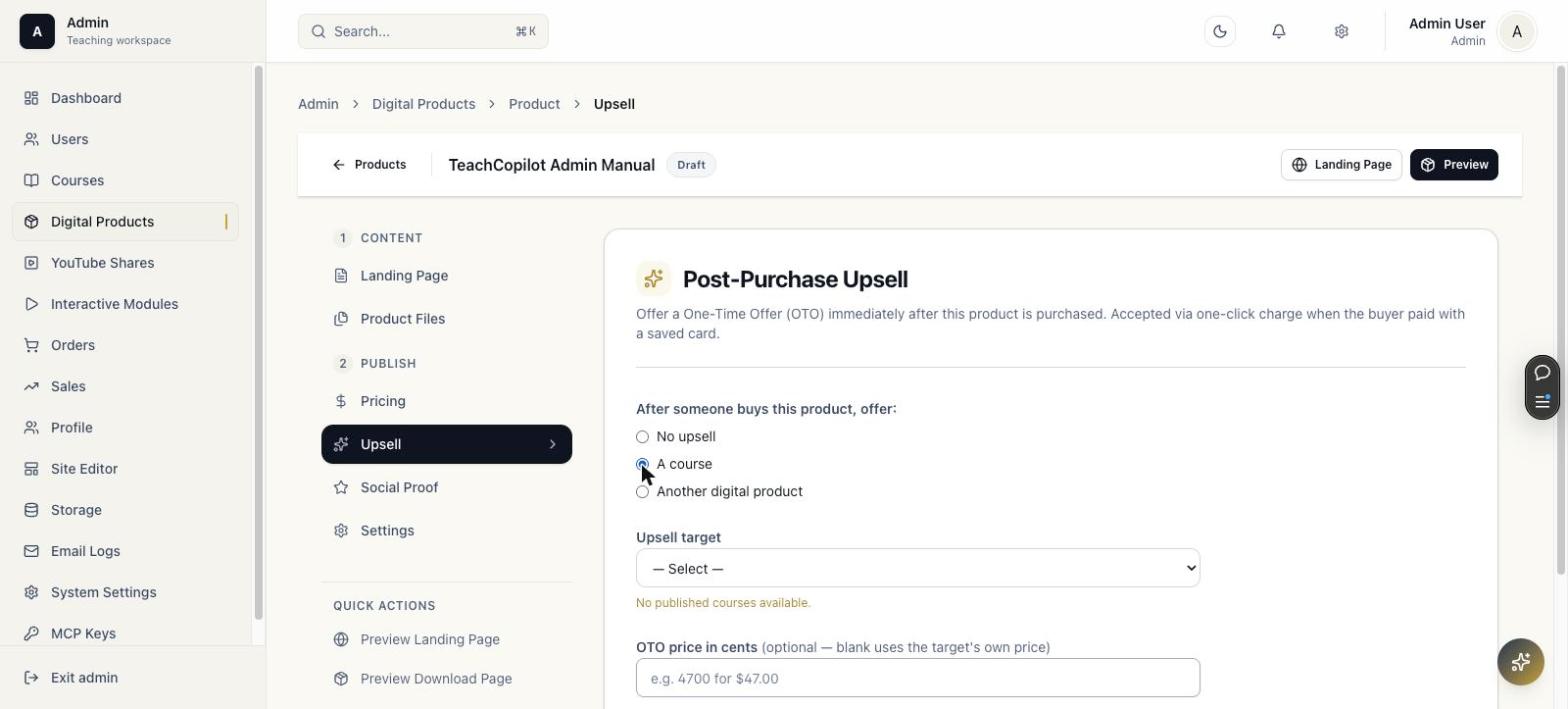
Same OTO pattern as course upsell, but the offer can point at another product or a course. Selecting "A course" reveals an Upsell target dropdown and an optional OTO price in cents override. Again, only published targets are selectable.
4.5 Product Social Proof & Settings
Social Proof/admin/products/[id]/social-proof
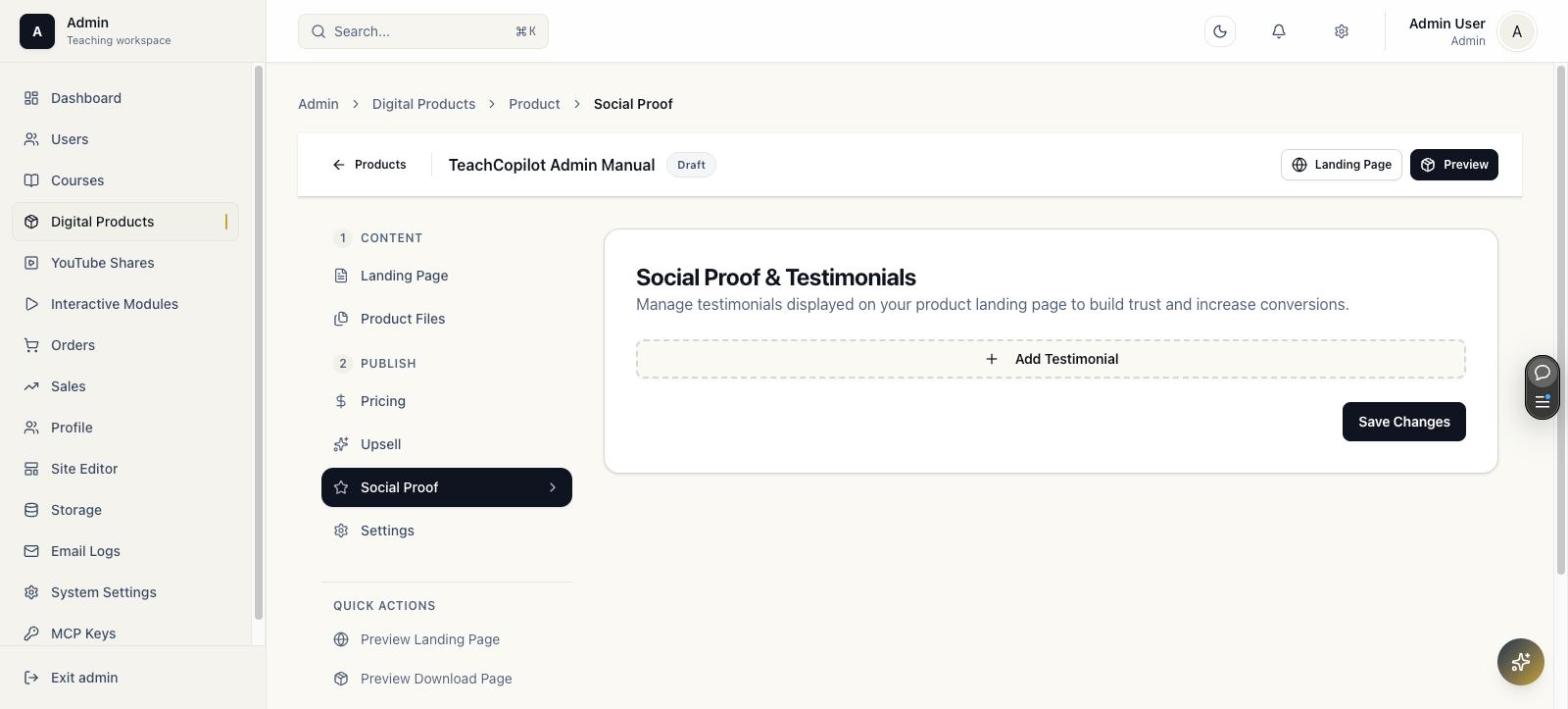
Same testimonial editor pattern as course Social Proof.
Settings/admin/products/[id]/settings
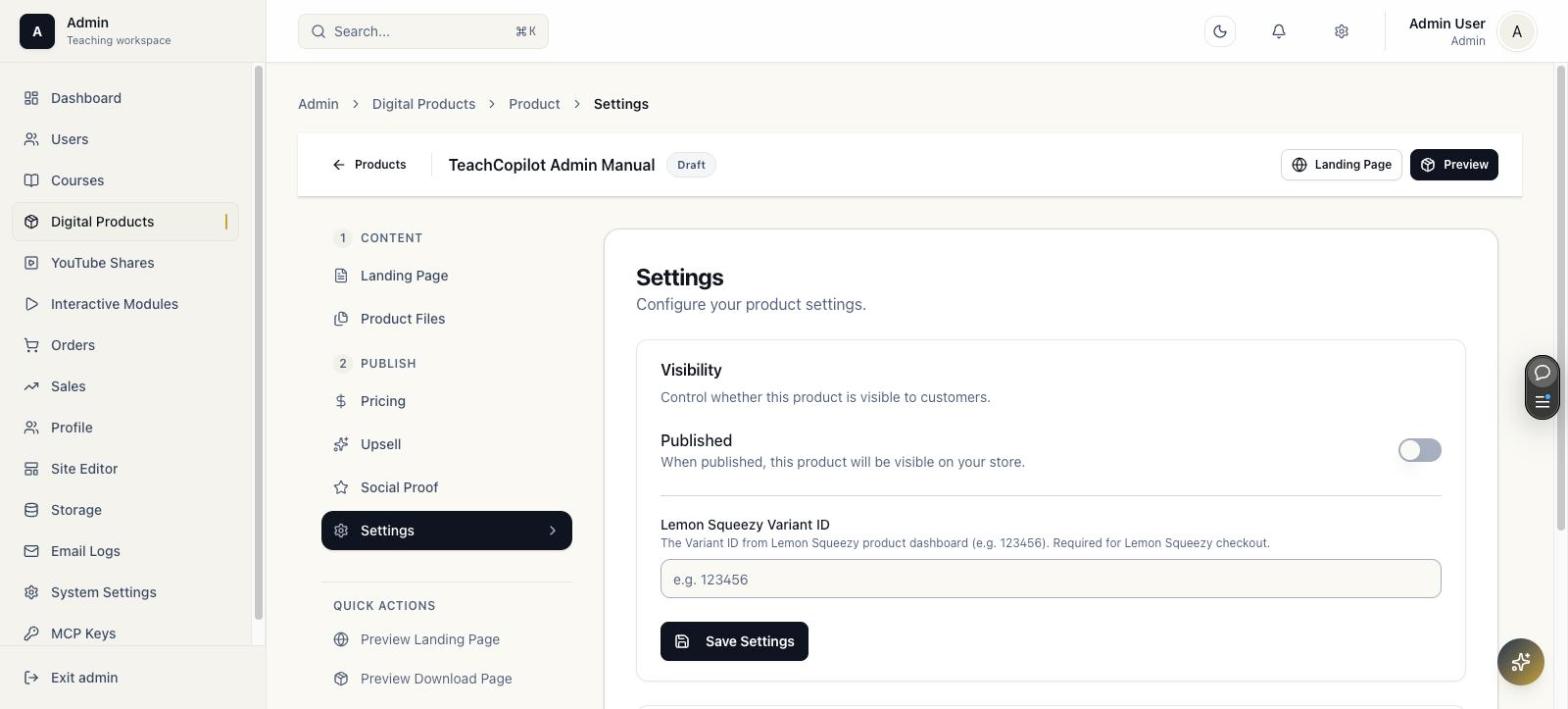
| Setting | Description |
|---|---|
| Published | Makes the product visible on the store |
| Lemon Squeezy Variant ID | Required only if selling this product through Lemon Squeezy checkout |
| Delete Product | Destructive action in the Danger Zone; irreversible |
5. YouTube Shares
Path/admin/youtube-shares
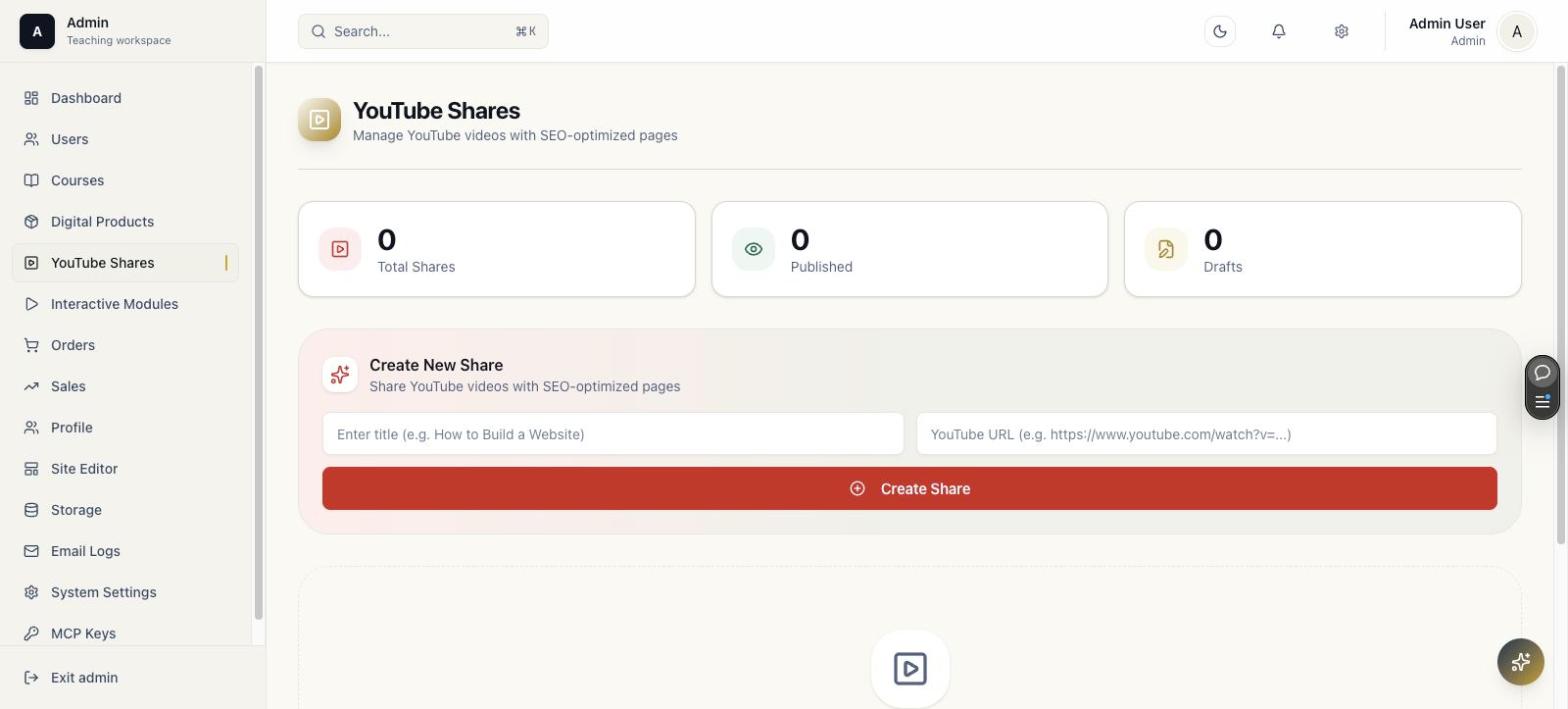
YouTube Shares create public SEO pages for YouTube videos.
| Feature | Description |
|---|---|
| Stat cards | Total Shares, Published, Drafts |
| Create New Share | Title + YouTube URL, one click to create |
| Slug | Public URL segment |
| Markdown content | Optional article content below the video |
Use Cases
- Turn a YouTube video into an indexed article-style landing page.
- Add summary, links, and calls to action below the embedded video.
- Use a stable slug for sharing.
6. Interactive Modules
Path/admin/interactive-modules
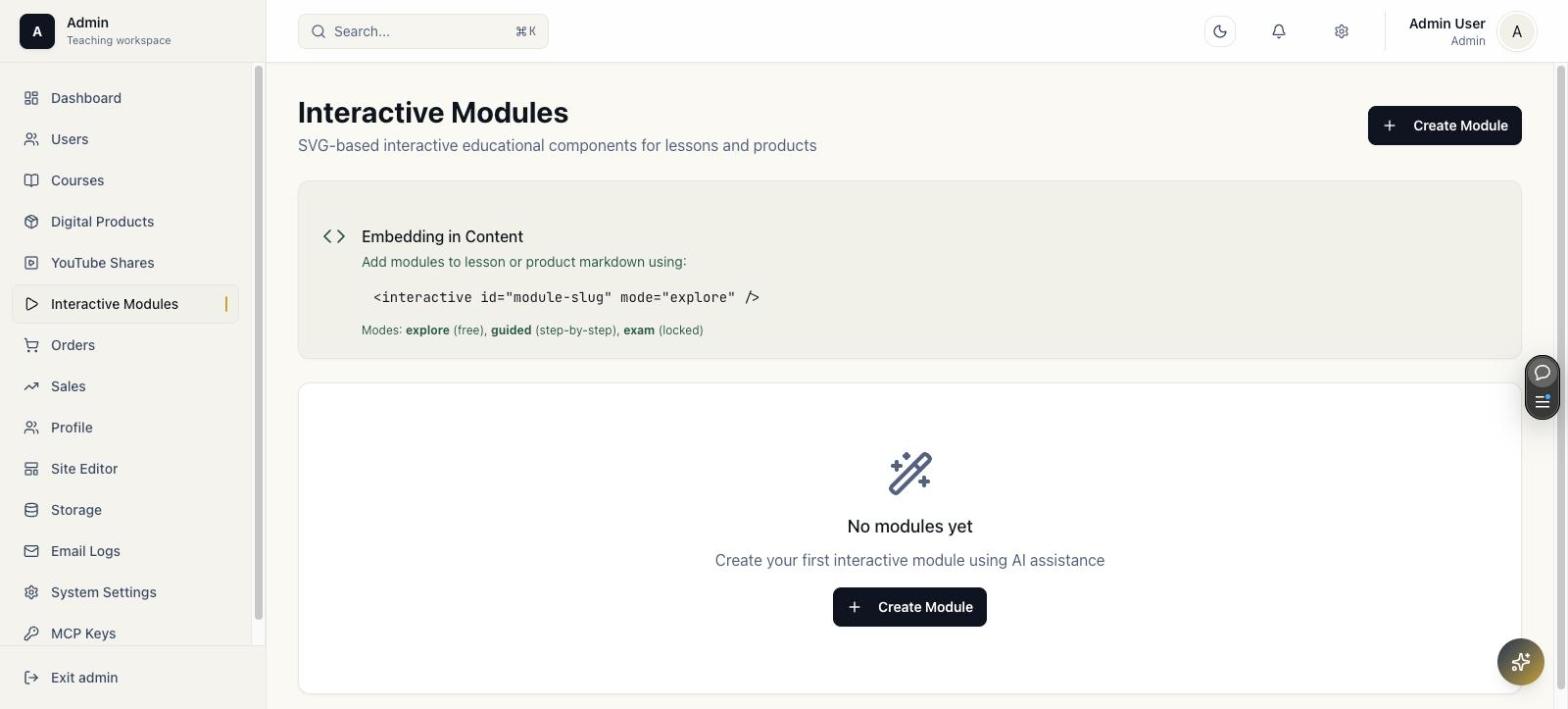
Interactive modules are reusable SVG/GSAP learning widgets that can be embedded inside any lesson or product markdown body.
Embed Syntax
<interactive id="module-slug" mode="explore" />| Mode | Behavior |
|---|---|
explore | Free exploration |
guided | Step-by-step walkthrough |
exam | Locked or assessment-style interaction |
Click Create Module to build a new one with AI assistance.
7. Orders
Path/admin/orders
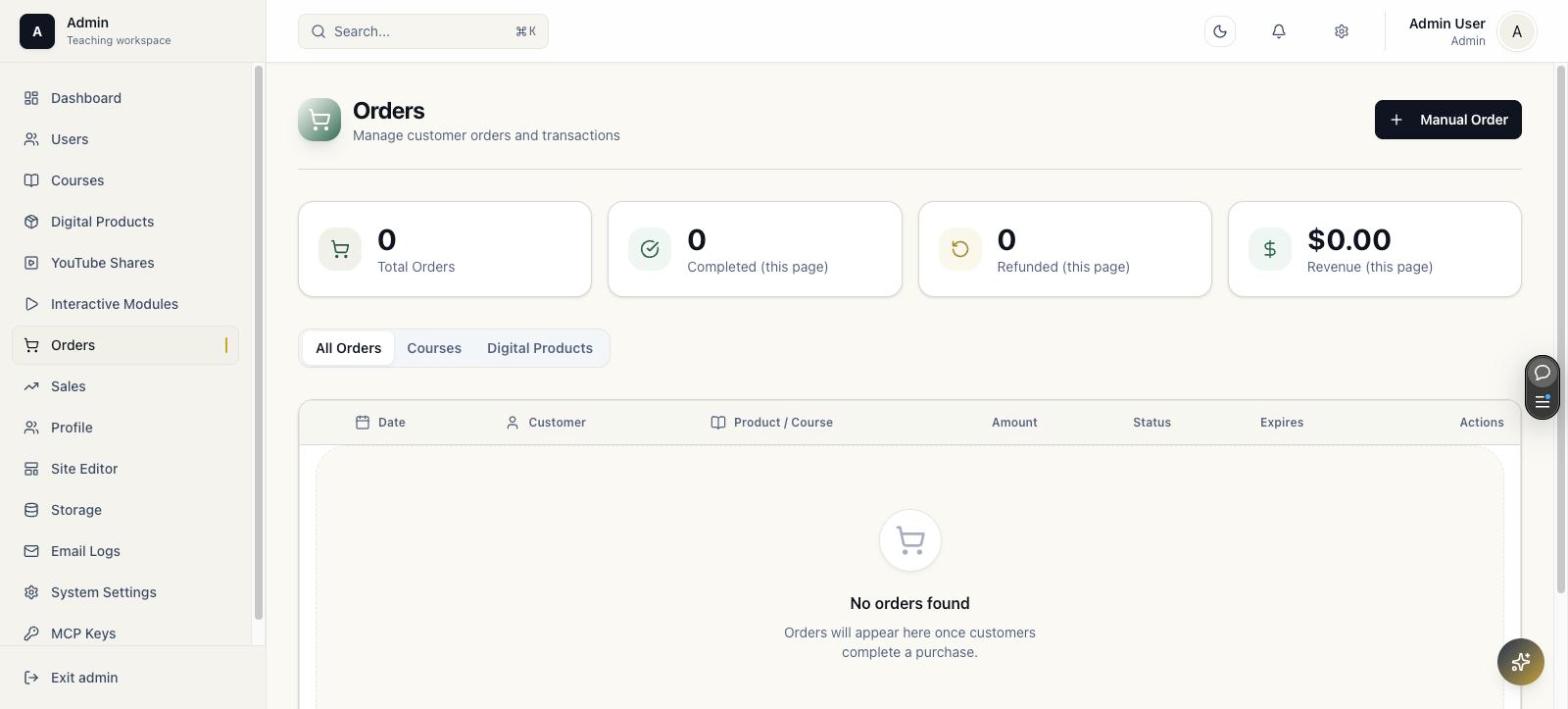
Orders represent course enrollments, digital product purchases, free claims, manual orders, and bank-transfer/pending flows.
Order List
| Column/Feature | Description |
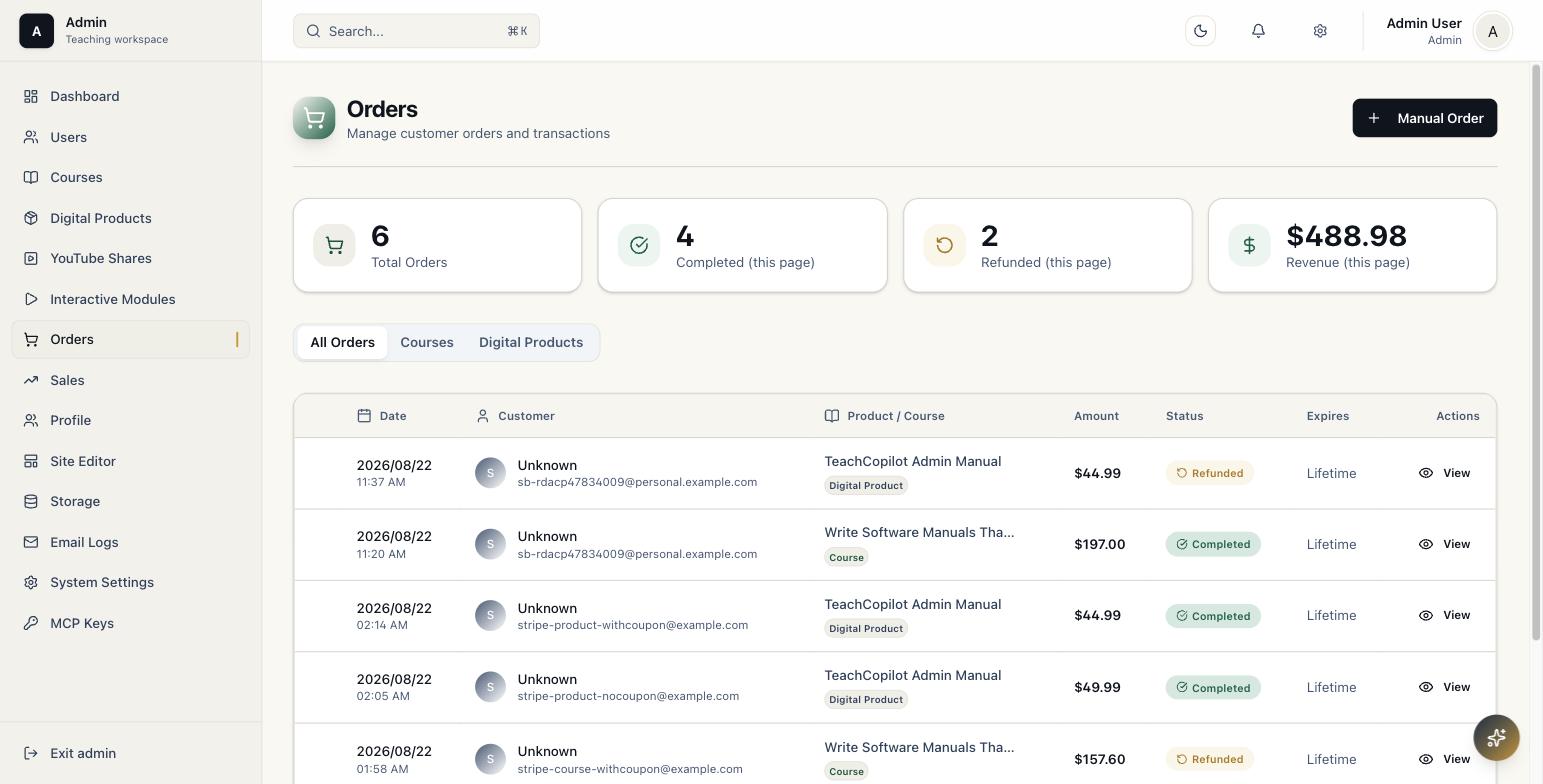
|---|---|
| Stat cards | Total Orders, Completed (this page), Refunded (this page), Revenue (this page) |
| Tabs | All Orders / Courses / Digital Products |
| Manual Order | Admin-created order, e.g. for an offline sale |
| Table columns | Date, Customer, Product/Course, Amount, Status, Expires, Actions |
Order Detail
Path/admin/orders/[id]
| Action | Purpose |
|---|---|
| Confirm pending payment | Completes bank-transfer/manual pending order |
| Fix enrollment | Repairs missing enrollment/ownership when fulfillment failed |
| Send invoice | Re-sends order invoice/confirmation |
| Refund | Initiates or records refund flow where supported |
Operational Notes
- Refund and destructive actions should be used only after confirming provider state.
- Pending bank-transfer orders do not represent successful payment until confirmed.
- Enrollment/ownership repair should be used for fulfillment gaps, not as a normal purchase path.
8. Sales
Path/admin/sales
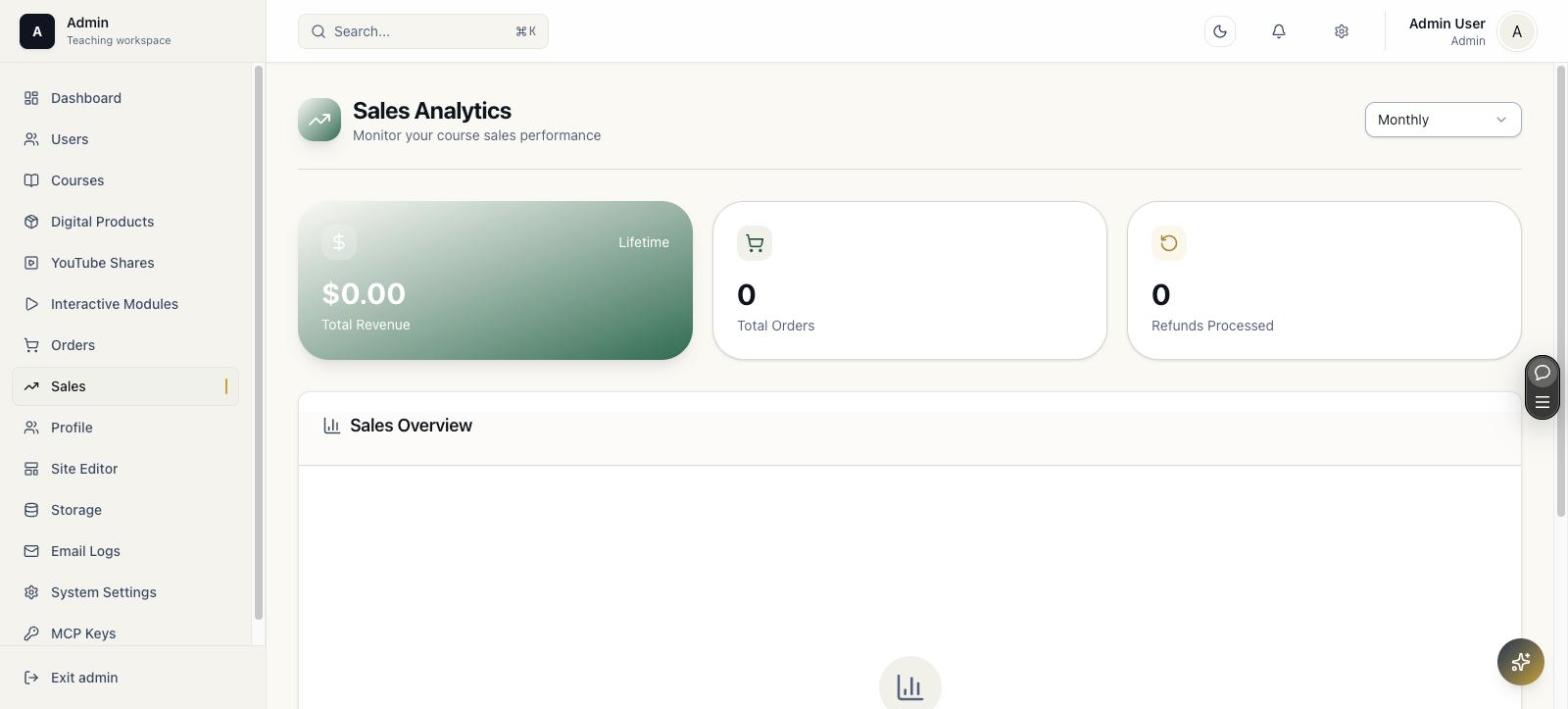
Sales reporting summarizes revenue and sales performance.
| Area | Purpose |
|---|---|
| Total Revenue card | Lifetime revenue, with a period selector (Monthly, etc.) |
| Total Orders / Refunds Processed | Quick counters |
| Sales Overview | Chart of sales over the selected period |
9. Profile
Path/admin/profile
The Profile page edits the currently signed-in admin account (name, avatar).
10. Site Editor
Path/admin/site-editor
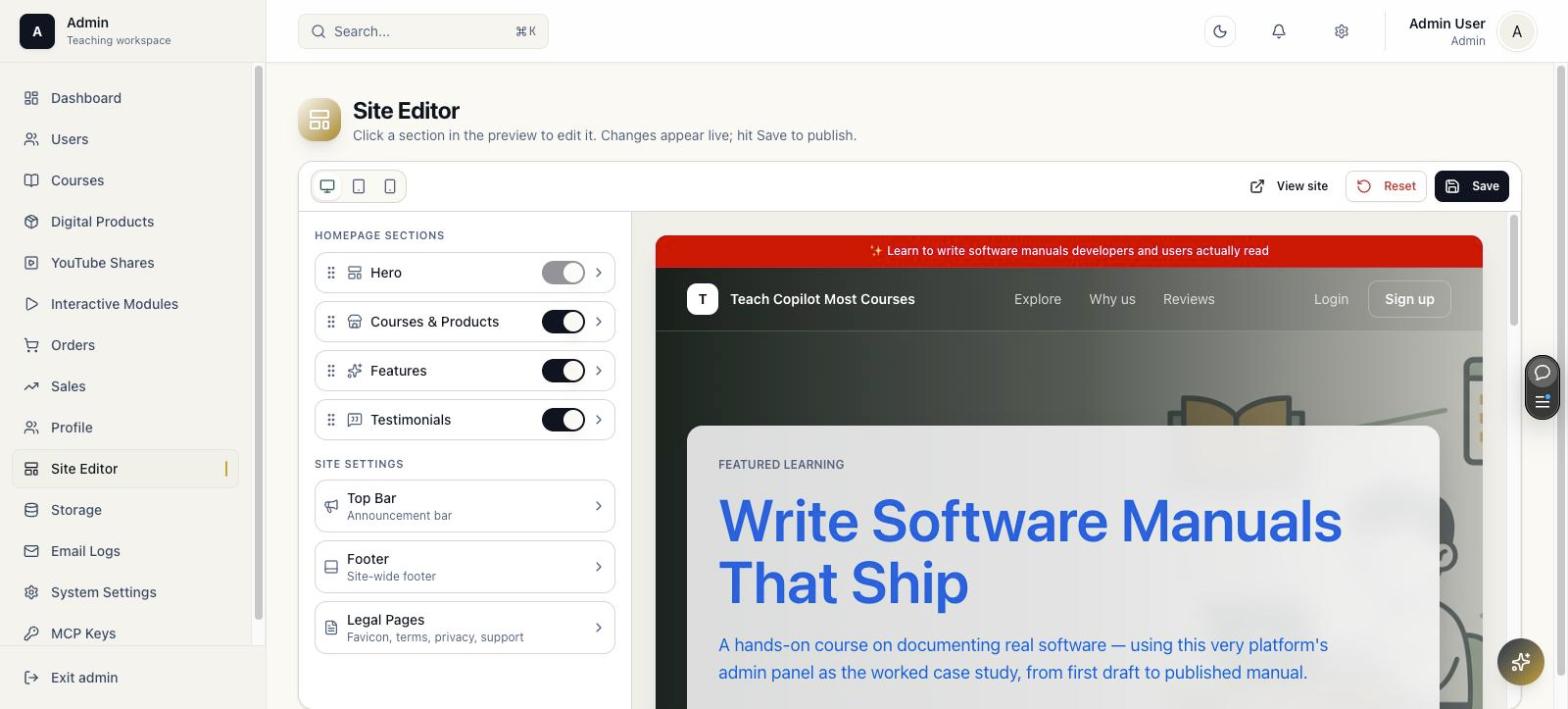
The Site Editor controls homepage and site-level marketing content with a live split preview: edit on the left, see the rendered homepage on the right. Click Save to publish; Reset discards unsaved edits.
| Section (left sidebar) | Purpose |
|---|---|
| Hero | Homepage headline, subheadline, rating badge text, hero image/video, CTA button + link |
| Courses & Products | Informational only. This section auto-lists published courses/products; manage them from their own admin sections |
| Features | Homepage feature grid (icon, title, description per row) |
| Testimonials | Homepage social proof |
| Top Bar | Announcement bar text and colors |
| Footer | Brand name, copyright text, colors |
| Legal Pages | Favicon, Terms of Service, Privacy Policy, Support page content |
10.1 Courses & Products
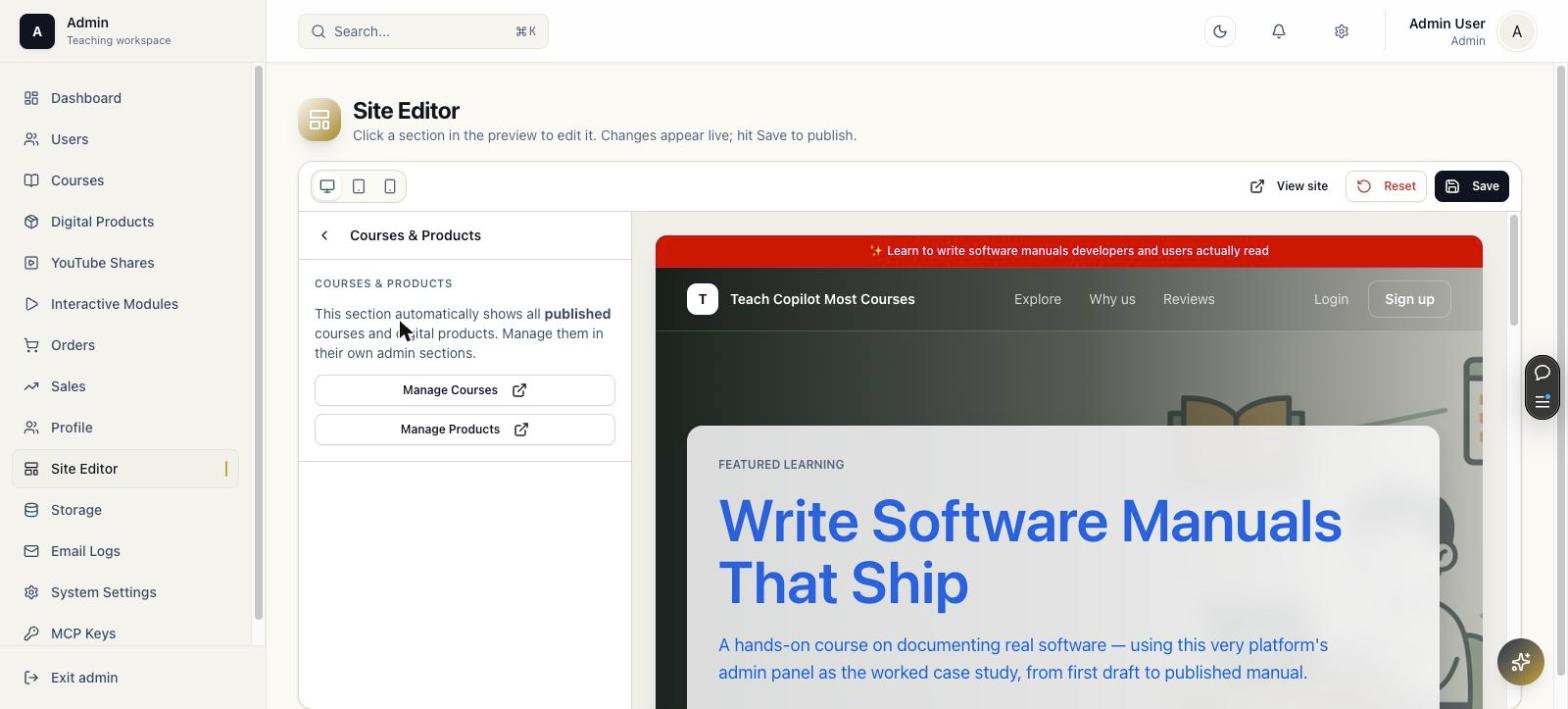
This panel has no editable fields. It explains that the homepage grid automatically shows all published courses and digital products, with Manage Courses / Manage Products shortcuts.
10.2 Features
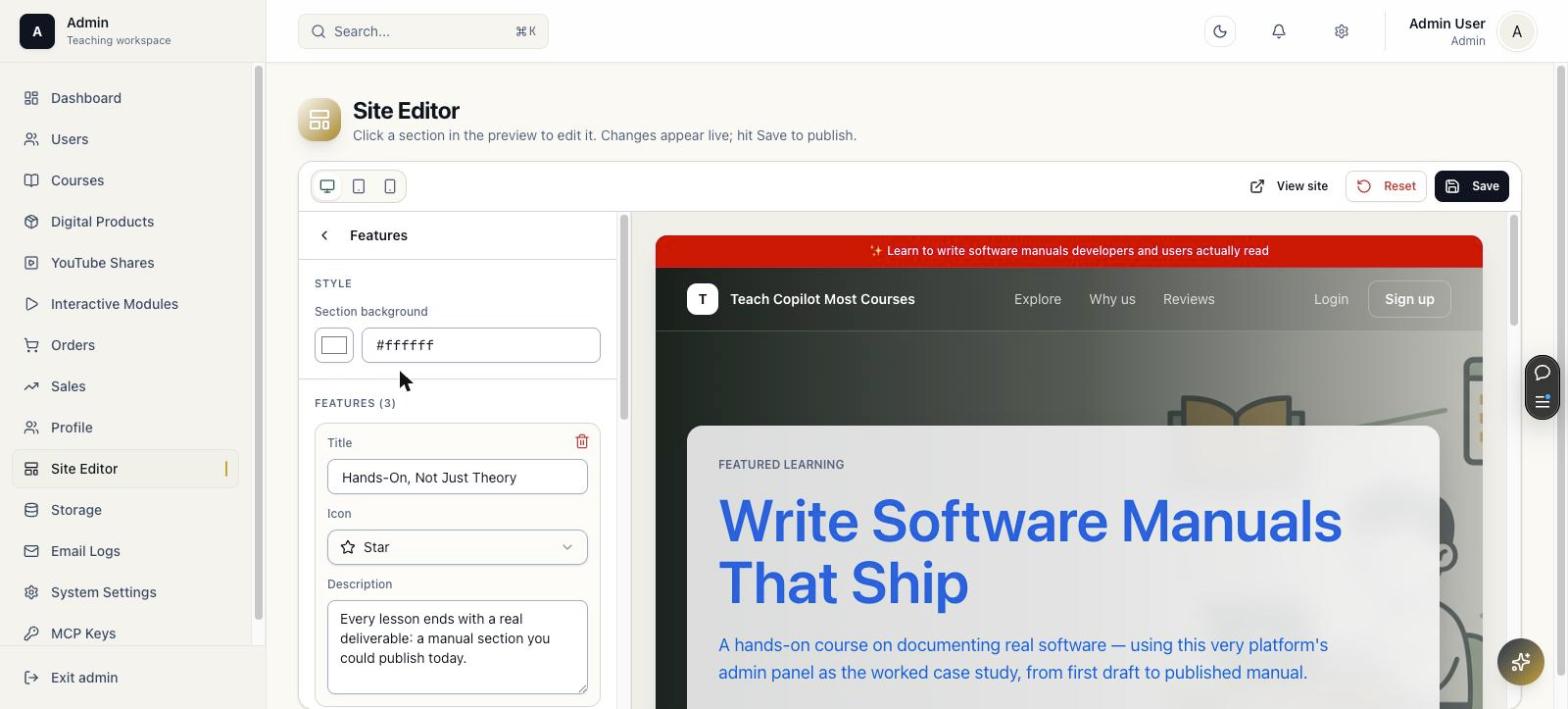
Each feature row has a Title, an Icon picker, and a Description. Reorder or delete rows as needed; section background color is also configurable here.
10.3 Testimonials
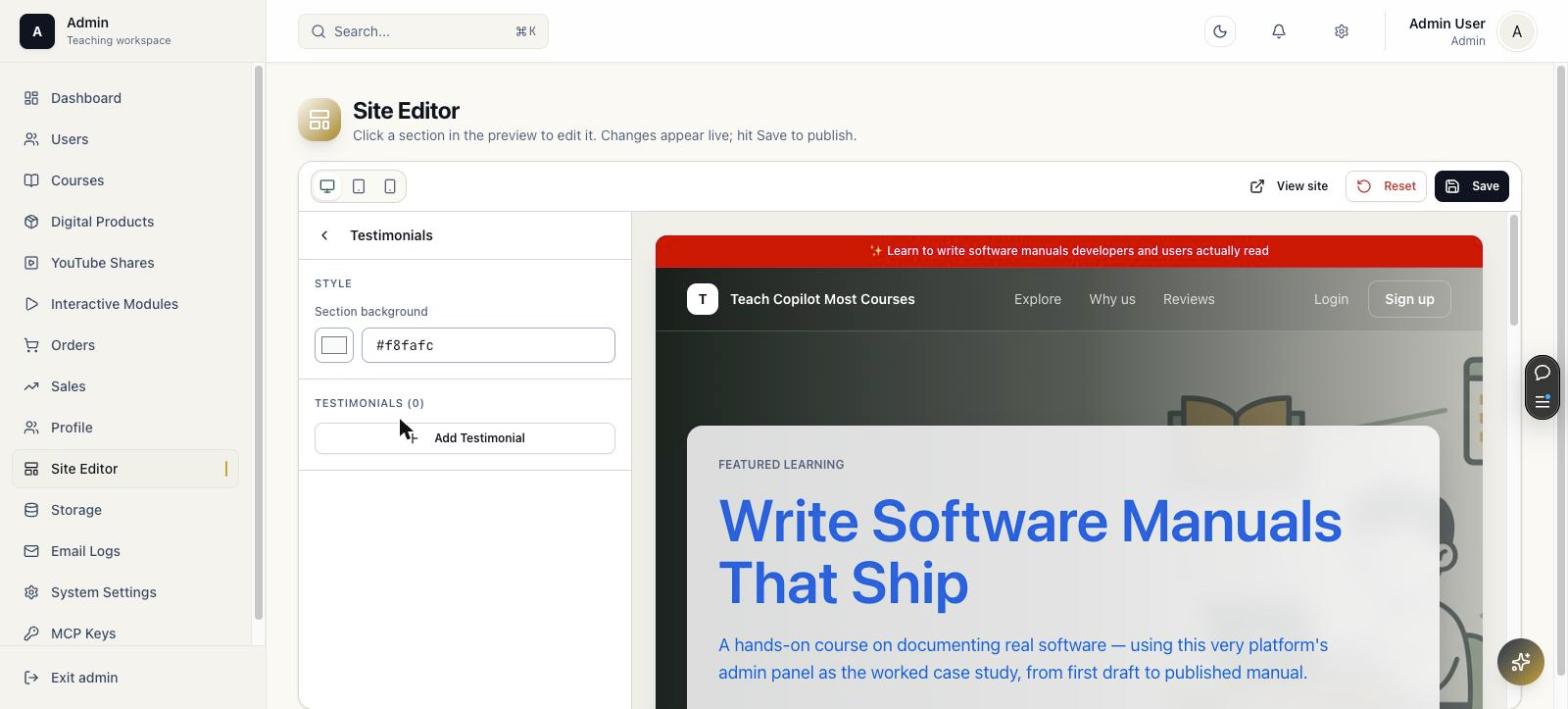
Homepage-level testimonials (distinct from per-course/per-product testimonials). Click Add Testimonial to add a quote, name, and optional photo.
10.4 Top Bar
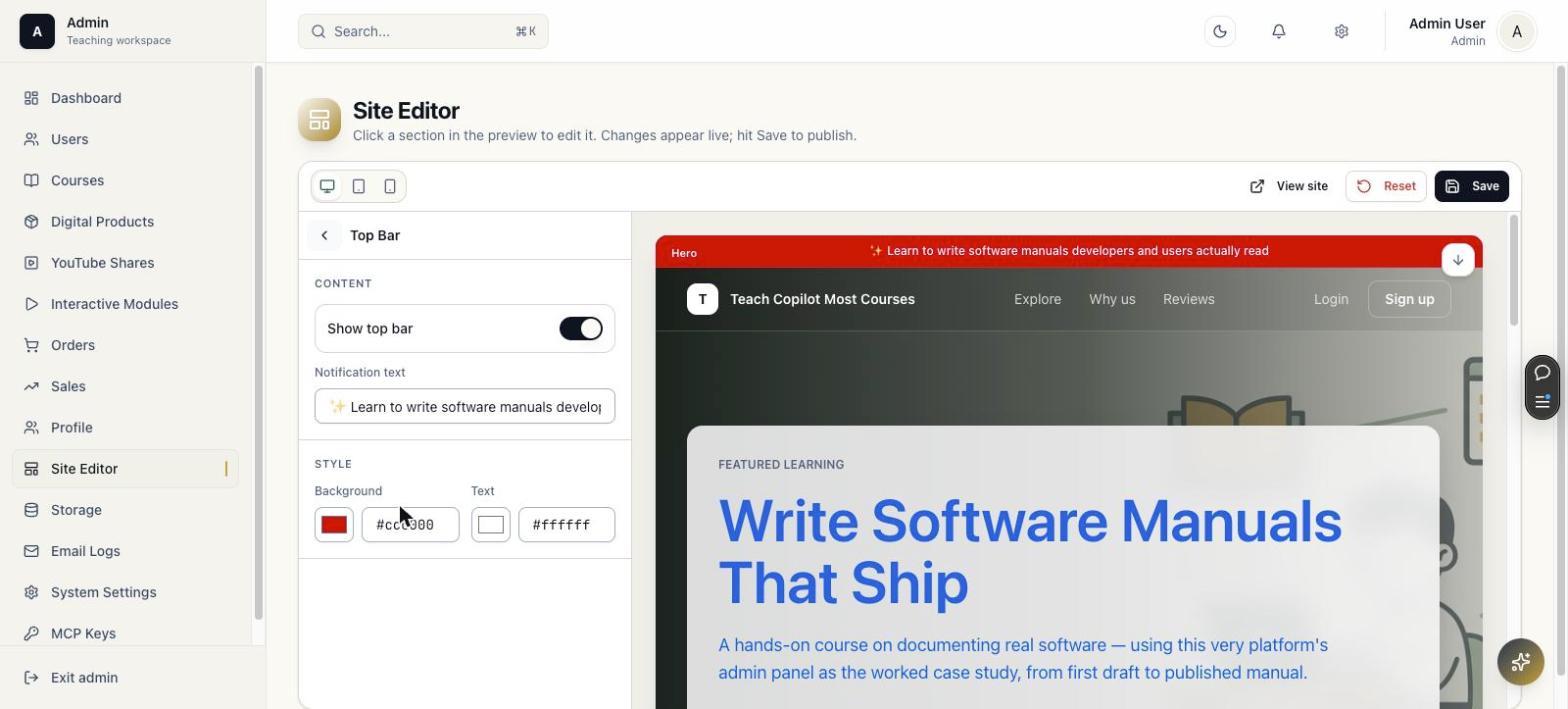
A Show top bar toggle, free-text Notification text, and background/text color pickers for the announcement strip shown above the header.
10.5 Footer
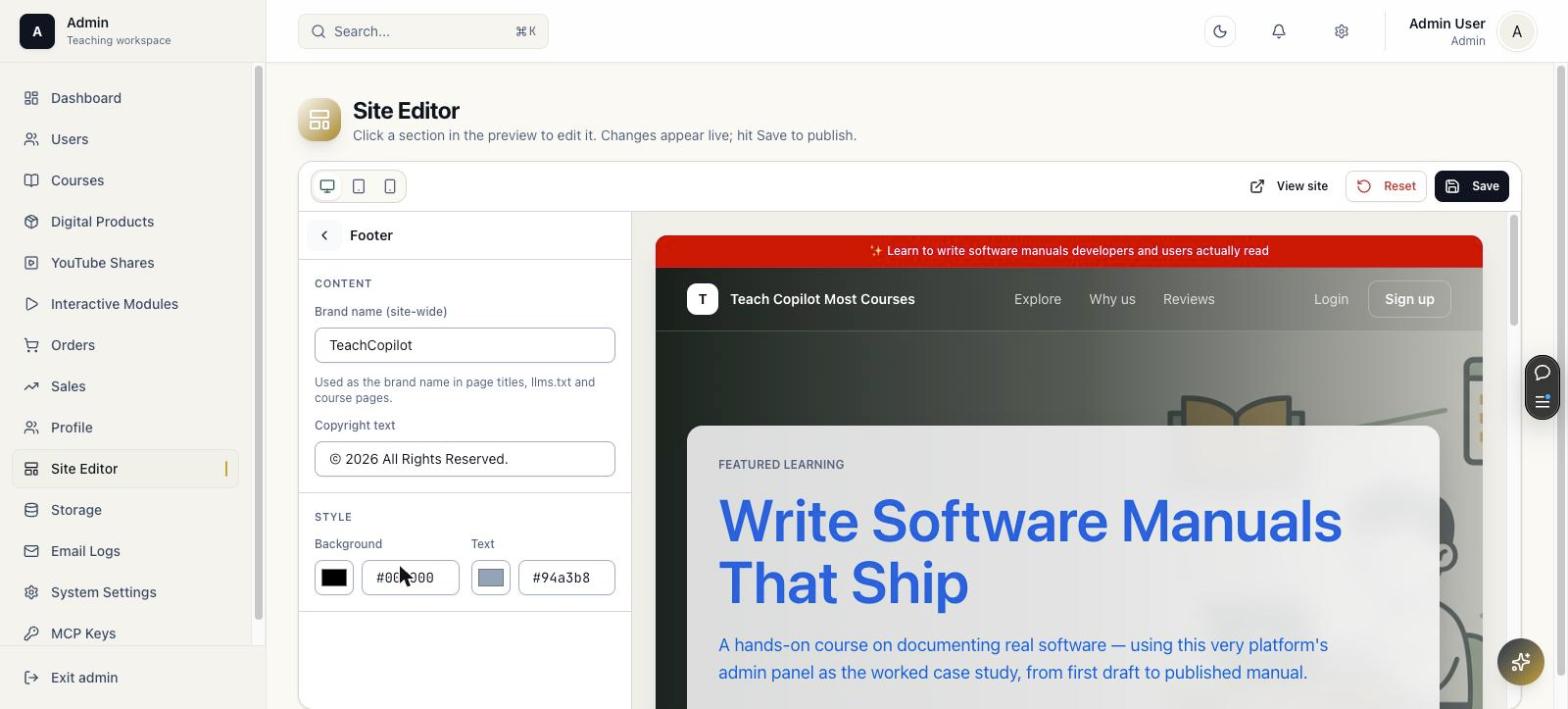
Site-wide brand name (used in page titles, llms.txt, and course pages), copyright text, and footer background/text colors.
10.6 Legal Pages
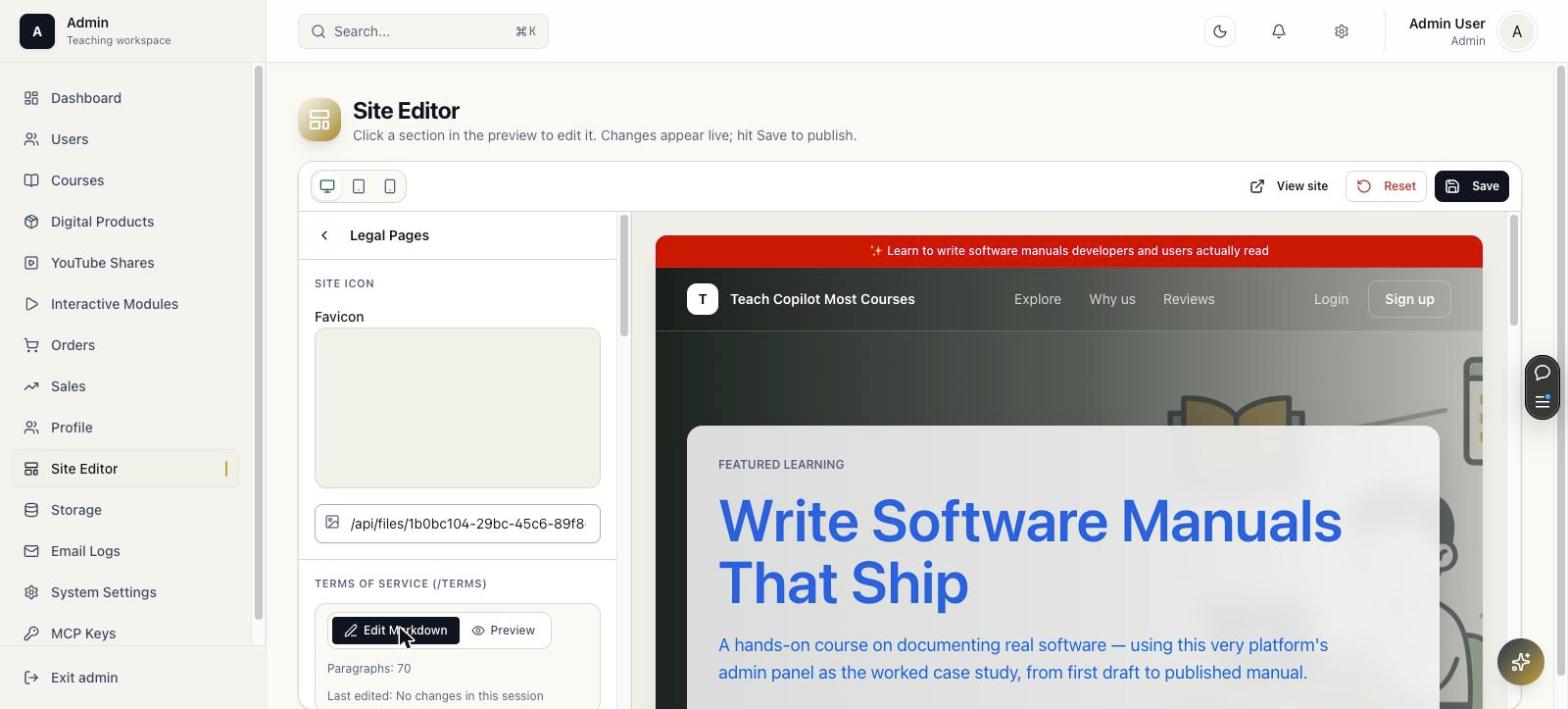
Upload a favicon and edit the markdown body of the Terms of Service page (and, further down this panel, Privacy Policy and Support content) directly in the admin panel.
Publishing Notes
- Changes appear live in the preview immediately; nothing is public until you click Save.
- Use the desktop/tablet/mobile preview toggle at the top of the editor to sanity-check responsive layout before saving.
- Keep homepage copy in English if the product is configured as English-first.
11. Storage
Path/admin/storage
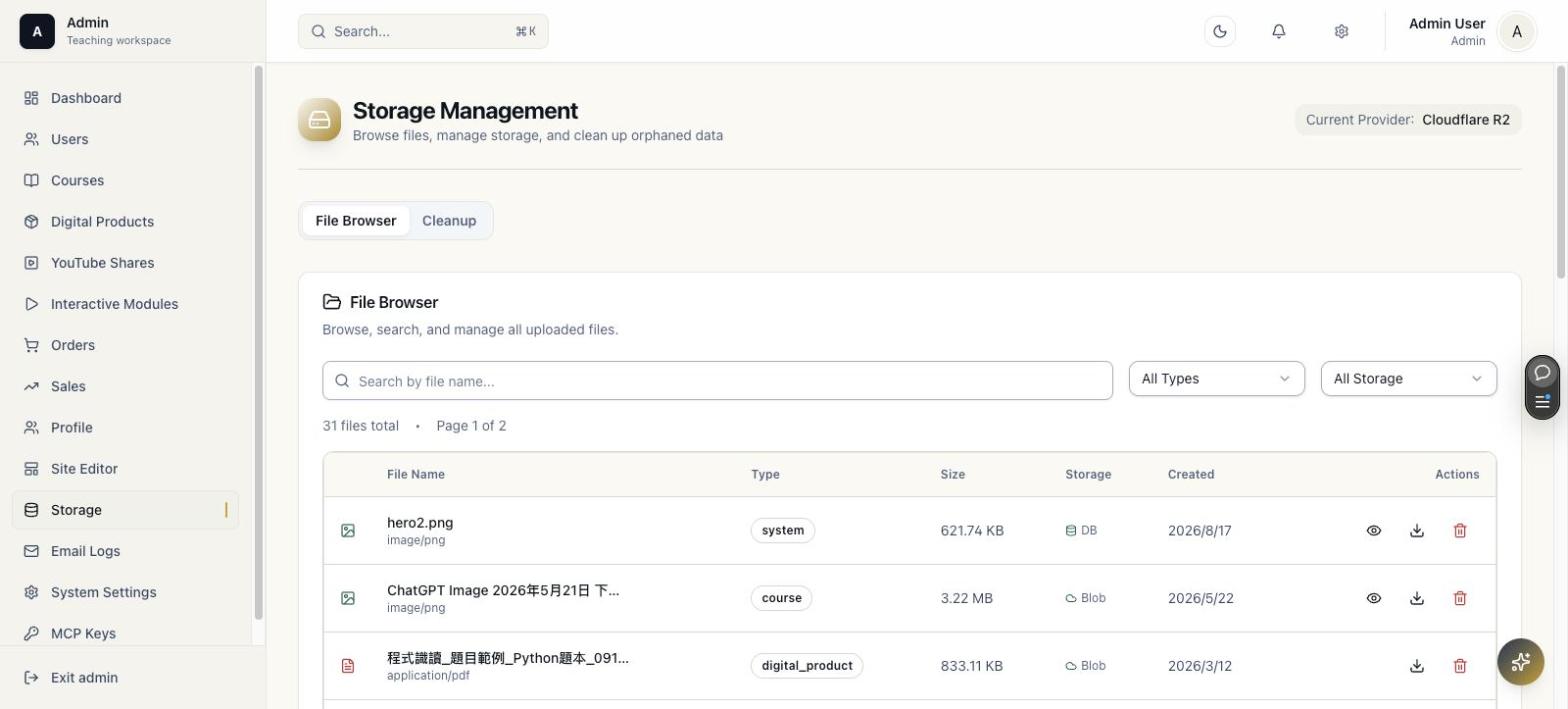
Storage manages every file uploaded through the application, regardless of which storage provider is active (shown top-right, e.g. "Cloudflare R2").
| Feature | Description |
|---|---|
| File Browser tab | Search by filename; filter by Type (system/course/digital_product/...) and Storage (DB vs Blob) |
| File table | Name, type, size, storage backend, created date; preview/download/delete actions |
| Cleanup tab | Identify and remove orphaned files |
Storage provider rule: when uploading through the admin UI or MCP, use the existing upload service. The service reads current storage settings and handles provider-specific writes, database file records, and cleanup behavior. Never insert files rows directly.
12. Email Logs
Path/admin/email-logs
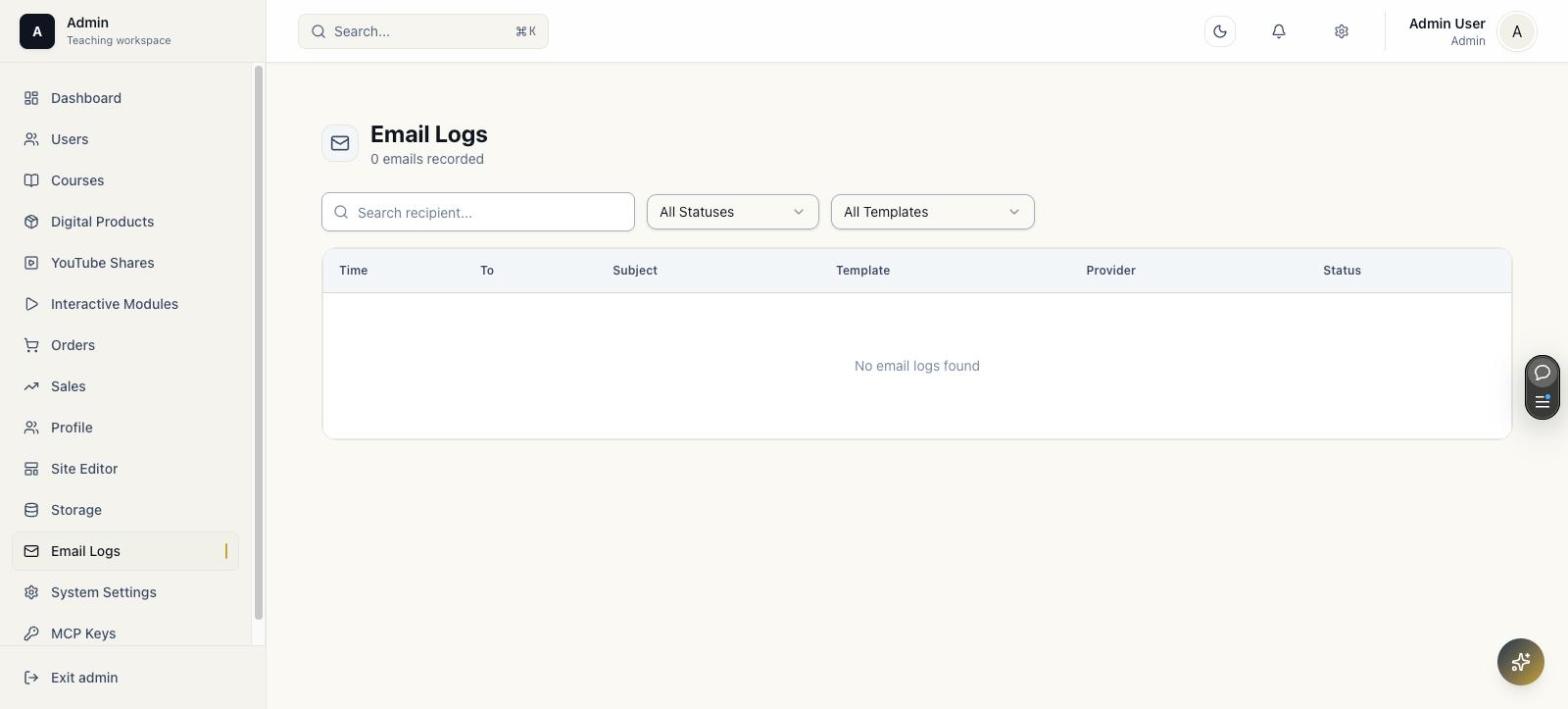
Email Logs show transactional email delivery events.
| Column/Feature | Description |
|---|---|
| Search recipient | Filter the table by "To" address |
| All Statuses / All Templates | Dropdown filters |
| Table columns | Time, To, Subject, Template, Provider, Status |
Use Cases
- Confirm purchase confirmation emails were sent.
- Debug password reset, magic-link, or welcome-email delivery.
- Verify Resend/SendGrid configuration changes through recent delivery logs.
If the active email provider has no API key configured, sends fail silently at the provider level and nothing appears here. Check System Settings → Email first if the log is unexpectedly empty.
13. System Settings
Path/admin/settings
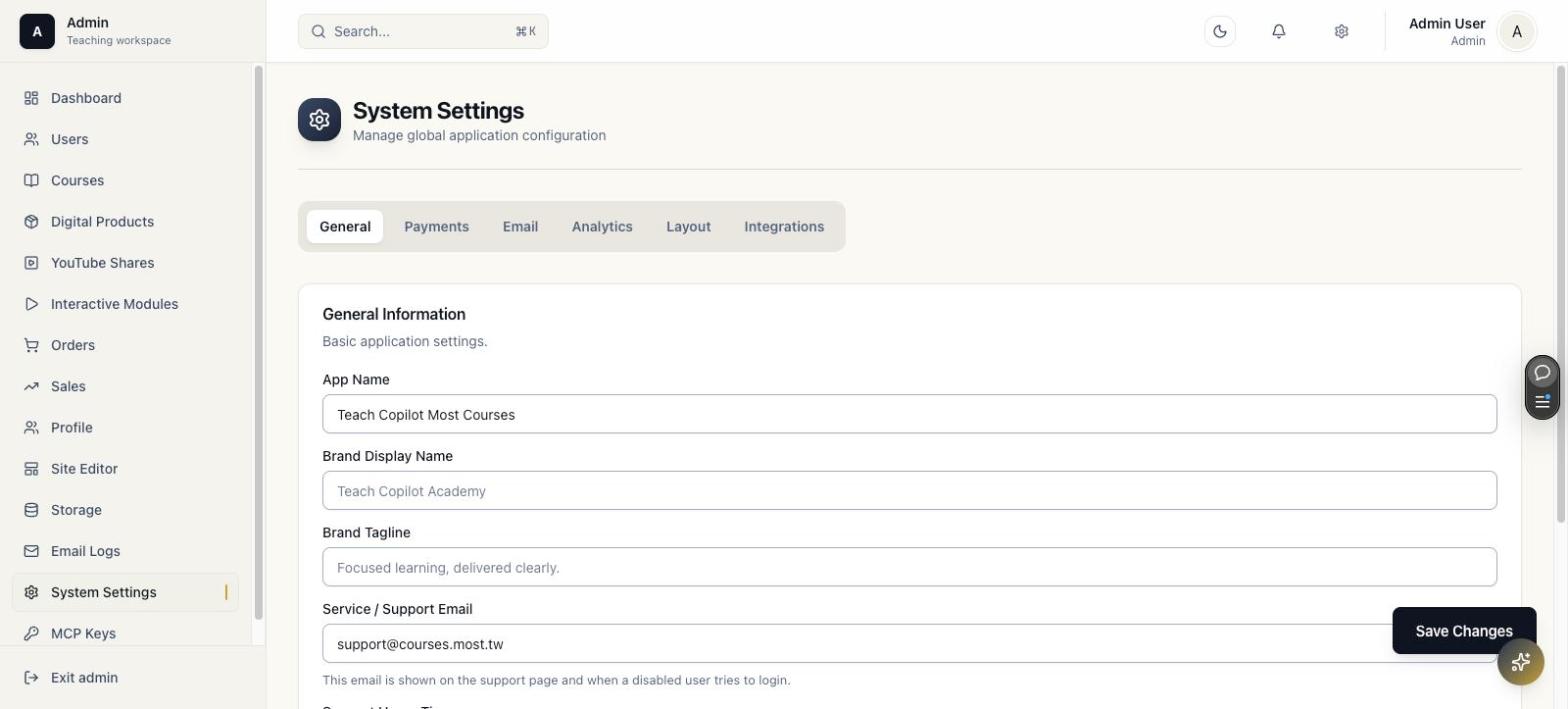
System Settings centralize platform configuration across six tabs: General, Payments, Email, Analytics, Layout, and Integrations.
13.1 General
Shown above. App Name, Brand Display Name, Brand Tagline, Service/Support Email, and support-hours timezone.
13.2 Payments
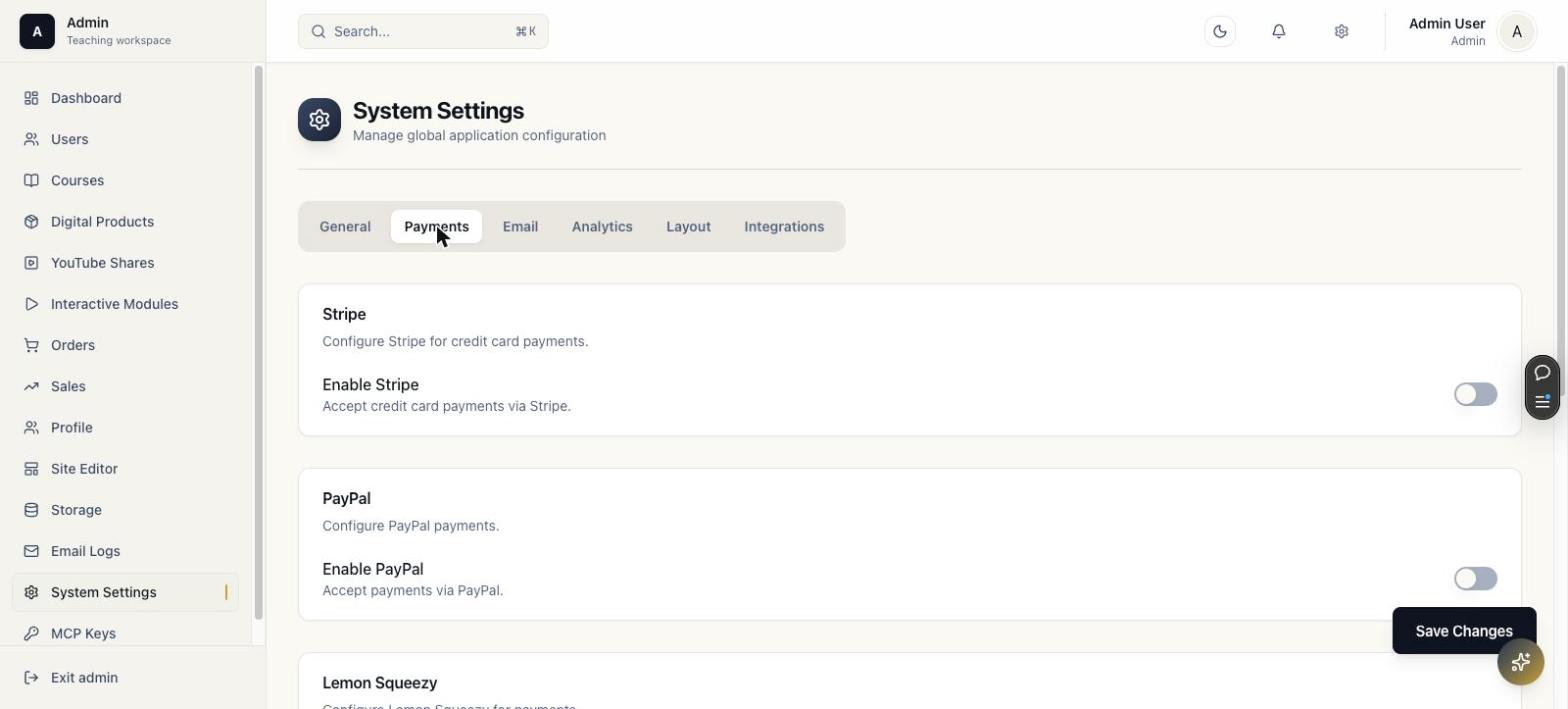
Per-provider enable toggles and credentials for Stripe, PayPal, and Lemon Squeezy, plus bank-transfer configuration further down the tab. Unlike Email, these toggles are independent — enabling Stripe does not disable PayPal, so a checkout page can legitimately offer more than one payment method at once.
13.2.1 Setting Up Stripe (Test Mode)
- Sign in to the Stripe Dashboard, switch to Test mode, and go to Developers → API keys. Copy the Publishable key (
pk_test_...) and Secret key (sk_test_...). - In Admin → Settings → Payments: toggle Enable Stripe on, paste both keys, and save.
- Required, not optional — create a webhook: Developers → Webhooks → Add destination, listen for
checkout.session.completed, point it at the URL shown under Webhook Secret in this tab (https://<your-domain>/api/webhooks/stripe). Copy the signing secret (whsec_...) it gives you back into that field and save again.
Why the webhook step isn't skippable: Stripe Checkout Sessions fulfill entirely through the webhook — checkout.session.completed is what creates the transaction record and grants course/product access. Found by testing the full purchase flow end-to-end: without a configured webhook, Stripe's own checkout page shows a completely convincing "Payment Confirmed — You're in" success screen, and the card is genuinely charged, but the platform never learns the purchase happened — no order appears in Admin → Orders, no account is created, and the buyer has no access to anything. There is no error anywhere in the UI to indicate this. Always place a real test purchase after setup and confirm it shows up in Orders before considering Stripe configured.
13.2.2 Setting Up PayPal (Sandbox)
- Sign in to the PayPal Developer Dashboard and create (or open) a REST API app under Sandbox.
- Copy the Client ID and Secret.
- In Admin → Settings → Payments: toggle Enable PayPal on, paste both values, and save. Webhook ID is optional — leave it blank unless you specifically want PayPal's own delivery logs as a secondary audit trail.
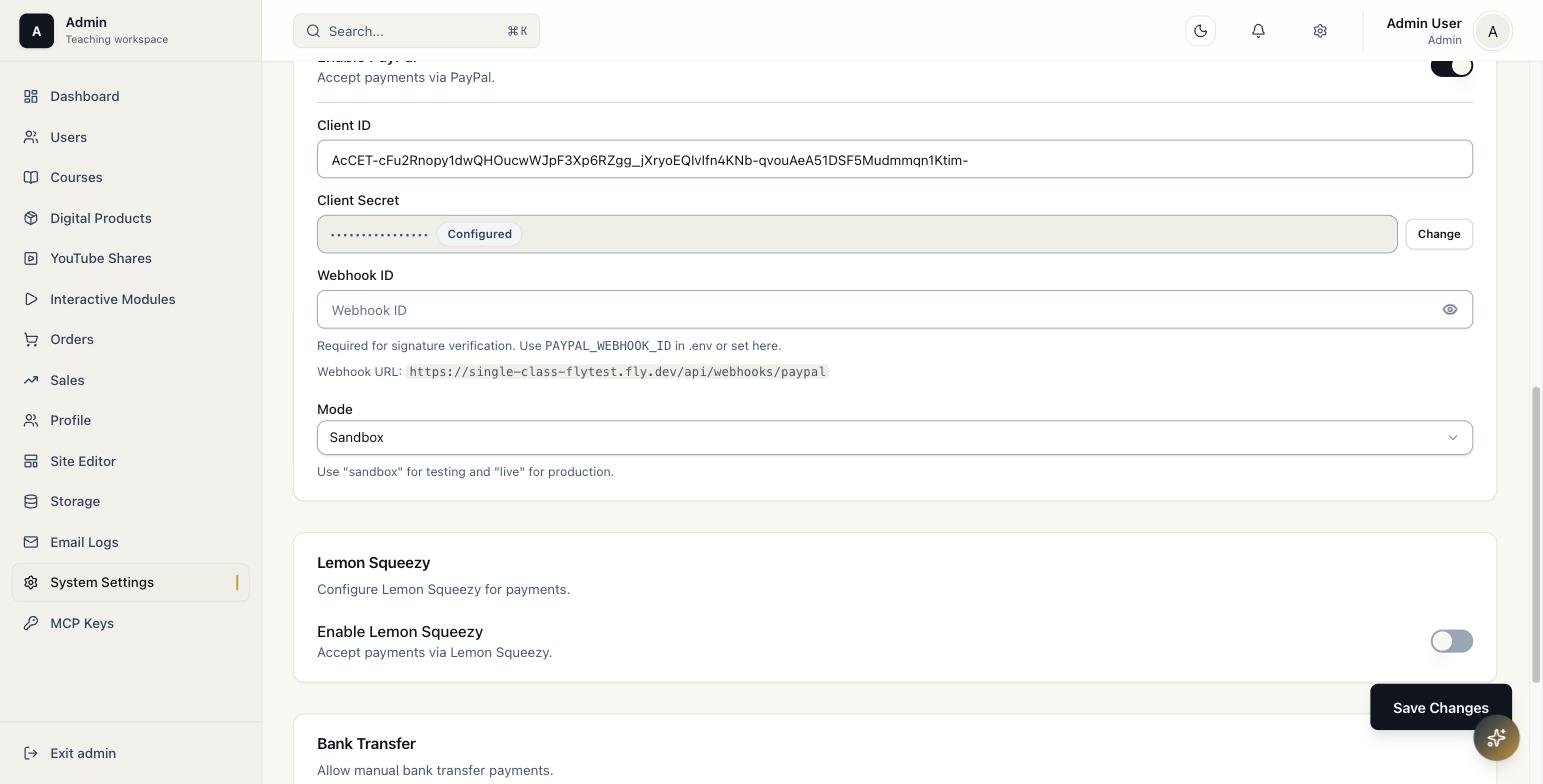
Unlike Stripe, the webhook is not required for fulfillment. PayPal's checkout uses a different architecture: when the buyer approves payment, the browser calls a capture action directly, which synchronously captures the order and grants access in the same request — there's no waiting on an asynchronous event. Confirmed by testing with the Webhook ID field left empty and no webhook subscription pointing at this deployment at all: purchases still fulfilled correctly every time. A webhook subscription (Testing Tools → Webhook Simulator, or a real one under Apps & Credentials) is only useful as a secondary safety net for refund/dispute events, not for the initial purchase.
13.2.3 Coupons at Checkout
A coupon is created against exactly one course or one digital product (Pricing tab → Coupon Management/Coupons → enter a code, percentage or fixed amount, optional usage limit and expiry). On the public checkout page, the buyer expands I have a coupon, enters the code, and clicks Apply to preview the discounted total before paying — the discount is calculated the same way regardless of which payment provider is used.
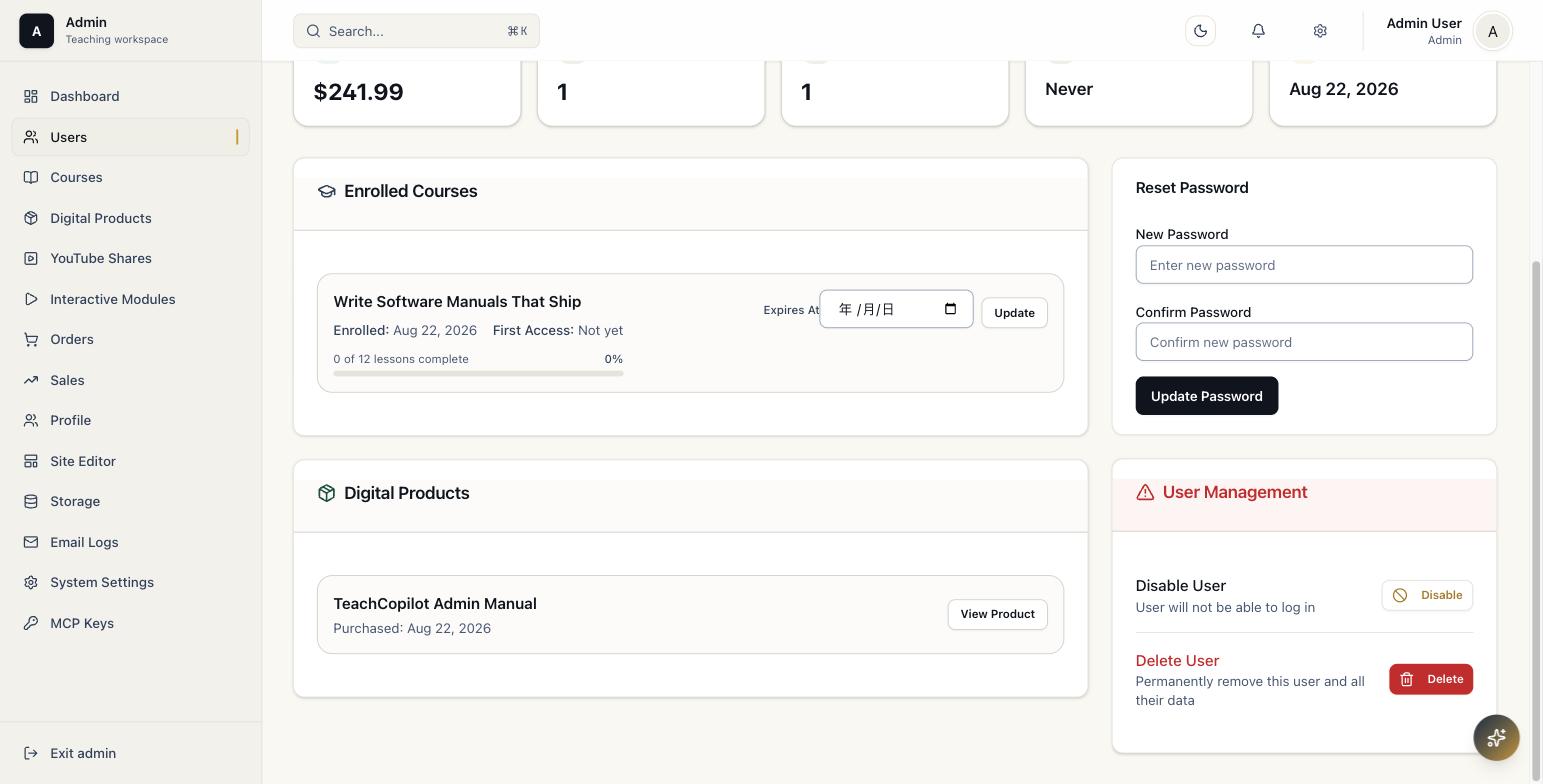
Verified end-to-end (2026-08-22): tested all four combinations of course/digital-product × with/without coupon through Stripe test mode, each as a genuinely signed-out guest checkout. Every purchase correctly: charged the discounted amount when a coupon was applied, appeared in Admin → Orders as Completed, auto-created a new student account with the exact purchase amount as Total Spend, and granted real course enrollment / product ownership (confirmed via each account's own "Enrolled Courses" / "Digital Products" panel, not just the order list).
PayPal verified end-to-end (2026-08-22): tested a course purchase with no coupon and a digital-product purchase with a coupon applied, both through PayPal Sandbox as a genuinely signed-out guest checkout with a real Sandbox test buyer account. Note that PayPal's own checkout popup requires a real user click to open (browsers block script-triggered clicks on it as a popup) and, after approval, a second explicit confirmation on PayPal's own review page — logging in alone does not complete the purchase. Both test purchases correctly charged the discounted amount when the coupon was applied, appeared in Admin → Orders as Completed, and granted real access: course enrollment and digital-product ownership were both confirmed on the same buyer account's "Enrolled Courses" / "Digital Products" panel, and the order-confirmation email was confirmed sent in Admin → Email Logs.
13.2.4 Refunds
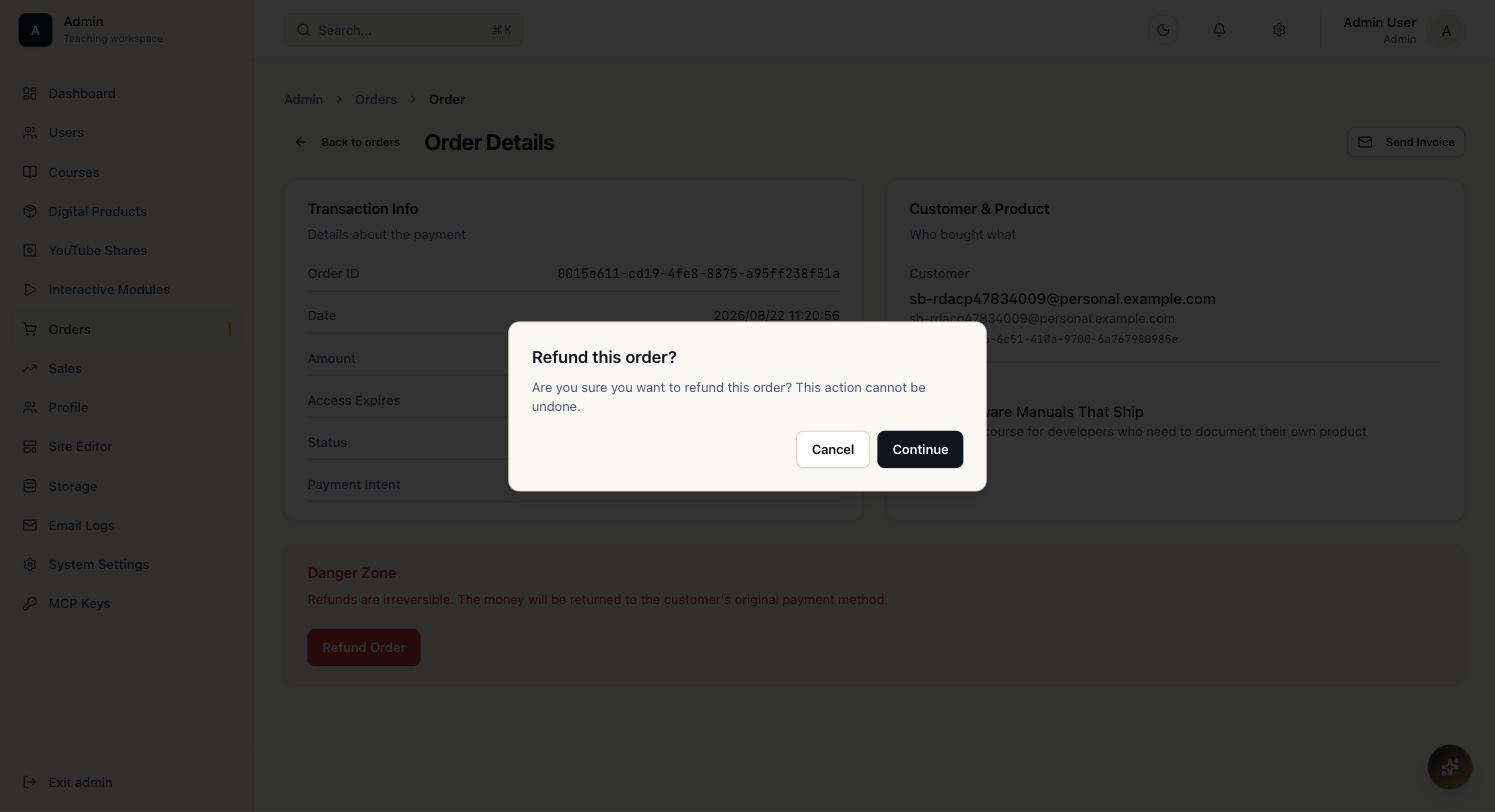
Open any Completed order (Admin → Orders → an order row) and scroll to the red Danger Zone card, which only appears while the order is Completed. Refund Order asks for a single confirmation, then issues a full refund — there is no partial-amount or reason field. Once refunded, the button disappears, so the same order can't be refunded twice.
- Open the order and confirm it's still Completed, then click Refund Order in the Danger Zone card.
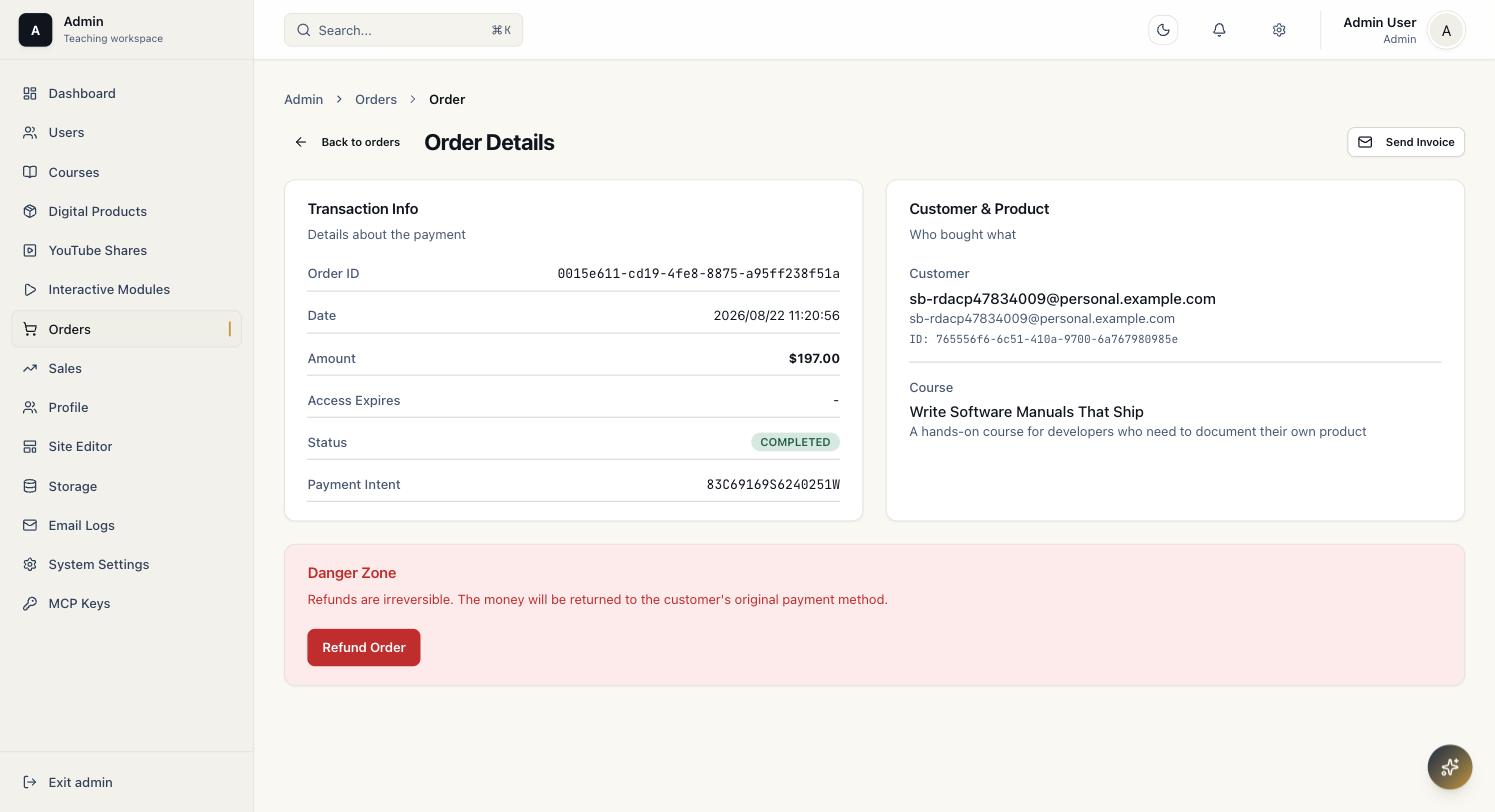
- Confirm the "Refund this order?" dialog — this is the only chance to back out, since the action is irreversible.
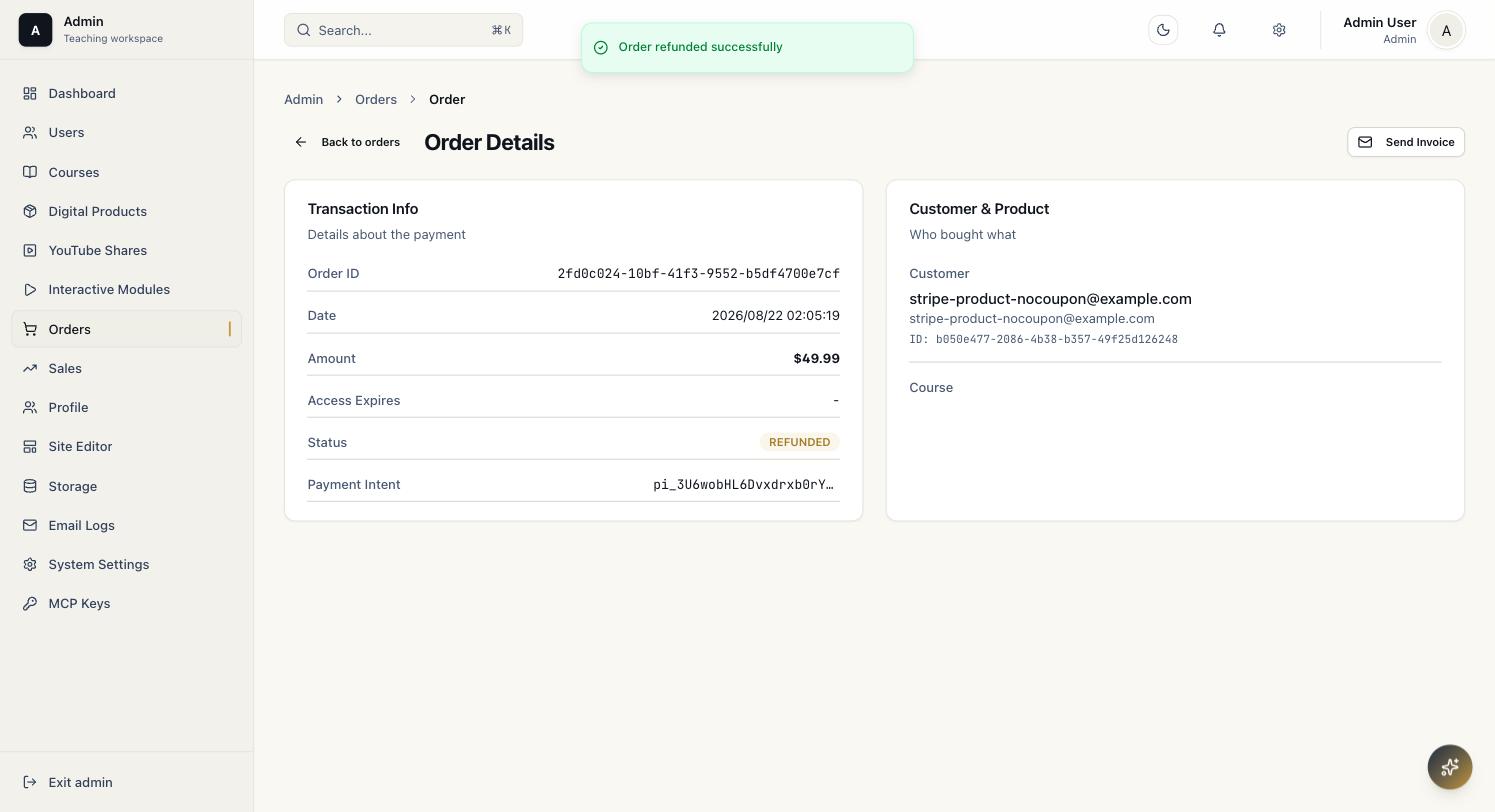
- The button briefly shows Processing Refund... while the server calls the real payment provider's refund API, then a toast confirms success and the order's Status flips to Refunded.
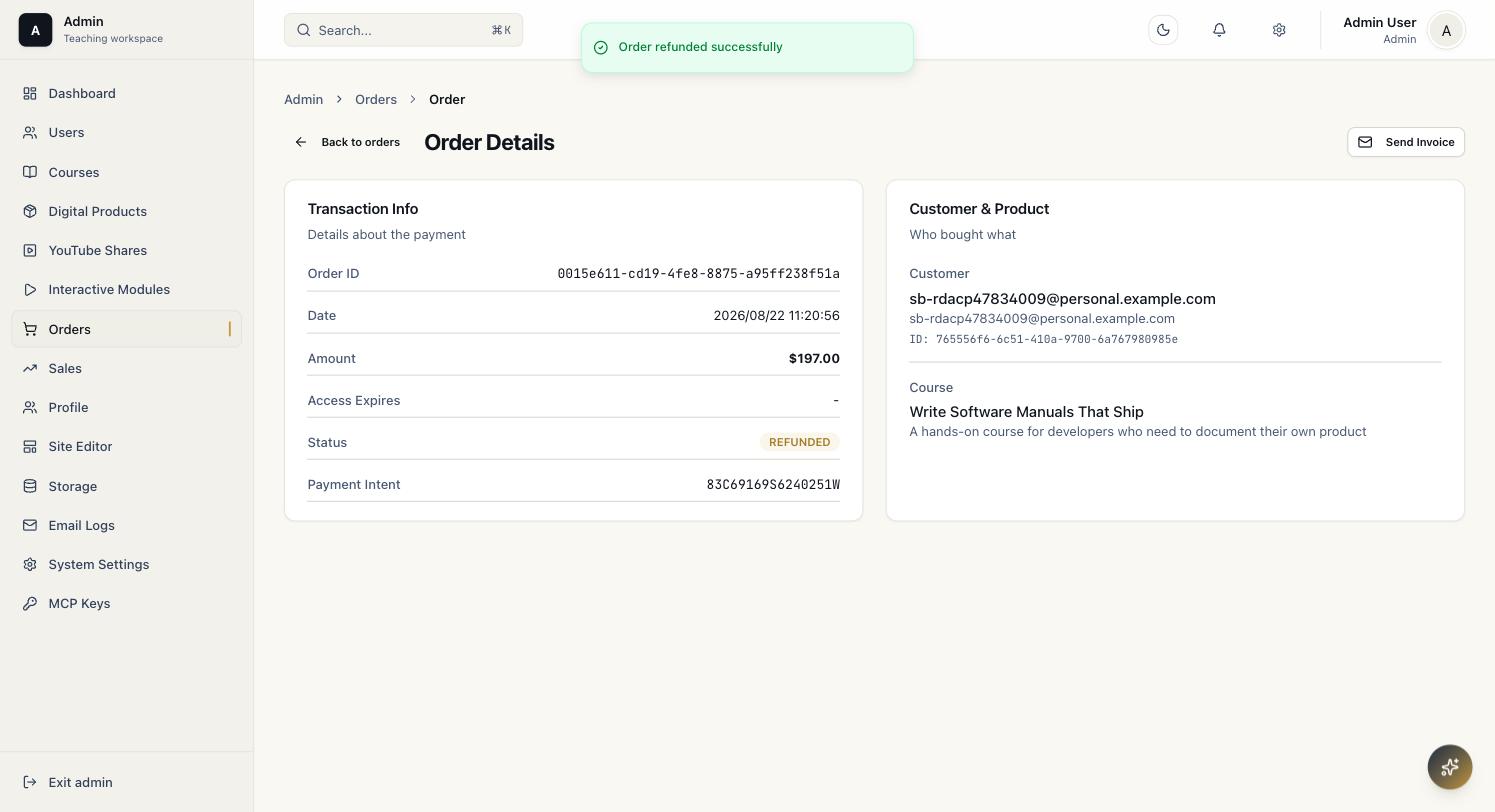
Verified end-to-end (2026-08-22), full 2×2 coverage: refunded one order from every course/digital-product × Stripe/PayPal combination, each previously purchased as a genuinely signed-out guest checkout.
| Provider | Item | Coupon | Amount | Provider API confirms | Access after refund |
|---|---|---|---|---|---|
| PayPal | Digital product | Yes (10%) | $44.99 | REFUNDED | Ownership row removed |
| PayPal | Course | No | $197.00 | REFUNDED | Enrollment removed |
| Stripe | Course | Yes (20%) | $157.60 | refunded: true | Enrollment removed |
| Stripe | Digital product | No | $49.99 | refunded: true | Ownership row removed |
Every row was confirmed as a genuine provider-side refund by querying Stripe's and PayPal's own REST APIs directly after clicking Refund Order in the admin UI — not just trusting the local status flip. Every buyer's account was then checked individually: Total Spend dropped by exactly the refunded amount, and the corresponding "Enrolled Courses" / "Digital Products" panel entry was gone, confirming real access revocation rather than a cosmetic status change.
Known limitation: refunding a coupon-discounted order does not return the coupon's usage slot — usageCount stays exactly where it was before the refund, confirmed on both coupon-discounted refunds above. If a coupon has a usage limit, a refunded order still permanently counts against it; the only workaround today is to manually raise the limit or issue a fresh code.
13.3 Email
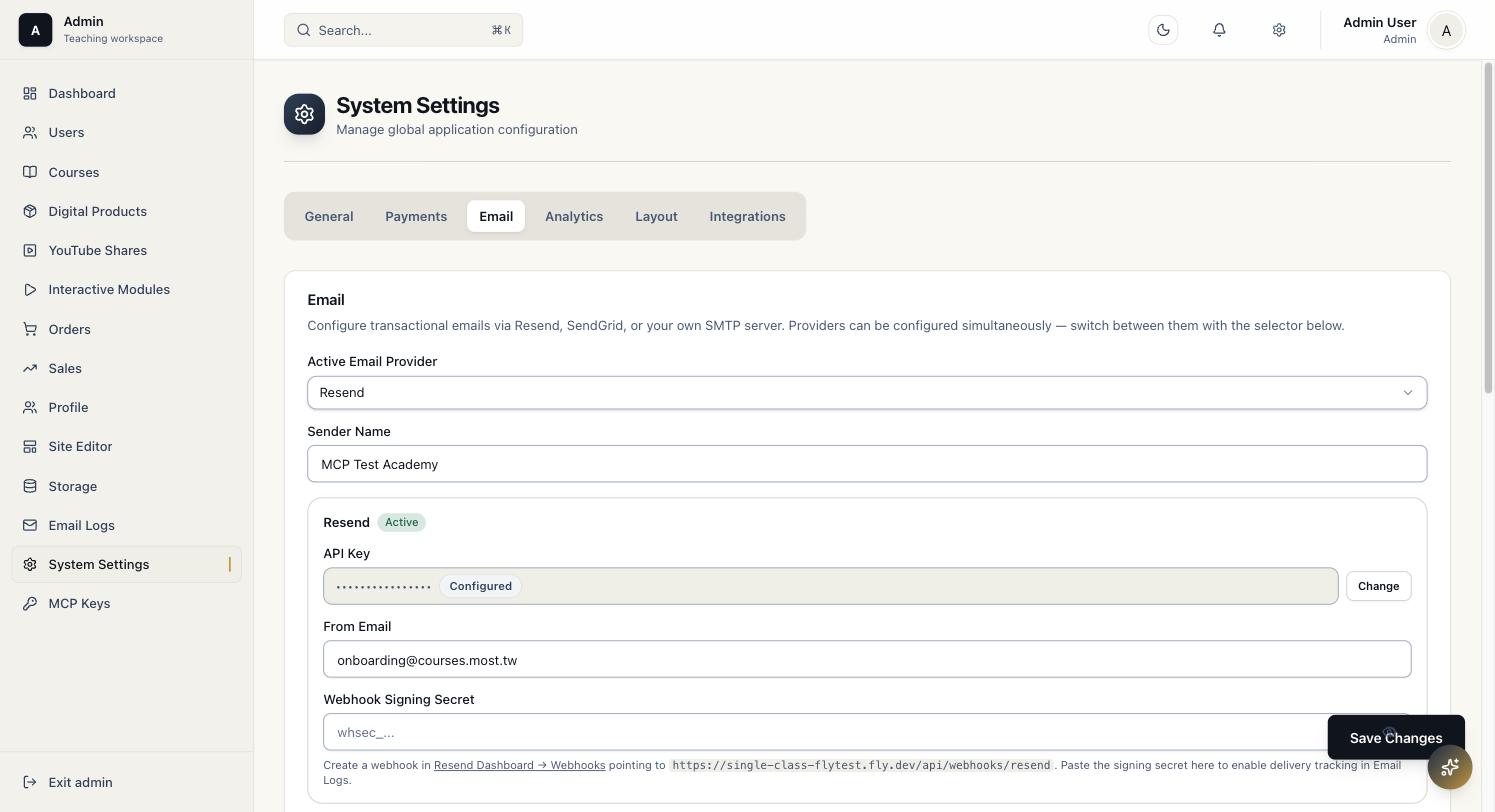
Three providers can be configured simultaneously — Resend, SendGrid, and SMTP — each keeps its own credentials, and the Active Email Provider dropdown at the top picks which one actually sends. Switching providers later is instant: no redeploy, just re-save with a different selection. Sender Name applies across all three. Whichever provider is currently active shows an Active badge on its card, as shown above.
13.3.1 Setting Up Resend
- Sign in at resend.com/api-keys and click Create API key. "Full access" is fine for a single instance; name it something you'll recognize later (e.g. the app's domain).
- Pick a From Email domain. Either use Resend's shared sandbox address (
onboarding@resend.dev— works immediately, but only reliably delivers to your own account's verified email) or, for real customer-facing sending, verify your own domain first under Domains (add the DNS records Resend gives you, wait for the "Verified" badge). - Back in Admin → Settings → Email: set Active Email Provider to Resend, fill in Sender Name, paste the
re_...key into API Key, and set From Email to an address at your verified domain (or the sandbox address). - Click Save Changes.
- Optional — delivery tracking: create a webhook in Resend Dashboard → Webhooks pointing to
https://<your-domain>/api/webhooks/resend, then paste its signing secret (whsec_...) into Webhook Signing Secret. Without this, emails still send — Email Logs just won't show delivered/bounced status updates after the fact.
13.3.2 Testing the Configuration
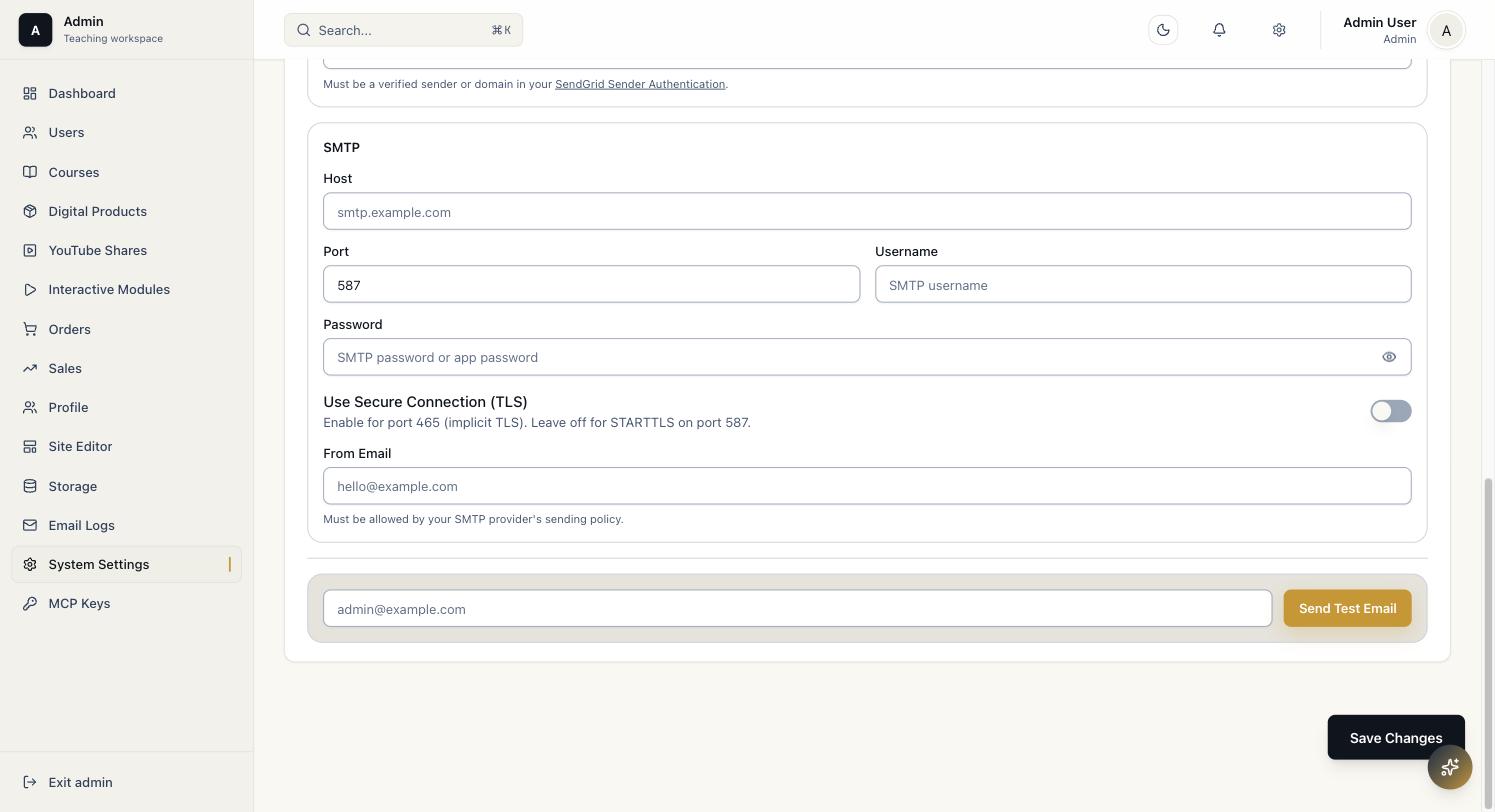
Every provider card ends with a Send Test Email field. Enter any address, click send, and check three places to confirm it actually worked end-to-end rather than just being accepted by the form:
- The in-app toast confirms the request was submitted ("Test email sent") — this only means the API call succeeded, not that the message was delivered.
- Admin → Email Logs records the attempt with recipient, subject, provider, and status (
sentmeans Resend/SendGrid/SMTP accepted it). - The provider's own dashboard is the actual source of truth for delivery — e.g. Resend Dashboard → Emails shows each message's real status (
Delivered,Bounced, etc.), which is the only way to catch a misconfigured From-domain that the app-side "sent" status won't reveal.
Verified working end-to-end on 2026-08-21: Resend configured with a verified courses.most.tw sender, test email sent to an external Gmail address, confirmed Delivered in both Email Logs and the Resend dashboard.
13.4 Analytics
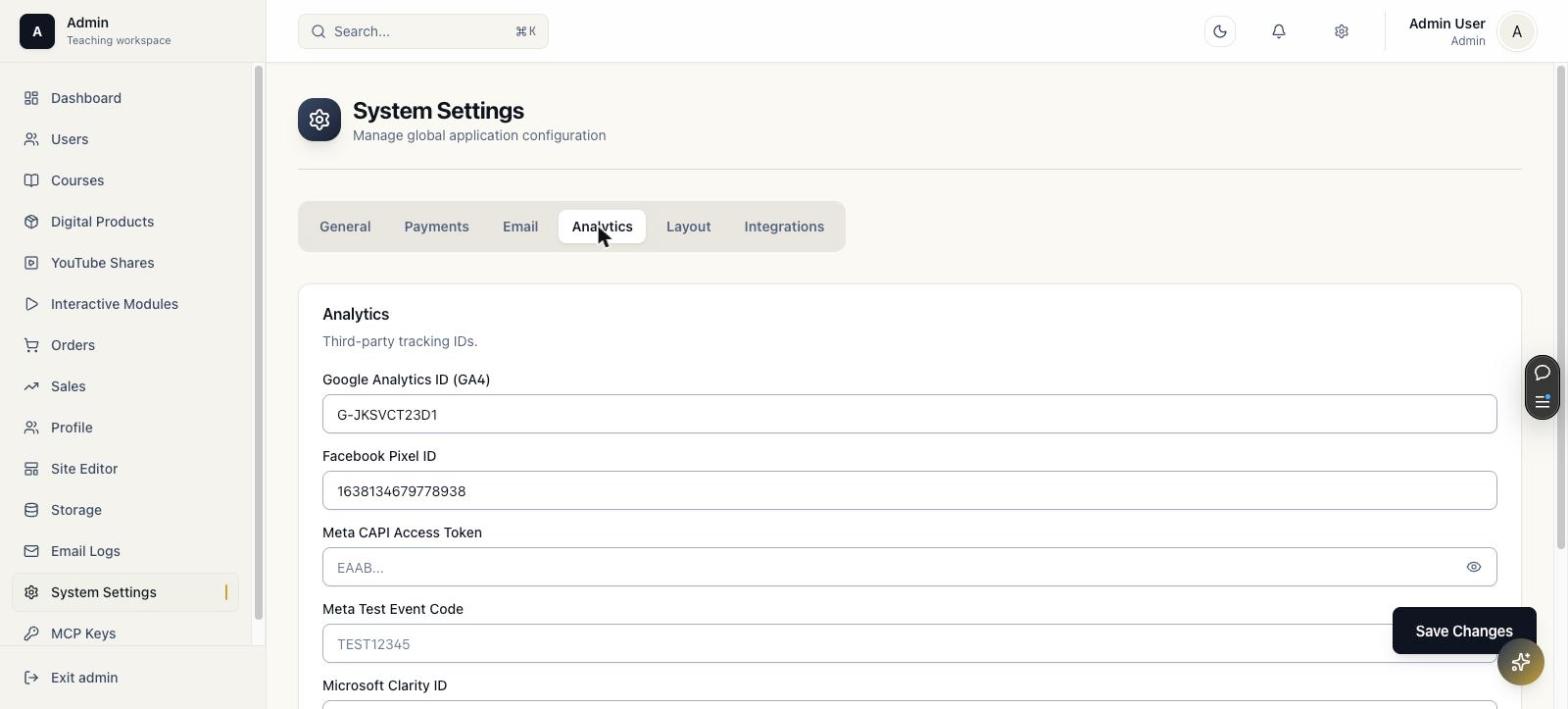
Third-party tracking IDs: Google Analytics (GA4), Facebook Pixel ID plus Meta CAPI Access Token and Meta Test Event Code, and Microsoft Clarity ID.
13.5 Layout
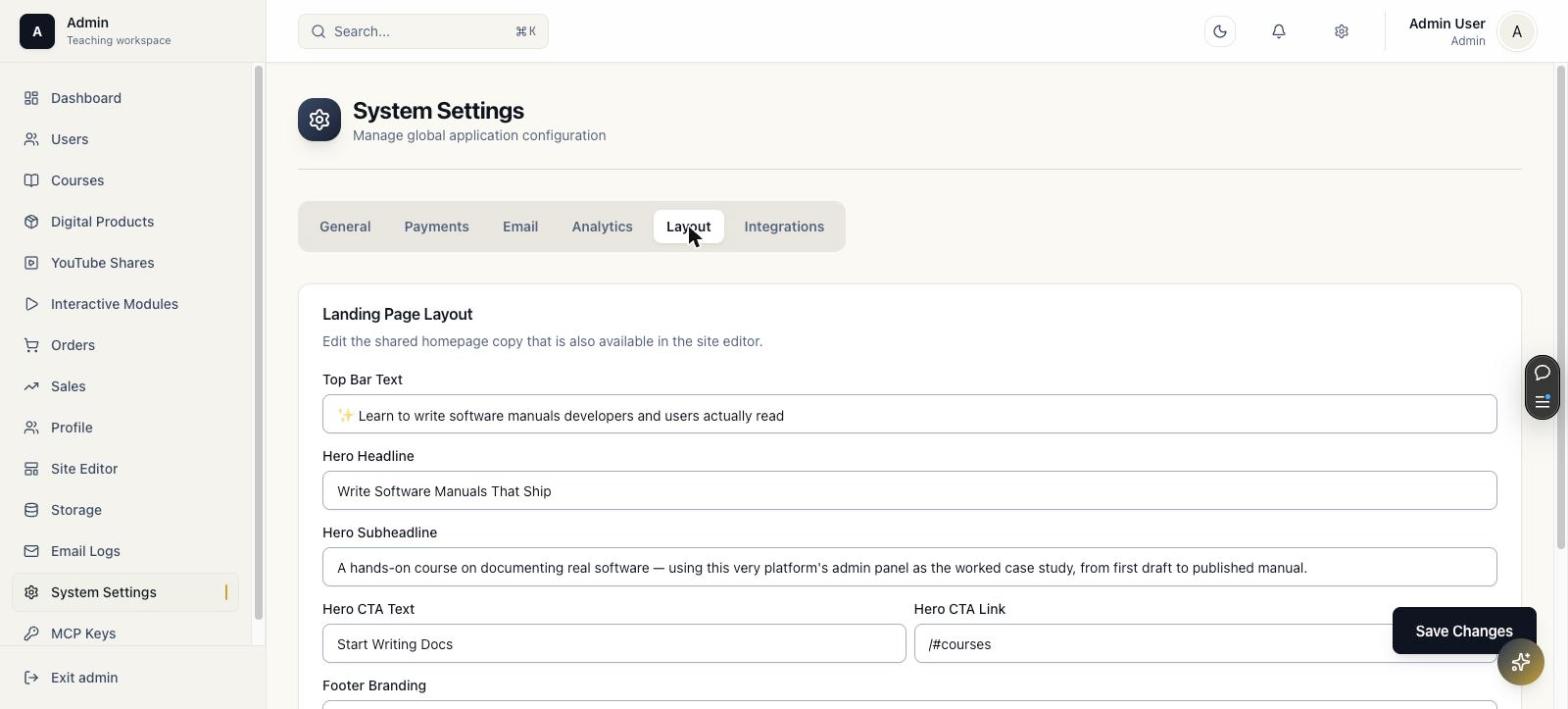
Edits the same homepage copy fields also reachable from Site Editor → Hero/Top Bar/Footer (Top Bar Text, Hero Headline, Hero Subheadline, Hero CTA Text/Link, Footer Branding). The two surfaces are kept in sync.
13.6 Integrations
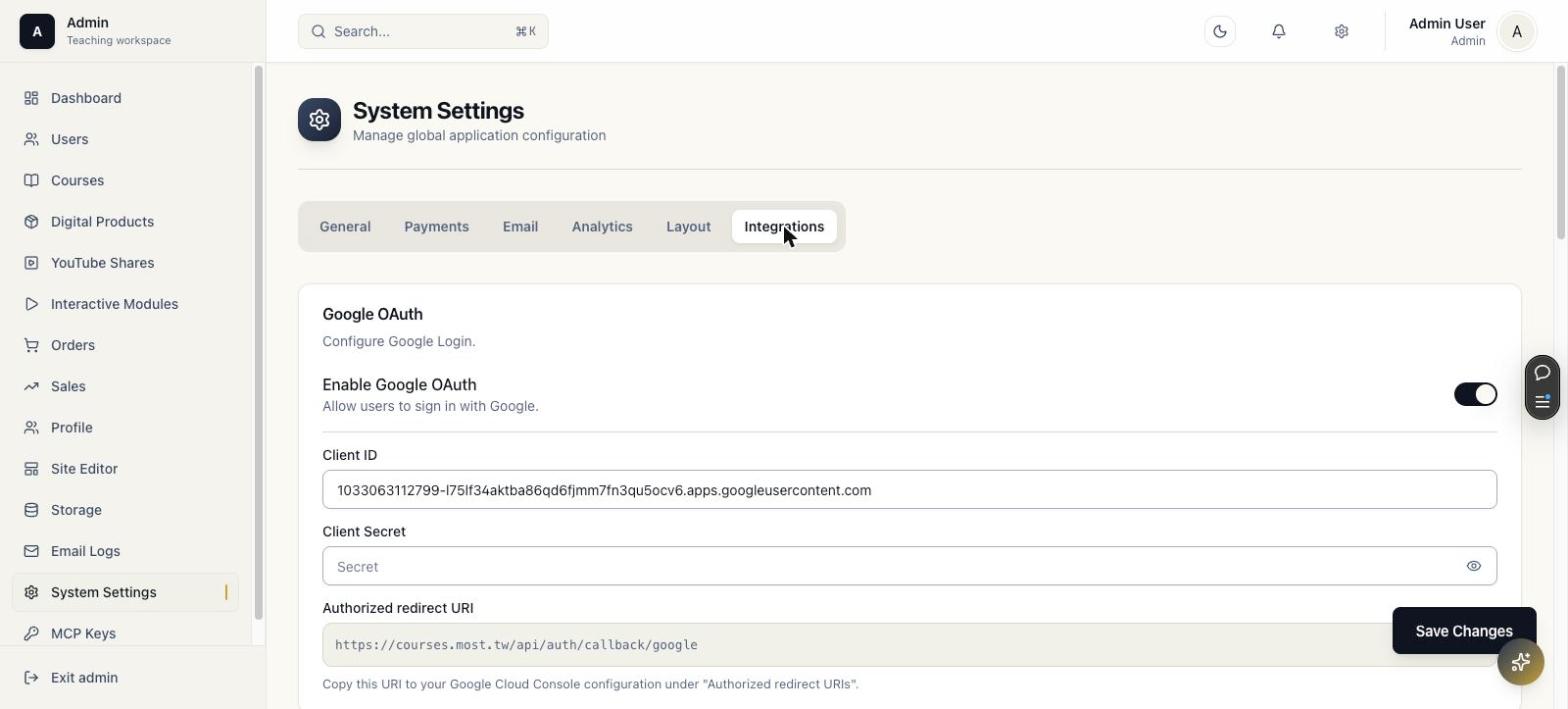
Google OAuth (Client ID/Secret, redirect URI for "Sign in with Google"), plus file storage provider and AI provider configuration further down the tab.
14. License Settings
Path/admin/settings/license
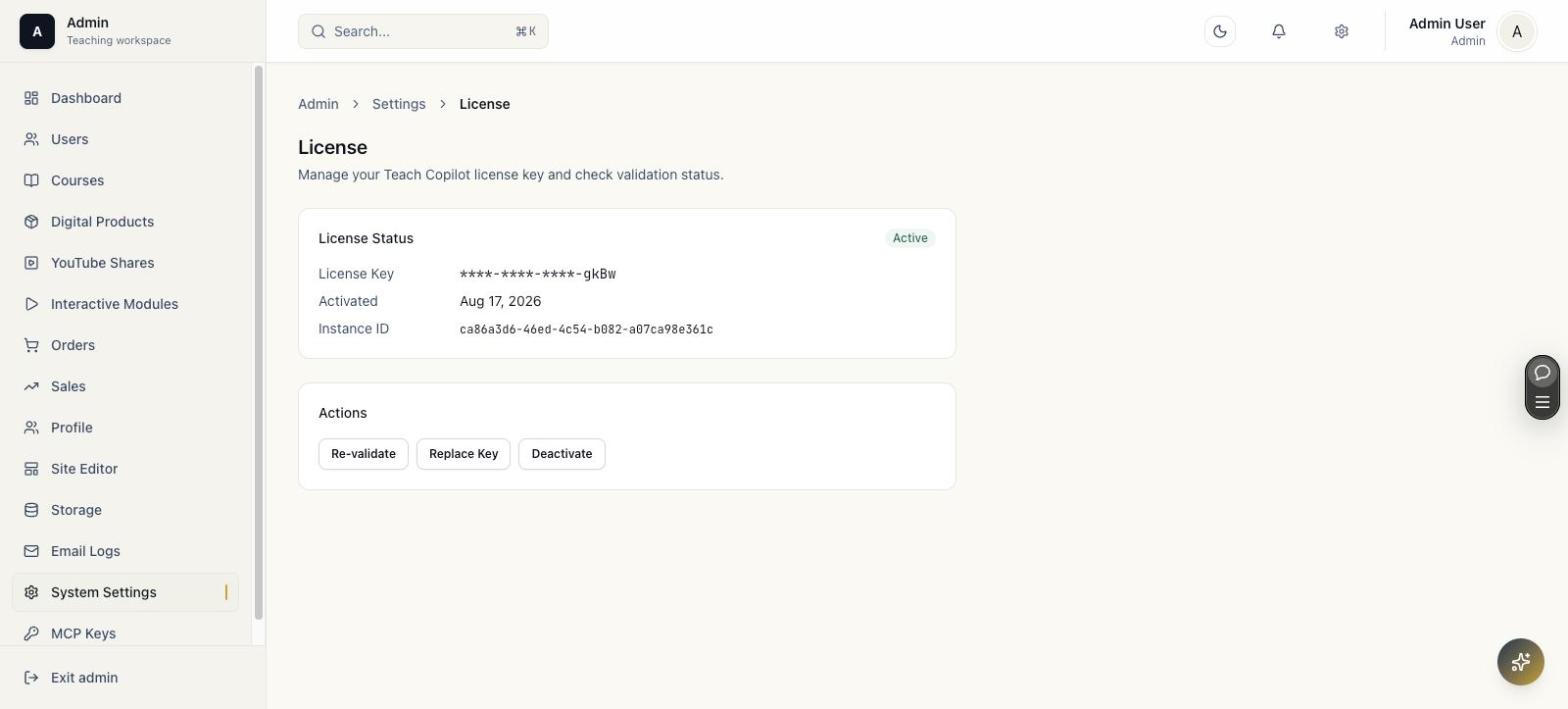
License settings show product license state and license-related actions.
| Panel | Purpose |
|---|---|
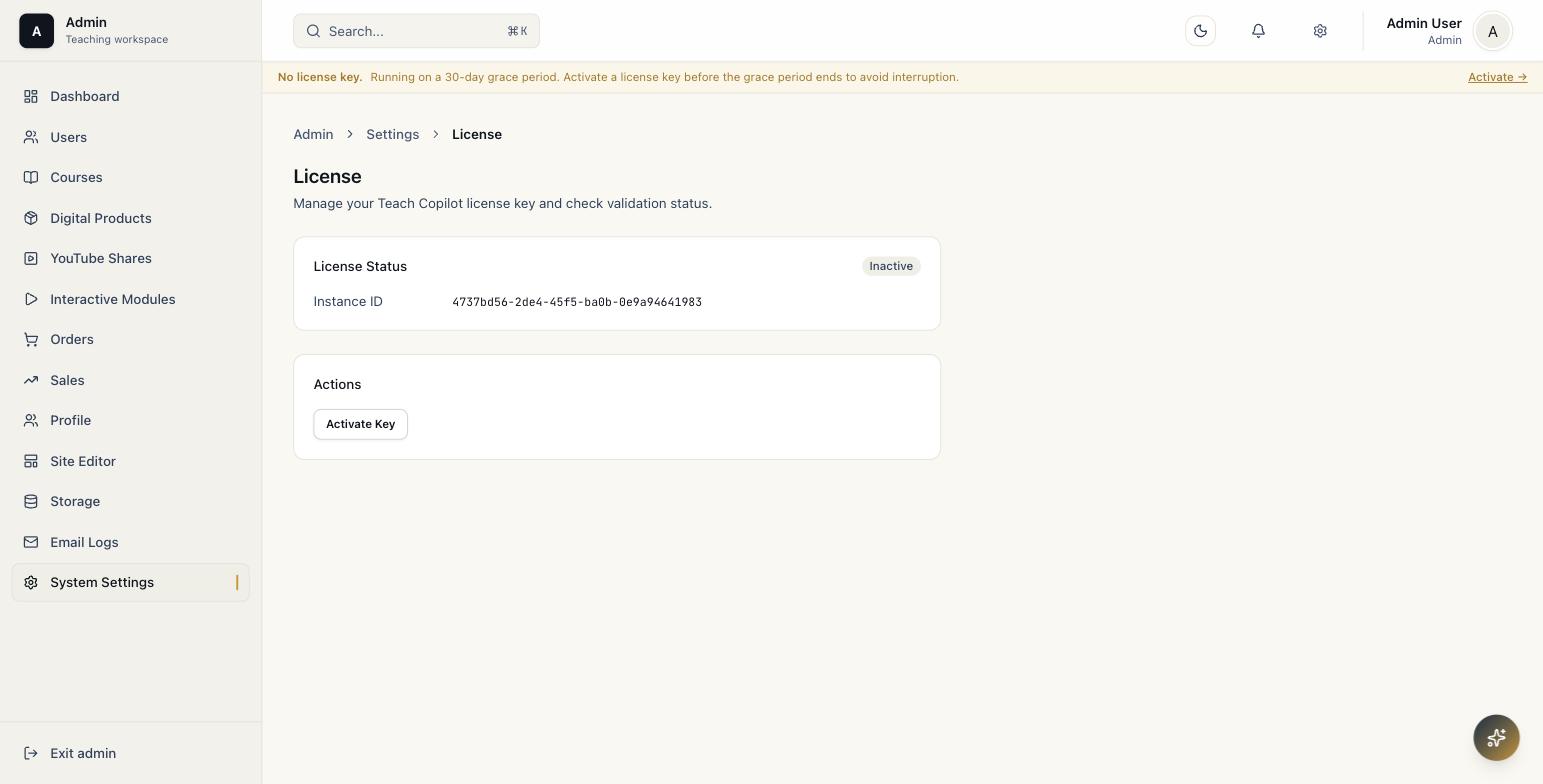
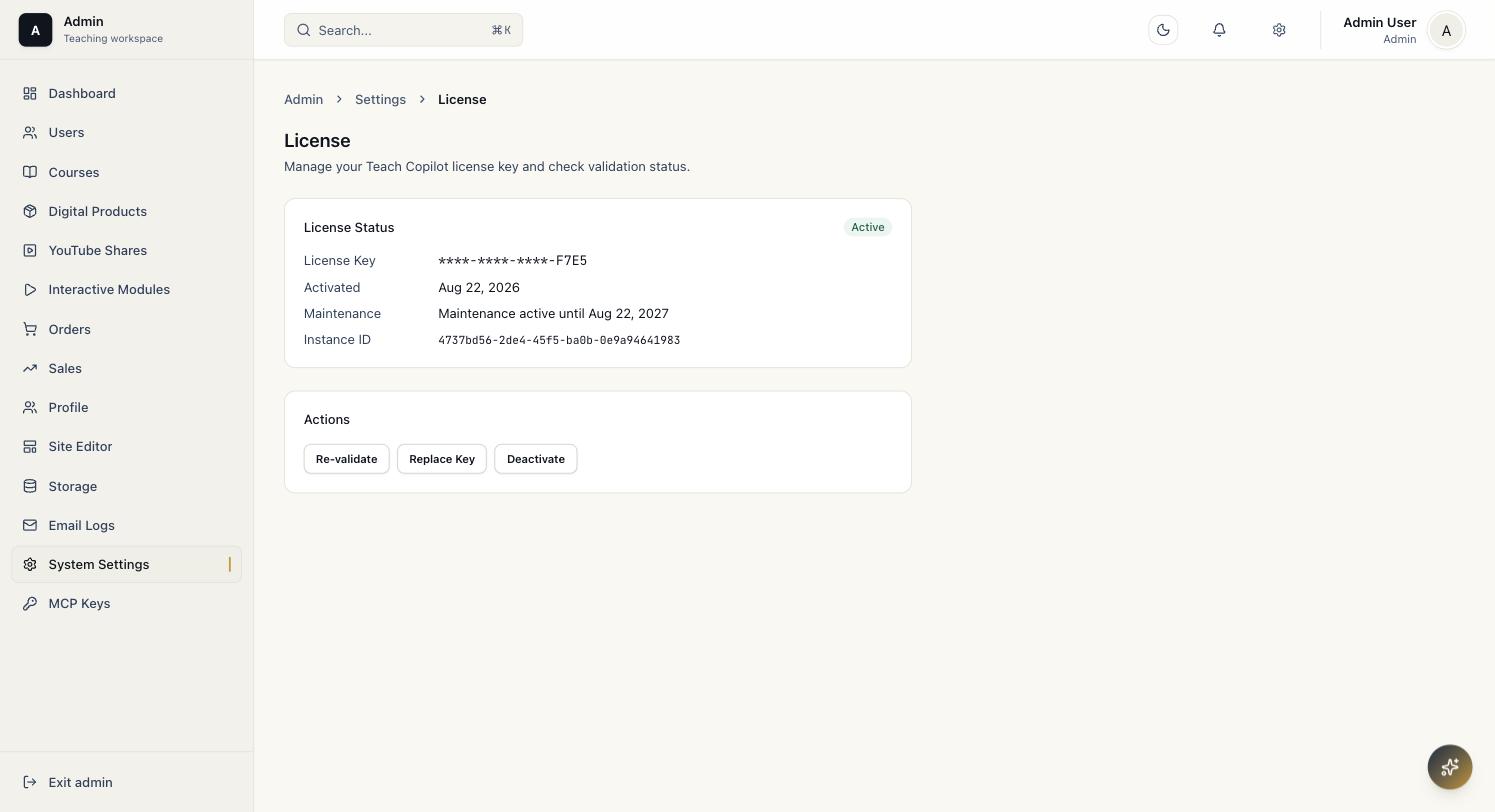
| License Status | Active/inactive badge, masked License Key, Activated date, Instance ID |
| Actions | Re-validate, Replace Key, Deactivate |
License Status Reference
| Status | Meaning | Admin Access | Student Access | MCP | Content Limits |
|---|---|---|---|---|---|
maintenance_active | Valid key, within maintenance window | Full | Full | Yes | None |
maintenance_expired | Valid key, maintenance window lapsed. Runtime continues | Full | Full | Yes | None |
cache_grace | License server unreachable; using cached state (7 days max) | Full + banner | Full | Yes | None |
dev_bypass | NODE_ENV !== production | Full | Full | Yes | None |
inactive | No key configured, within 30-day grace | Full | Full | No | 1 course, 1 section, 1 product |
grace_expired | No key configured, grace period elapsed (30+ days) | Locked | Locked | No | N/A |
disabled | Key explicitly revoked by vendor | Locked | Locked | No | N/A |
refunded | Order refunded | Locked | Locked | No | N/A |
Key principle: maintenance_expired is not restricted. The platform runs on a lifetime license. Maintenance expiry only stops access to new updates, official support, and minting new Docker registry pull tokens. It does not disable the admin panel or student access.
Freemium Content Limits
When the license status is inactive, grace_expired, disabled, or refunded:
- Courses list (
/admin/courses): shows at most 1 course. A yellow banner appears showing how many courses are hidden. - Curriculum editor (
/admin/courses/[id]/curriculum): shows at most 1 section. The Add New Section form is disabled. - Digital products list (
/admin/products): shows at most 1 product. The Create Product form is disabled.
These restrictions are UI-layer only. All content remains in the database. Activating a valid license key immediately removes all restrictions; no migration needed.
14.1 Activating a License Key
- Go to Admin → Settings → License (
/admin/settings/license) - Paste the
SC2-...key into the License Key field - Click Activate
The key is validated offline. No internet connection is required during activation.
Grace-period banner still showing right after activation? The License Settings page itself updates immediately — check there first. The yellow "30-day grace period" banner on other admin pages can take a few minutes to catch up on deployments running multiple app instances (e.g. Fly.io's default 2-machine setup); it's a display lag only, not a sign activation failed, and it clears on its own. Single-container deployments (VPS/docker-compose) aren't affected.
14.2 Purchasing and Activating a Lemon Squeezy License
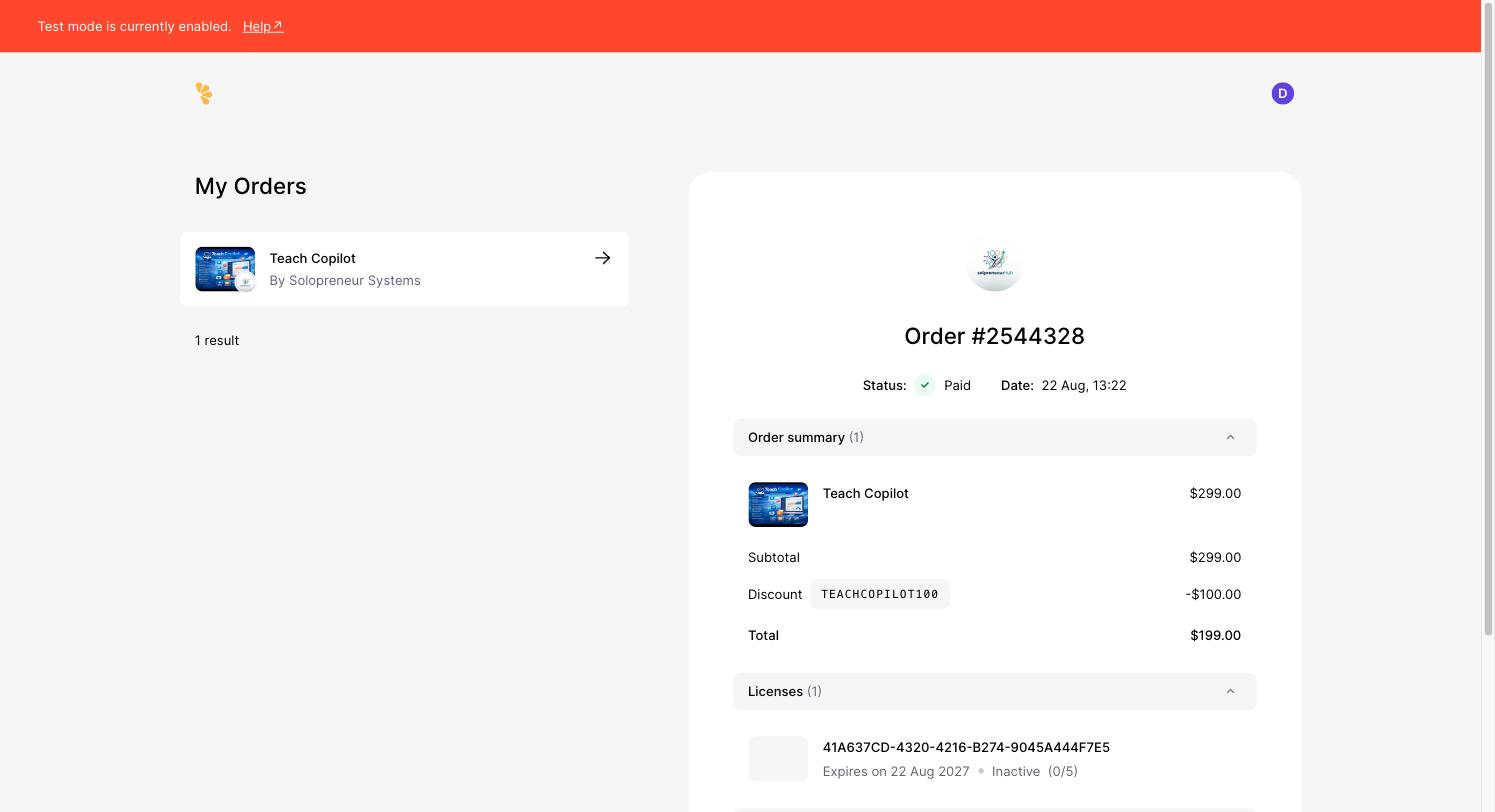
If you bought Teach Copilot through a Lemon Squeezy checkout instead of receiving a hand-issued SC2-... key, the key looks like a UUID (e.g. 41A637CD-4320-4216-B274-9045A444F7E5) and validates directly against Lemon Squeezy's own servers — no extra setup on your side.
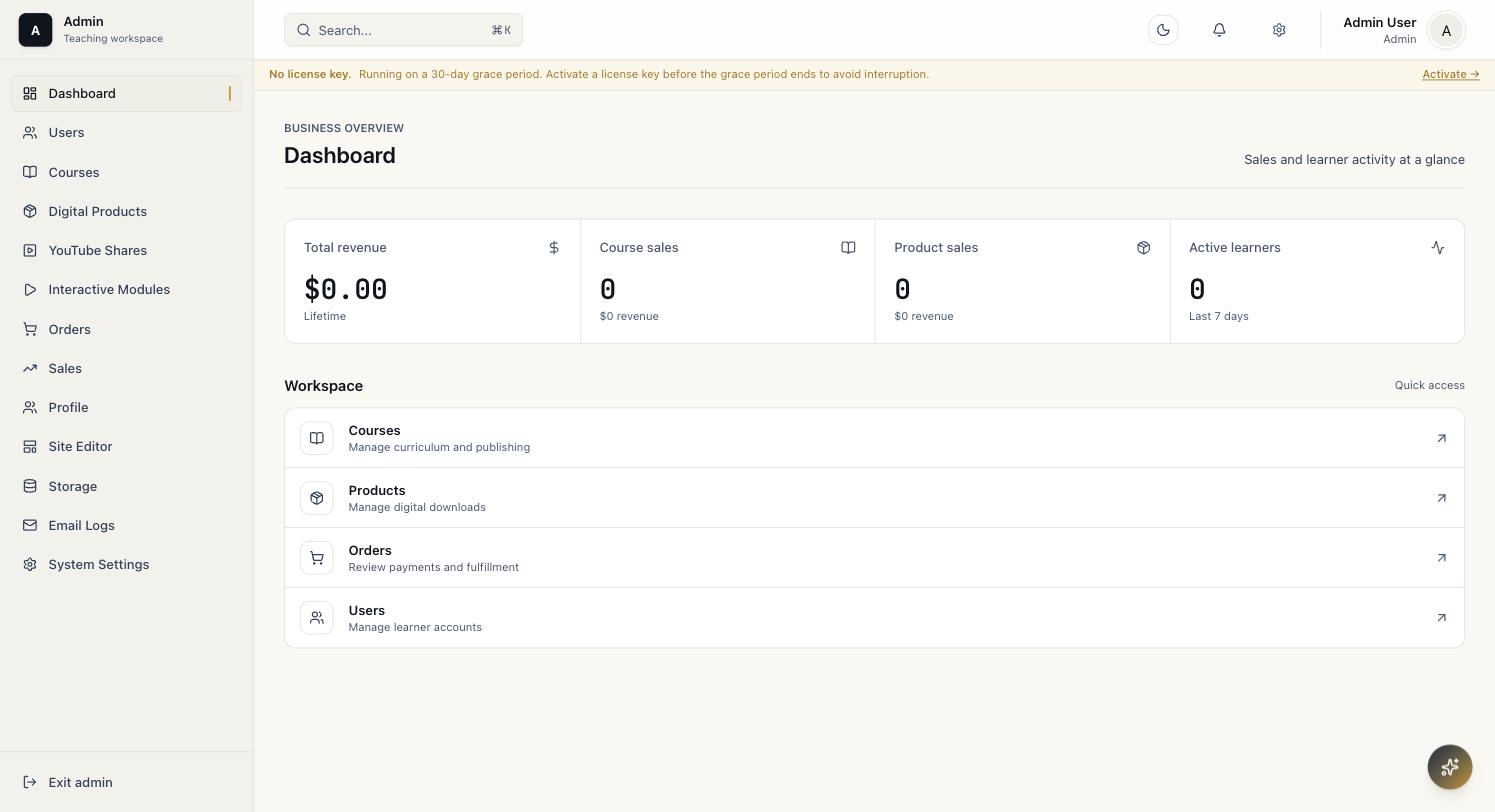
- After checkout, open the confirmation email or Lemon Squeezy's My Orders page — your license key is listed under the order.
- Go to Admin → Settings → License (
/admin/settings/license) and click Activate Key.
- Paste the full key (with dashes) into the License Key field and click Apply. This step requires an internet connection — the key is checked against Lemon Squeezy's servers, not verified offline like SC2 keys.
15. MCP Keys
Path/admin/settings/mcp
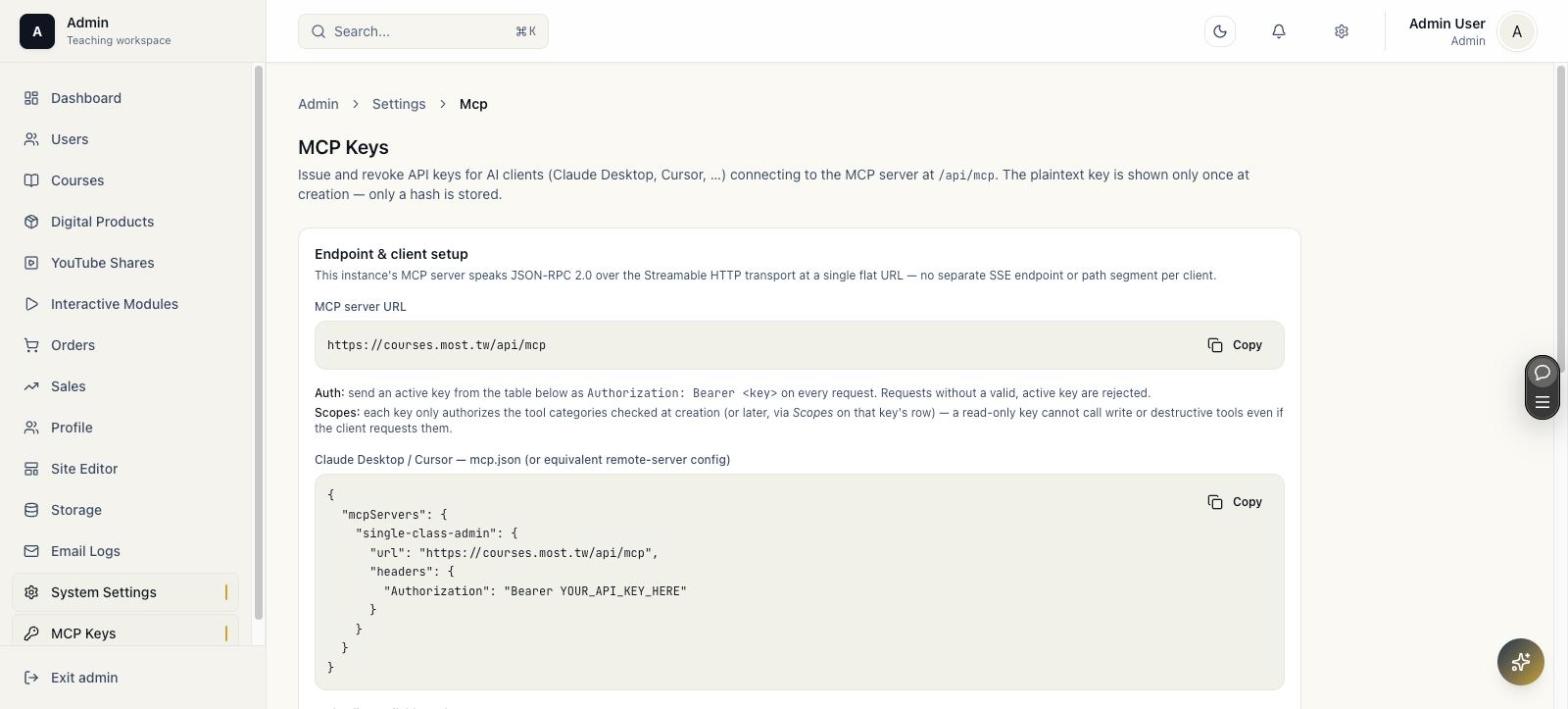
Issue and revoke API keys for AI clients (Claude Desktop, Cursor, and any other MCP-compatible client) to connect to this instance's MCP server.
| Panel | Purpose |
|---|---|
| Endpoint & client setup | Shows the resolved, actually-reachable MCP server URL (/api/mcp), auth format, scopes explainer, and copy-paste mcp.json / curl snippets |
| Key table | Issue new keys with scoped permissions; the plaintext key is shown only once at creation. Only a hash is stored |
The server speaks JSON-RPC 2.0 over the Streamable HTTP transport at a single flat URL. Every request must include Authorization: Bearer <key>; requests without a valid, active key are rejected. Each key only authorizes the tool categories checked at creation (or later via that key's row). A read-only key cannot call write or destructive tools even if the client requests them.
16. Recommended Admin QA Checklist
Use this checklist after major deployments.
| Area | Check |
|---|---|
| Auth | Admin sign-in works |
| Dashboard | Dashboard loads without server errors |
| Users | User list and detail page load; Add User sends a welcome email |
| Courses | Create draft course, edit landing page, pricing, curriculum, settings |
| Products | Create draft product, upload file through UI, edit pricing/settings |
| Orders | Order list and detail load; avoid real refund test unless intentional |
| Site Editor | Homepage fields save and public homepage reflects changes |
| Storage | Upload and cleanup tools use configured provider |
| Test email sends and appears in Email Logs | |
| Settings | Payment/storage/analytics test connections behave as expected |
| MCP Keys | A freshly issued key can call tools/list against /api/mcp |
| Public pages | Published course/product URLs load and use UUID paths |
17. Screenshot Inventory
Screenshots in this manual are sourced from a full tour of a live production deployment's /admin, numbered in capture order and stored alongside this page under assets/images/.
| Screenshot | Page |
|---|---|
04-dashboard.jpg | Dashboard |
05-courses-list.jpg | Courses list |
06-course-landing-page.jpg | Course landing page |
07-course-curriculum.jpg | Course curriculum |
08-course-intended-learners.jpg | Course intended learners (Coming Soon) |
09-course-pricing.jpg | Course pricing |
10-course-upsell.jpg | Course upsell |
11-course-social-proof.jpg | Course social proof |
12-course-reviews.jpg | Course reviews |
13-course-comments.jpg | Course comments |
14-course-settings.jpg | Course settings |
15-course-publish-warning.jpg | Course publish confirmation dialog |
16-products-list.jpg | Products list |
17-product-landing-page.jpg | Product landing page |
18-product-files.jpg | Product files |
19-product-pricing.jpg | Product pricing |
20-product-upsell.jpg | Product upsell |
21-product-upsell-course-target.jpg | Product upsell targeting a course |
22-product-social-proof.jpg | Product social proof |
23-product-settings.jpg | Product settings |
24-orders-list.jpg | Orders list |
25-users-list.png | Users list (cropped, privacy-safe) |
26-user-detail.jpg | User detail |
27-sales-analytics.jpg | Sales report |
28-settings-general.jpg | System settings, General |
29-settings-payments.jpg | System settings, Payments |
30-settings-email.jpg | System settings, Email — active provider selector |
30b-settings-email-test.jpg | System settings, Email — SMTP fields and Send Test Email |
31-settings-analytics.jpg | System settings, Analytics |
32-settings-layout.jpg | System settings, Layout |
33-settings-integrations.jpg | System settings, Integrations |
34-settings-license.jpg | License settings |
35-interactive-modules.jpg | Interactive modules list |
36-youtube-shares.jpg | YouTube shares |
37-storage.jpg | Storage |
38-email-logs.jpg | Email logs |
39-mcp-keys.jpg | MCP Keys |
40-site-editor-overview.jpg | Site editor overview |
41-site-editor-courses-products.jpg | Site editor, Courses & Products |
42-site-editor-features.jpg | Site editor, Features |
43-site-editor-testimonials.jpg | Site editor, Testimonials |
44-site-editor-topbar.jpg | Site editor, Top Bar |
45-site-editor-footer.jpg | Site editor, Footer |
46-site-editor-legal-pages.jpg | Site editor, Legal Pages |